A place to showcase my crafts and talk about it...what's better than that? I hope to inspire and encourage others to create things for themselves, friends and family.
Happy Thankful Friday! This week I'm thankful for baseball season! I've mentioned before that we're a big baseball family and this week is opening day for MLB.
I feel like I haven't watched much the last couple of years so I'm determined to watch more this year.
Last night I did something fun with a Clearance Sale find at Walmart, my Cricut and scrap vinyl.
What do you think? Pretty cute, huh?
What are you thankful for this week? Leave a note in the comments!
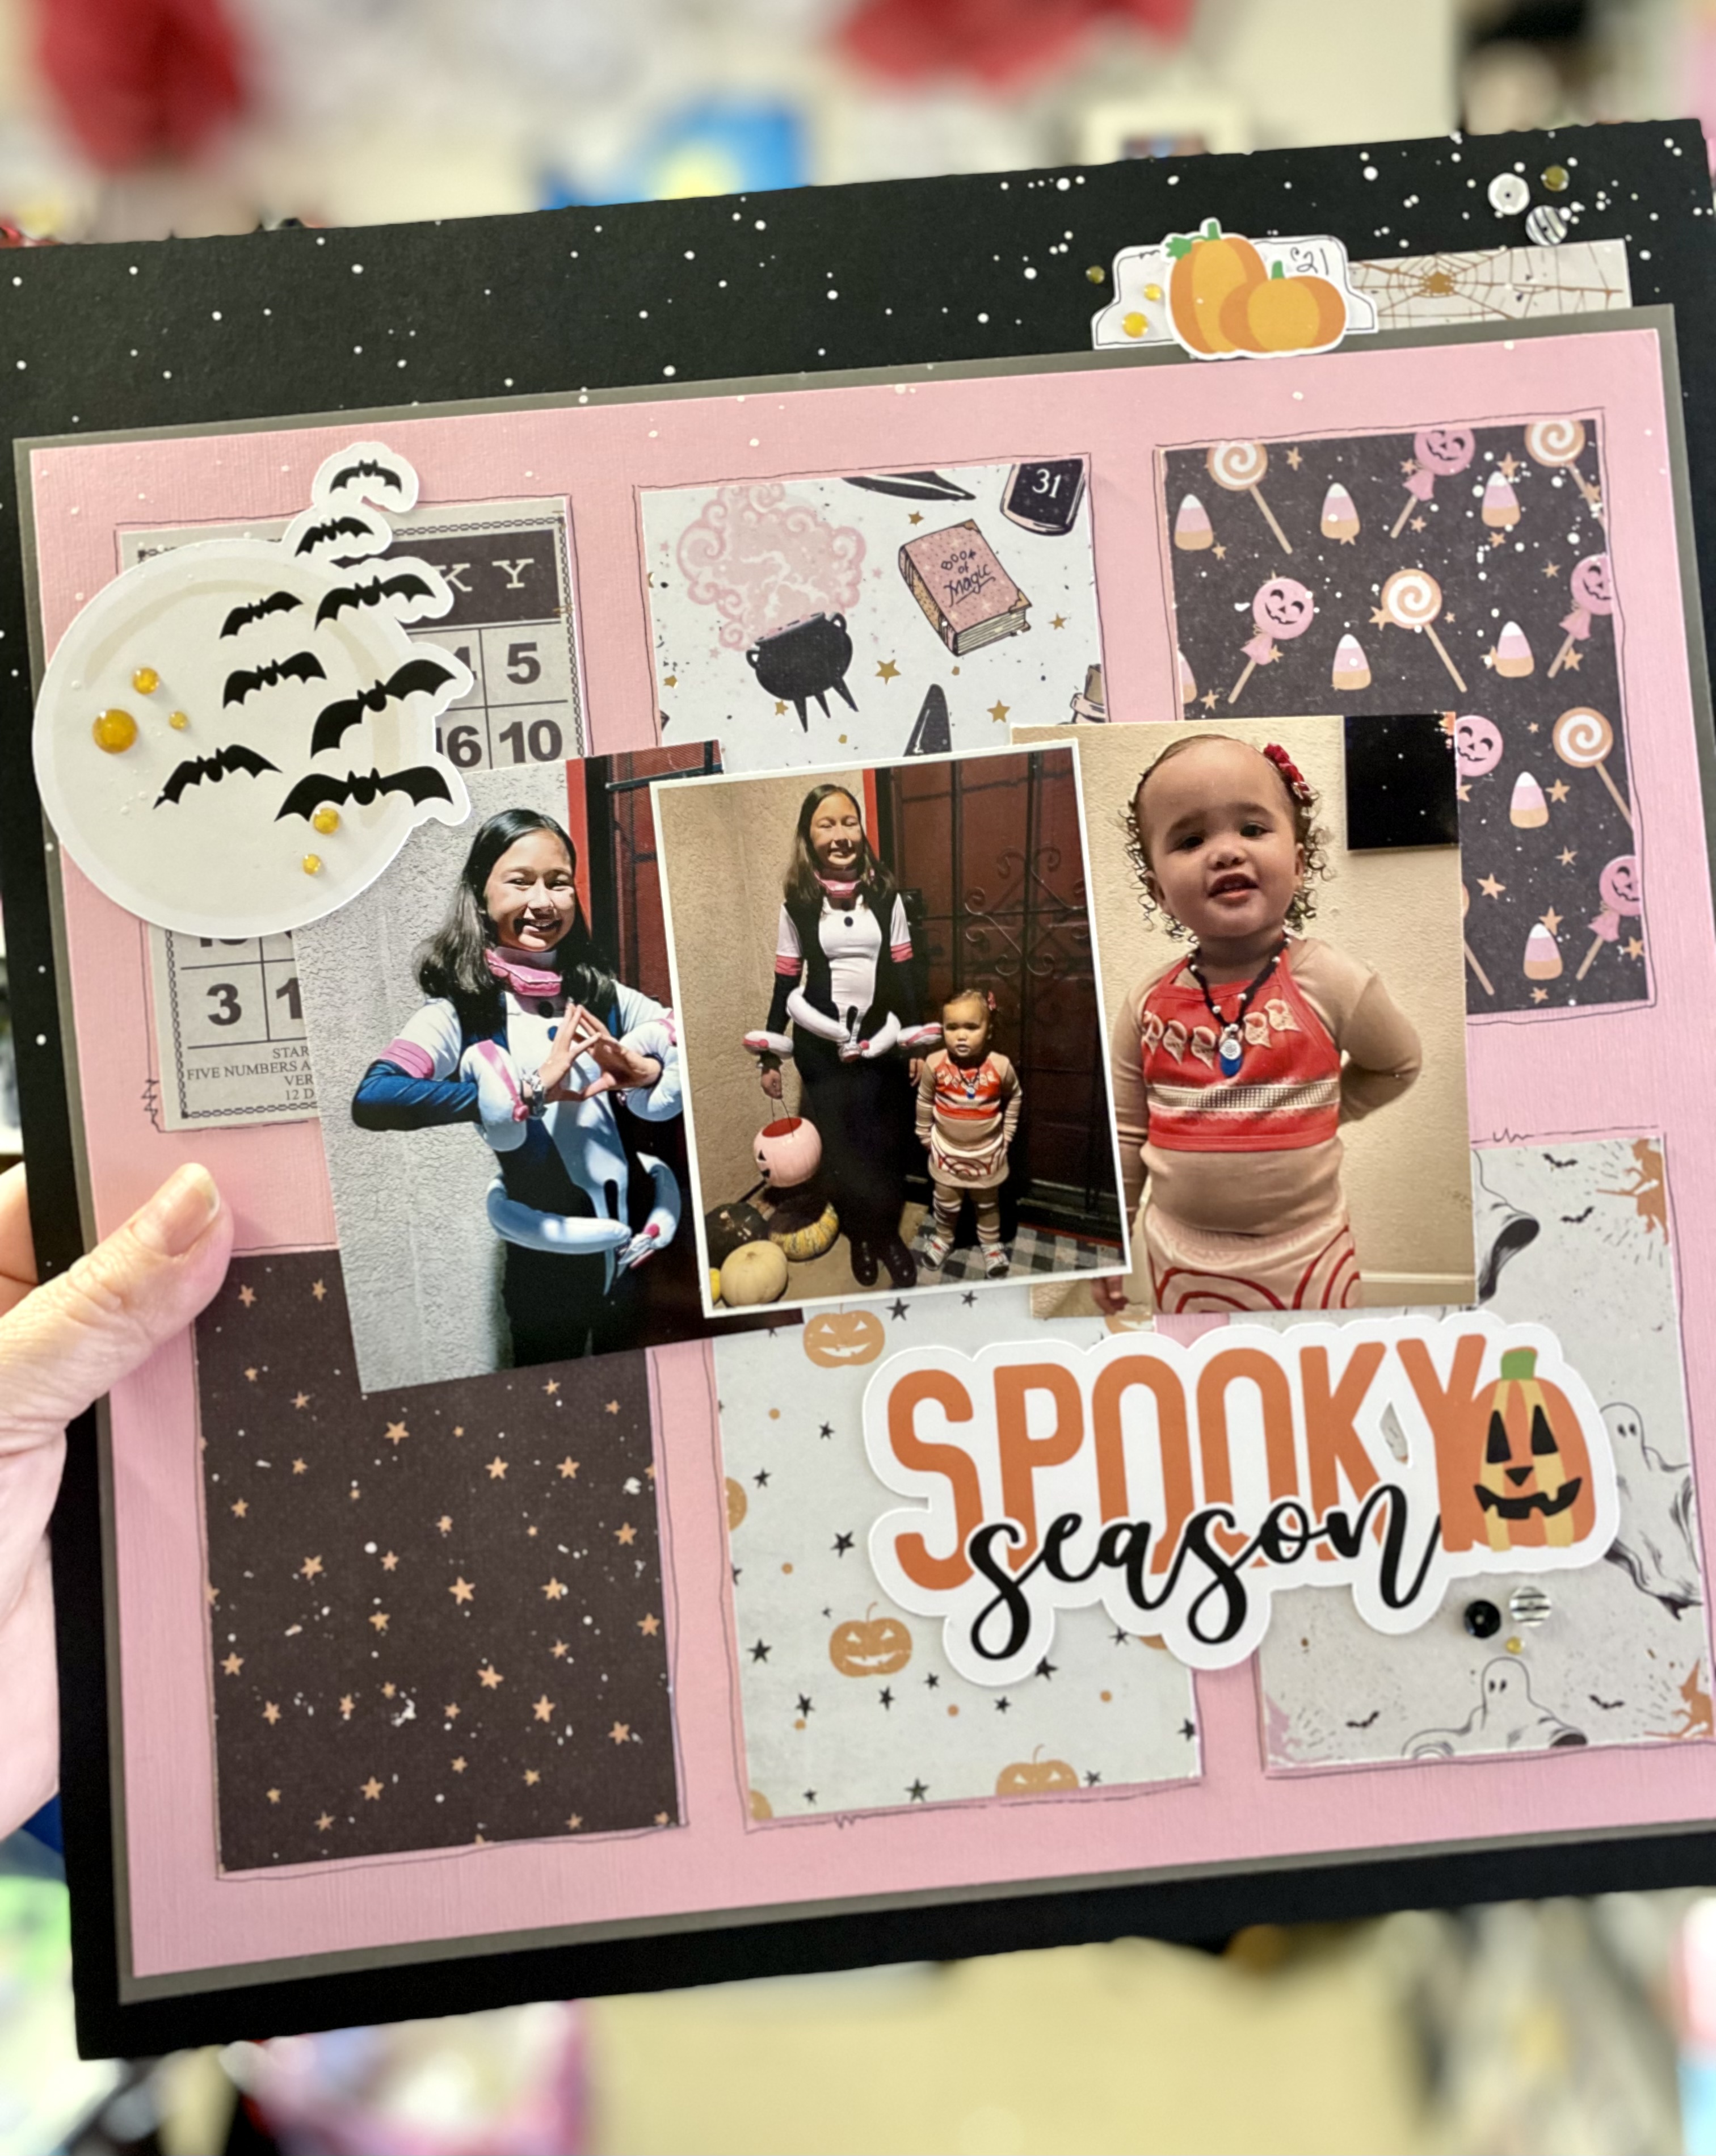
The title to this layout is Carving which according to the photos, we are carving our pumpkins but little did we know that I ended up carving my finger too.
Oops! Yes, this may be the last year we carve pumpkins! Watch the process video as I add to an already started layout. This layout includes two flip flaps. One is 6x12 and the second is 4x6.
I used Canva to create two 4x6 images. One is a cover page and the second is a journaling spot. I love using Canva to create fun photos for my IG account but didn't think to use it in this capacity. The creative projects are endless!
Although this page doesn't have a lot going on, I got nine photos by using the flaps! And the flaps really do add all the interest the page needs!
Products Used:
Flip Flaps and Adhesive Journaling Strips are from Close To My Heart (CTMH)
Oh, can you believe my Junk Journal signatures are almost complete? I think there's about a dozen that still need to be done but I'm ready to move on and create another one!
This spread was pretty simple by adding lots of colors using Distress Crayons for most of the work. I also added some white acrylic paint, Dina Wakley Media Gloss Spray in white and a white Posca paint pen for additional splatter.
The spread already had some elements on it which makes it a little easier to get started on a spread. I made unique labels by printing a photo of my artwork onto round labels and the negative part of the label sheet was added to this spread.
Double the supplies!
Besides the white cloud to the left of the page, there really wasn't much else going on. It is such an upgrade and much more colorful!
I hope you agree. Have you started your Junk Journal yet? Check out my YouTube Mixed Media/Art Journal Playlist to get some inspiration!
Be sure to check out the process video for this one to see how this cloud came together - a beautiful accident!
This was a quick and fun layout using a tutorial by Scrapbooking With Ann Marie/Scrapbooking The Day Away's website. I've mentioned it before and I truly think it's a great site especially if you're a new scrapbooker or need motivation.
The bottom part of this layout was made by cutting four 4x2 strips of Burgundy cardstock and four 4x1 strips of Navy Blue cardstock. I could have placed a 1x12" strip horizontally above this, but I chose to add the bottle cap sticker instead.
I used the Print/Cut option in Design Space to create my embellishments - my new favorite thing to do with my layouts. The gnomes were both wearing green (for St. Patrick's Day - apparently this is the only time gnomes drink beer) but I didn't need them to be green so I changed the colors prior to flattening them. I also added offsets to each of them before flattening, printing and cutting. I'll have to do a "How To" video on this process but if you need a tutorial, check out YouTube...there's all kinds out there!
The base page is a patterned paper. This works well as long as it has a good weight. I don't recommend using a patterned paper if it's thin. Even though it's a patterned paper, it really reads as a solid since the image is very subdued.
I love creating multi-photo layouts and I am really happy that I was able to get all three of these 4x6 prints on the page. I was able to make use of some irrelevant areas to either trim off or add an embellishment cluster to.
Check out the YouTube process video:
Products Used:
Patterned Paper & Stickers from Beer Lovers kit from Recollections
Well hello Friday! For some reason this has been a long week. We continue to get lots of rain, but it looks like sunny days are ahead (for a short time anyway!) What am I thankful for this week? I'm thankful for our school district's adult transition program. They have plant sales every new season and my work bestie and I took a drive out there to buy some plants. And buy we did!
I always purchase a lot because I always have HIGH HOPES. Now, it doesn't always work, but a few of my plants are still alive (which is another thing to be thankful for). I love that I don't give up and that I'm determined to create a garden that I can be proud of.
This is a Fort Night Lily that I purchased about three years ago as a wee little starter plant. It's getting its buds and I'm super excited that it's doing well!
If you are local, you may want to check their sale out this weekend. The prices are excellent!
Hi there, I'm busy as ever in the Command Center and over the weekend I decided to make small gusset bags with copies of my art. I do this every so often - make copies of spreads I created in my Junk Journal to use on other projects. I've also done this with labels. Those turn out really cool!
Check out the YouTube process video to see how easy it is to put together. They turned out so beautiful. I absolutely LOVE them!
I added a few more mixed media art freebies on my FREEBIE tab. Take a look and make some copies to use on your own projects. Also take a look for suggestions on how to use them.
Be sure to follow me on IG for more projects! @3sons_and_astar
I'm so glad I'm part of the Sketch n Scrap DT because I get first crack at their card sketches. I love working with sketches because it makes starting a card so easy.
I bought a die set recently and I wanted to try them out...now seemed like a great time!
Here's the sketch I'm working with:
And here's my card:
How fun are those plants ...right? I used scrap patterned papers for them. I also cut out more than I needed so I can make more cards!
I love the stencil background and the twine bow in the front. See how it’s done on the YouTube video.
Be sure to click to the SNS site or FB page to see more sketches and participate in the challenge!
If you're a IG user, check out my account @3sons_and_astar. I post all kinds of projects & reels!
The cactus plants die did not have a brand but I purchased them from Tall Mouse during an Expo.
Rectangular stitch dies are from Close To My Heart.
Enamel dots and ink pad are from Stampin Up!
Stencil, twine, black fine point pen & scrap patterned papers are from my stash.
Over the weekend, we were in the garage sorting and tossing and cleaning it. It has surely become a cluster of random junk! During this process, I found a tall, green & white coffee mug that neither of us remember where it came from. At first it was a TOSS, but then I thought, nah, let me do something St. Patrick-y to it for my IG. (yes, that's how I think now)
Of course I forgot to take a before photo, but here's the after:
I mean it’s a cute mug, but our cup cabinet is so full already!
And a short video:
Super cute, right? And honestly, the mug is a perfect size for hubby's daily coffee. Sure, the words probably gear towards alcoholic beverages, but there may be times when there's something extra poured in the coffee!
I'm going to start a new series called, Trash to Treasure. Even though I already have an "upcycle" label on the blog, I am adding a "Trash to Treasure" label too.
This was a great project to use scrap vinyl and I have a lot!
It's time to share another DT project that was created using CutCardStock papers. I absolutely love the variety and quality of the paper and the prices are amazing too! Be sure to check out the store for all your cardstock needs!
Baseball is a big thing in our household. We hate - yes, it is a strong word but completely accurate - LA when it comes to sports and if you're a SF Giants fan, you know what I'm talking about.
But...a good friend asked if I could create a birthday card for a LA Dodgers fan. You can only imagine my first reaction but then took a deep breath and decided that I could do it. I searched for free Dodgers' logo SVGs and found Worldvectorlogo. It downloaded perfectly and since I'm only using it for personal use, I figured it was fine.
With the logo and baseball stitches cut from Cricut Access, I made this fun shaker card and it is perfect for the fan.
The front panel was also cut using the Cricut since it had the circle cutout. You can certainly use a punch if you want.
After adhering the clear transparency to the back of the front panel, I used liquid adhesive to apply the logo over the top.
I used two layers of foam adhesive to create a deep well for my homemade shaker bits. I used blue glitter, sequins, and beads, silver star and red heart confetti to create a fun combination! Once the shaker bits are added, I add an extra piece of clear transparency to close the shaker. This makes it so much easier to place the front panel to the cardbase.
TGIF and Happy Thankful Friday! This week I'm thankful for Zumba. Oh my goodness, have you tried it? It makes you sweat in places you never knew you could sweat. I mean, do earlobes sweat? Yup, that much!
One of my coworkers was recently certified to teach Zumba so she is offering a class every Tuesday for free for our office staff.
It is a lot of fun, basically dancing, but it is a lot. I'm thankful because I'm actually moving and grooving and hey, I also realize I do like Bad Bunny! LOL
So thank you to the Zumba instructor, Monica and thank you for Zumba!
As always, March is another month of fabulous layout sketches on the Sketch n Scrap site. I love these grid layouts since they make it so easy to use lots of coordinating patterned papers.
Here's the sketch I worked with:
And here's my layout:
I used six different patterned papers and three different colored card stock to complete the layout. Cutting dimensions:
Each patterned paper is 3x4
Pink = 10 x 11
Gray Mat = 10.25 x 11.25
All paper embellishments were print/cut using my Cricut. I was feeling a little lazy and decided to use the Print/Cut option instead of cutting and assembling each embellishment, but honestly, I don't know why I don't it more often.
Check out the process video below:
And here are more photos:
One of my favorite things to do is to outline areas on the layout. Once I do that, I'll do a little scribble as if the thread got caught. You can see an example above.
I'm also so unsure what type of paper to use when creating a Halloween layout when the costumes are not your typical Halloween colors or scary by any means. Do you have the same problem? I was so happy to find the Thirty One collection from Prima. The pinks certainly tone down the scary!
To print/cut the same embellishments and title for your scrapbook layout, here's a link to my project in Design Space.
Be sure to add your layout using this sketch to the Sketch n Scrap blog and/or their facebook page.
I love using sketches and tutorials for quick starts to a layout. This tutorial is from the Scrapbooking With Ann Marie/Scrapbooking The Day Away website and perfect for all layout themes. I used it for these birthday photos of my daughter and granddaughter. Their birthdays are one day apart.
I used She Blooms papers from Illustrated Faith. I love the bright colors and festive look of the papers & stickers!
The embellishments were made using the Cricut and made both layouts super easy to create and complete! My fav!
Be sure to check out the website. There are two types of memberships...one is free and the other has a monthly fee. I swear it's worth it!
I still need to add some journaling but basically, these layouts are done!
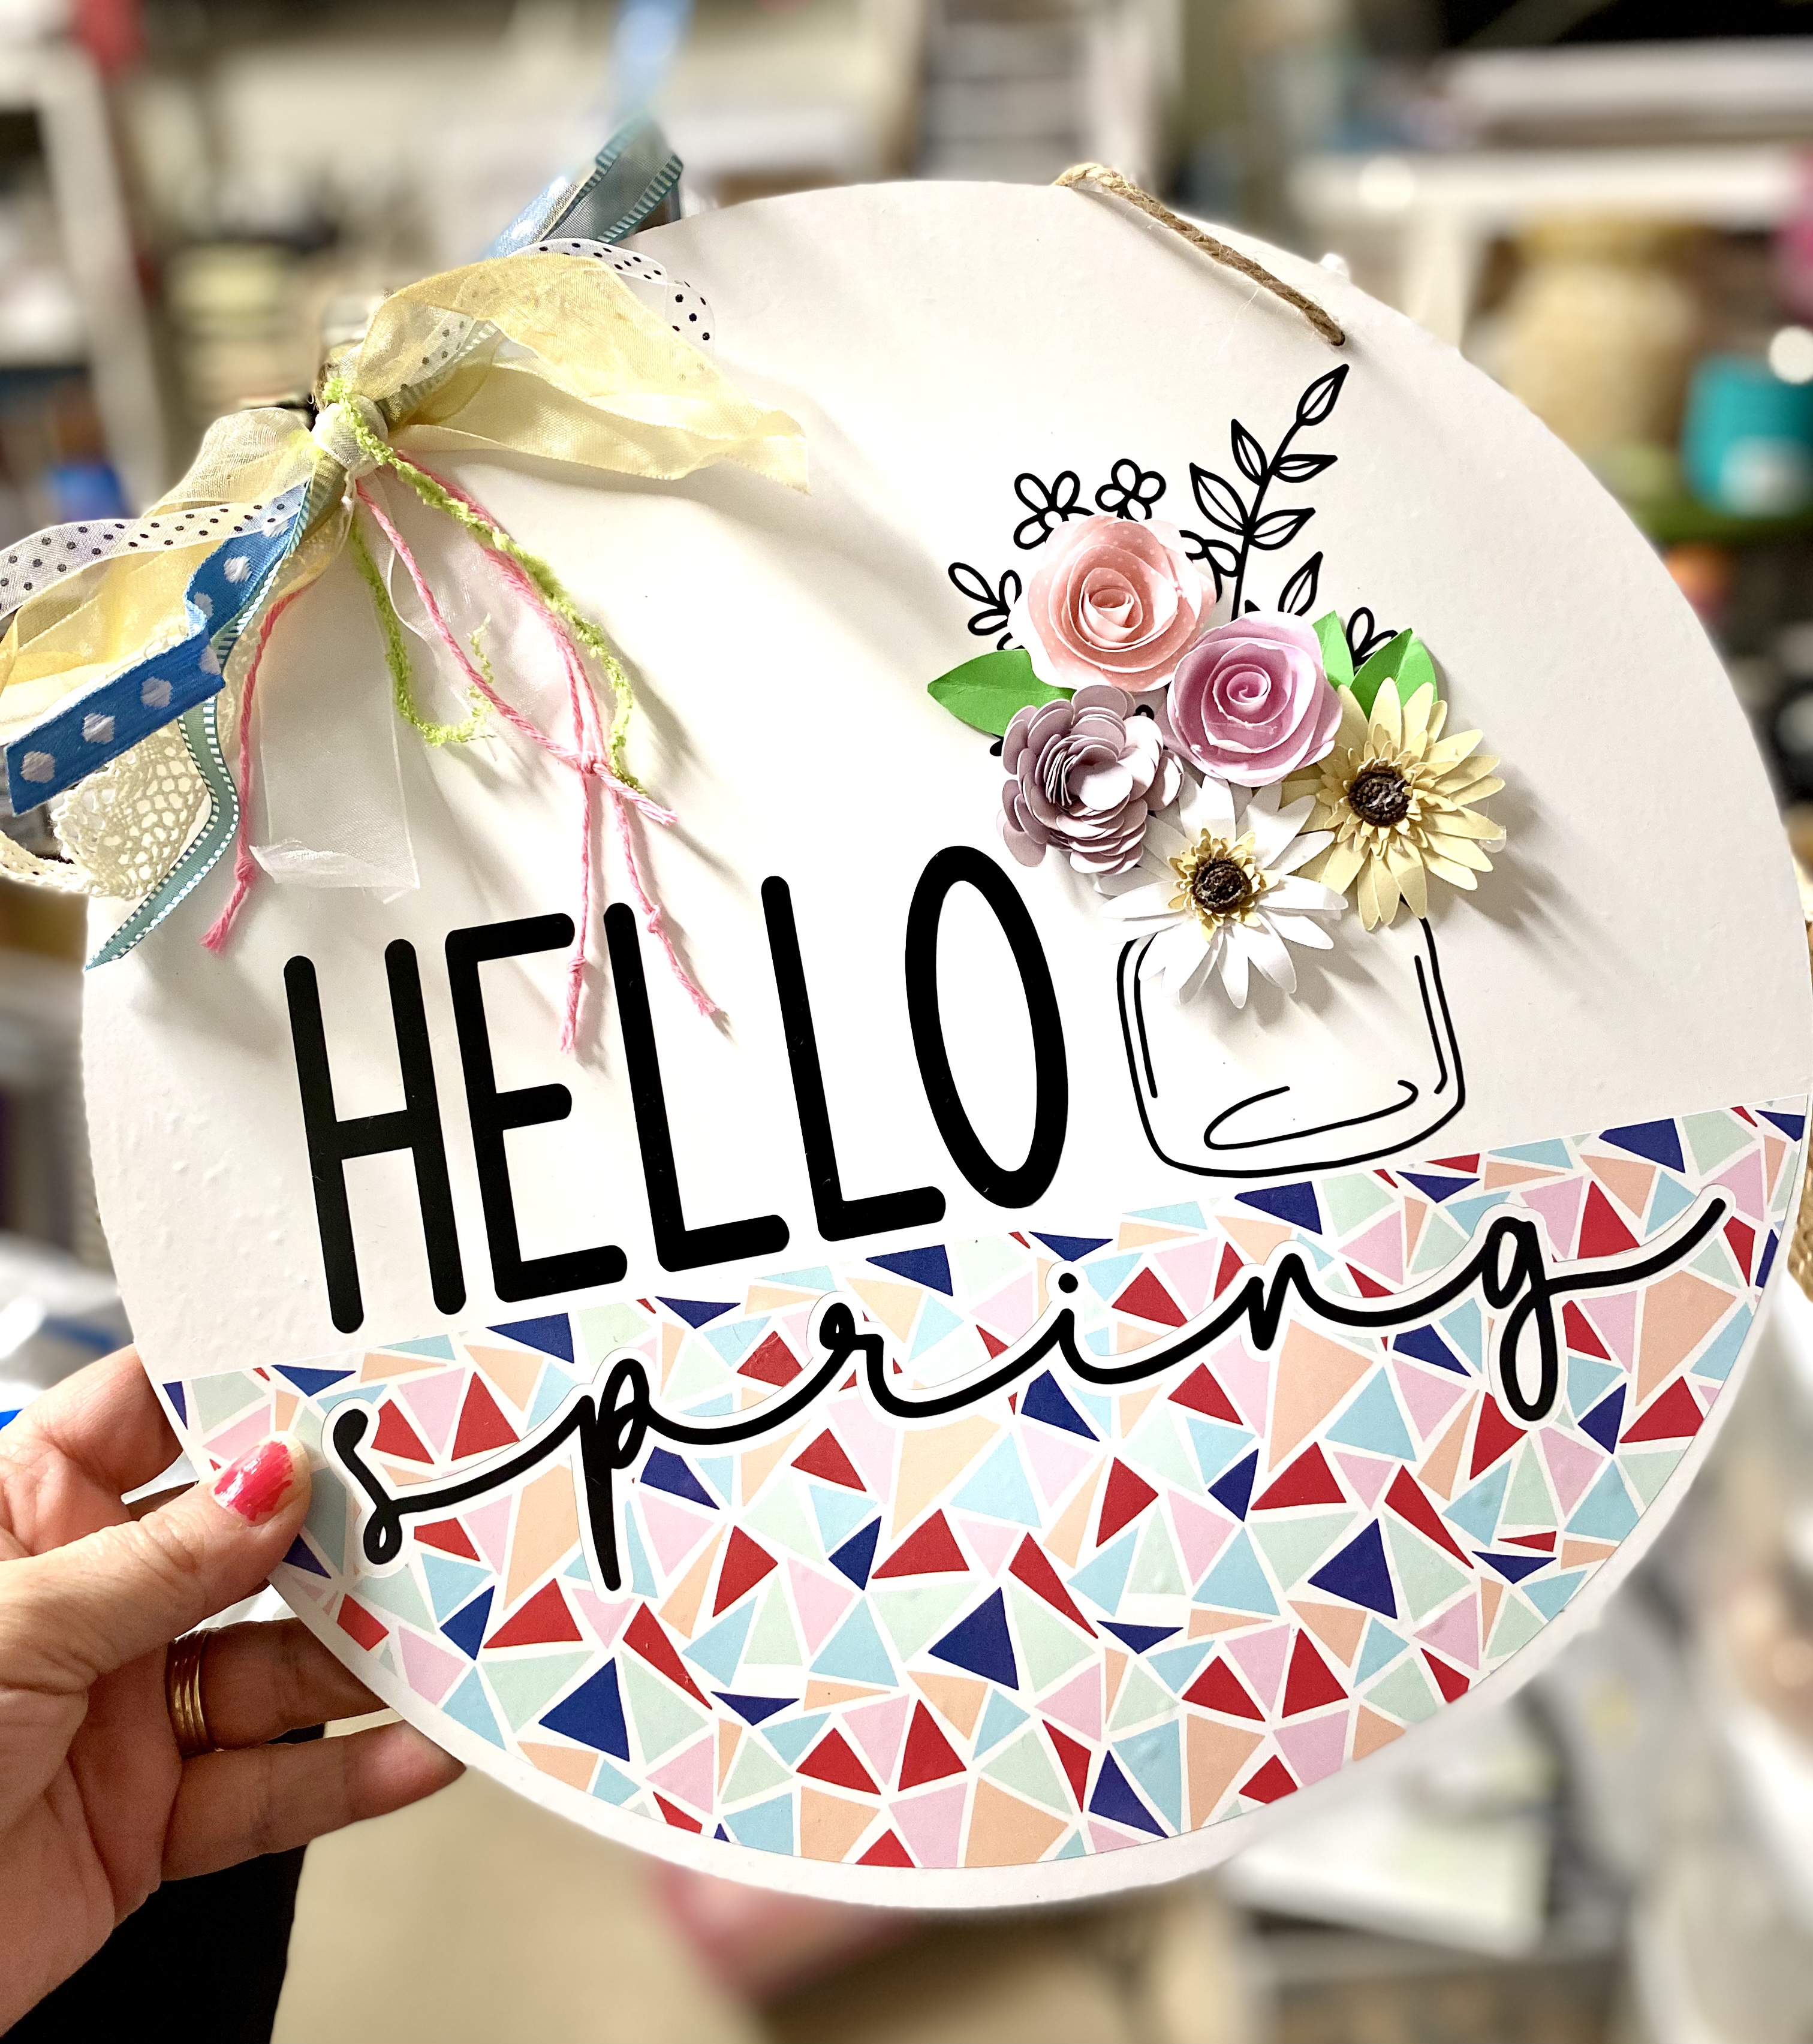
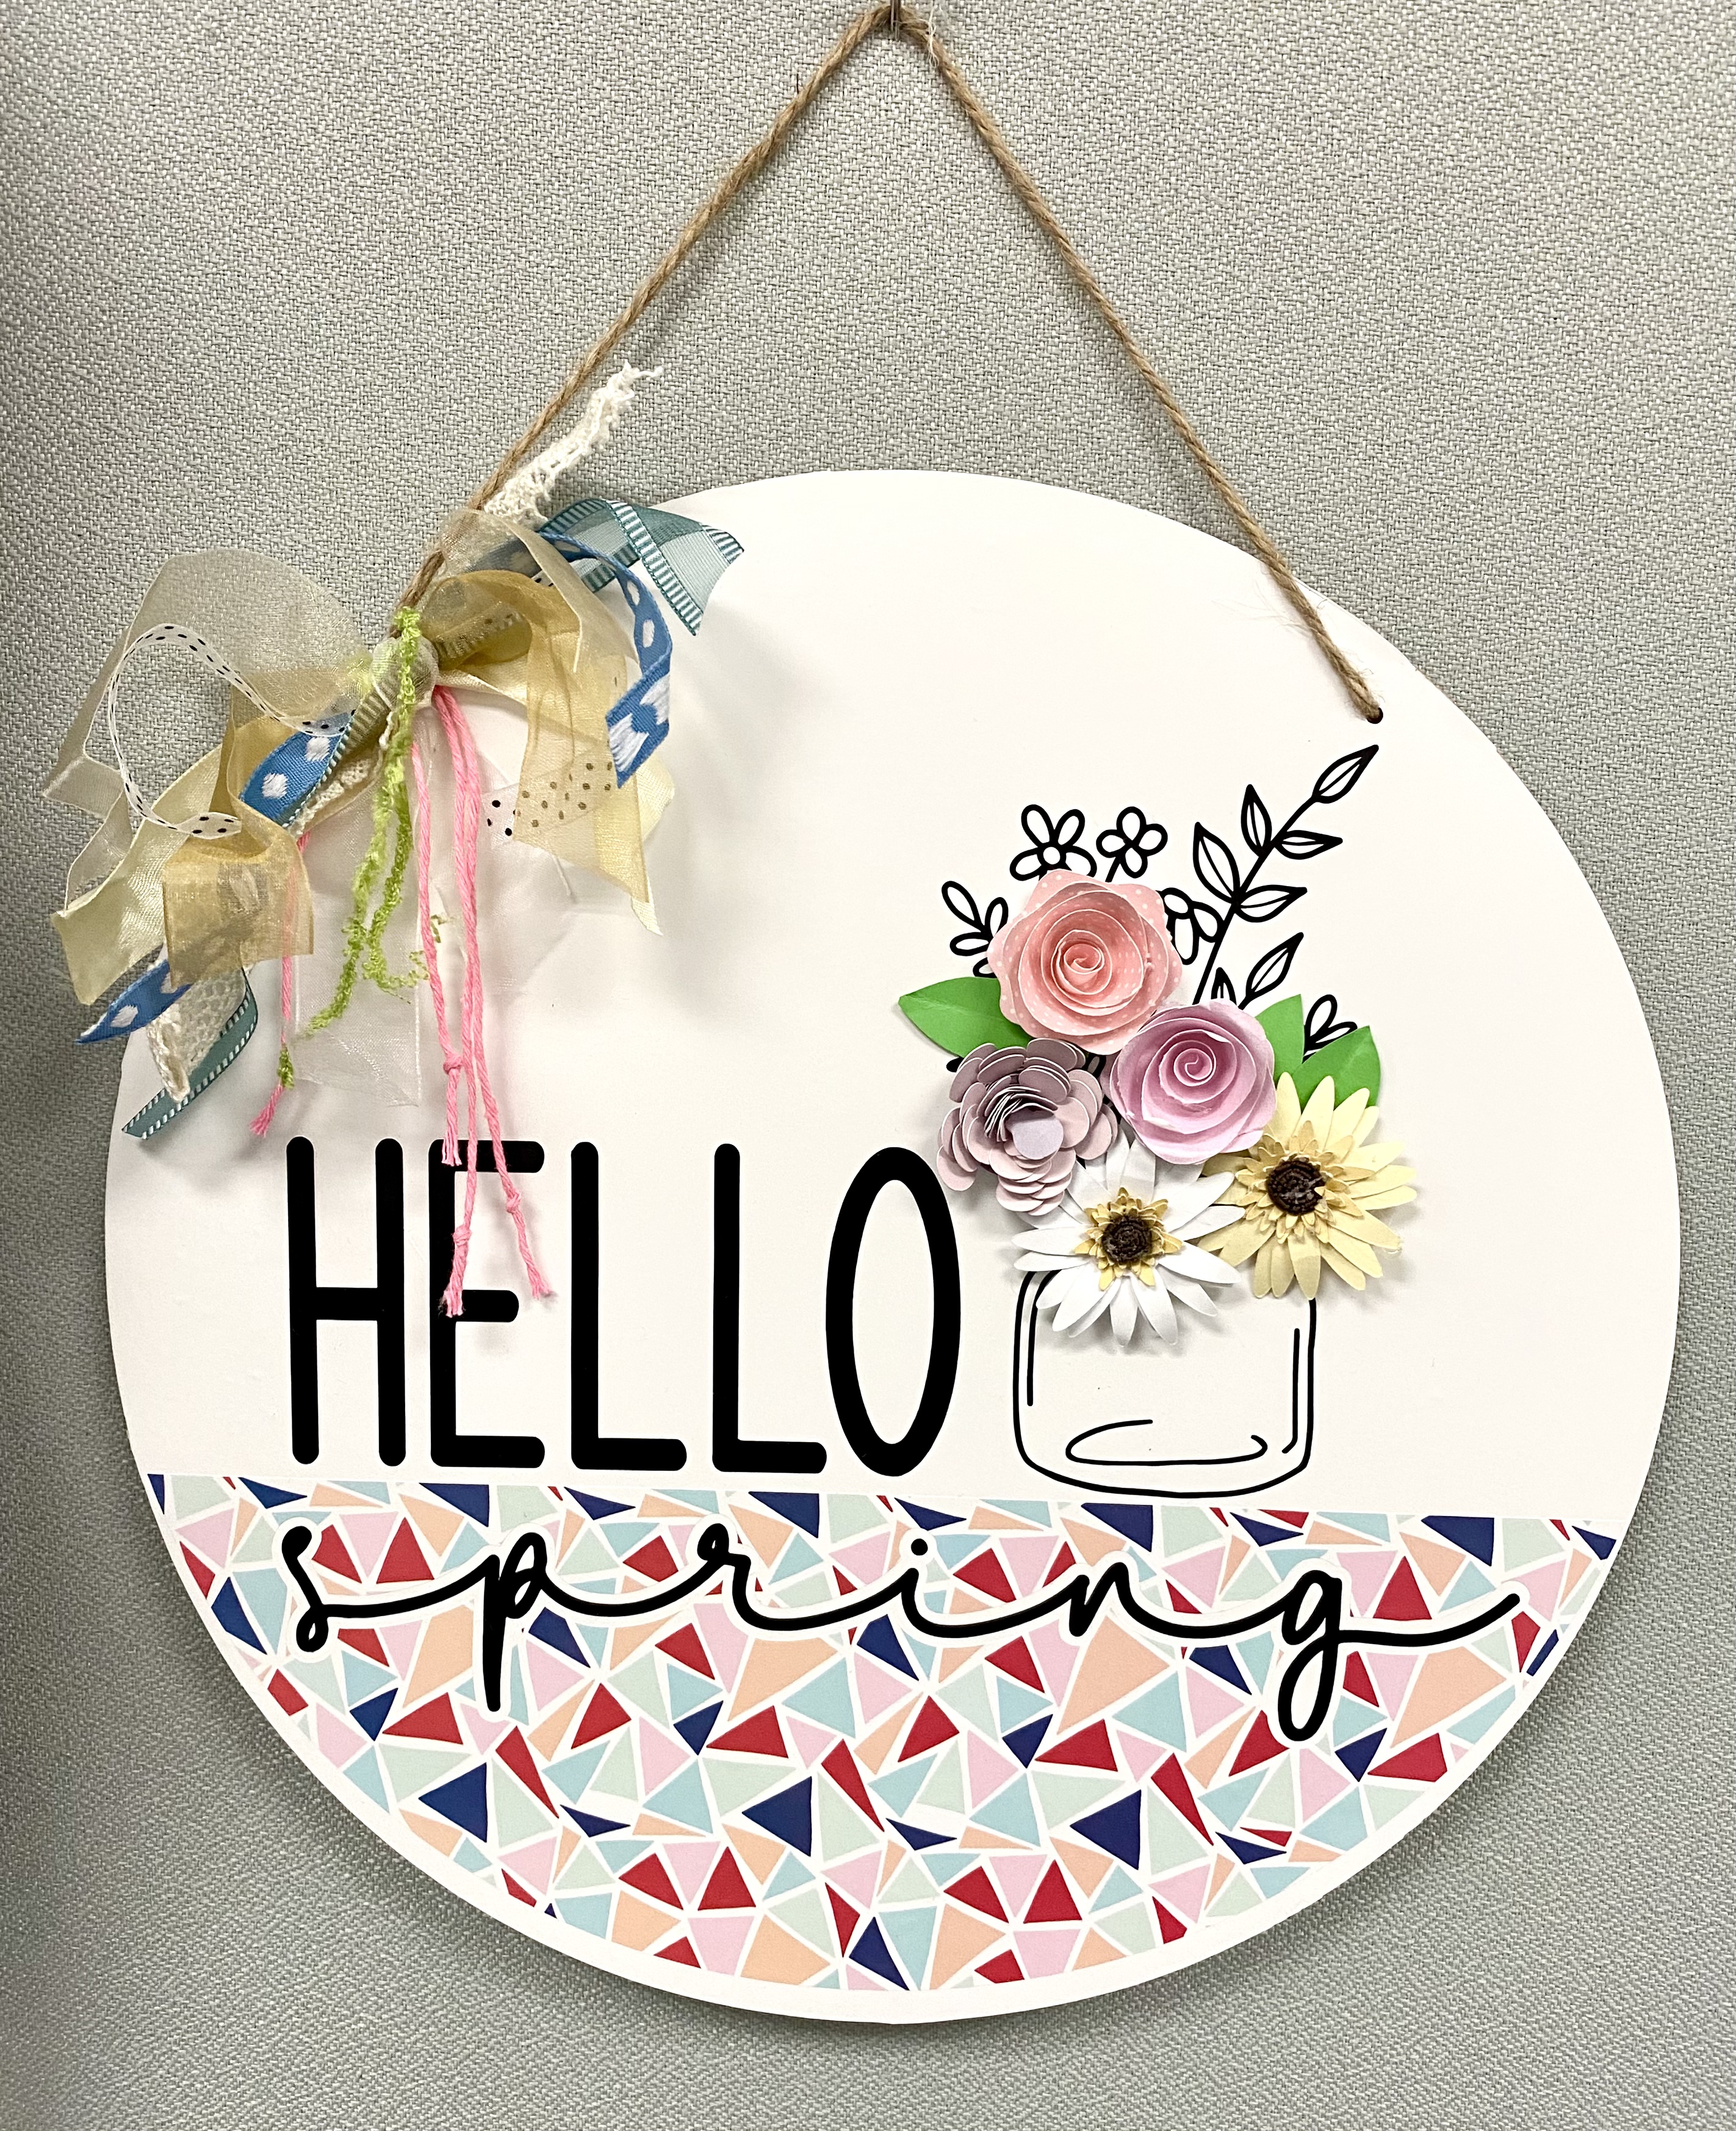
This has been on my Make It Wish List for a long time and I finally finished one. It's a decorated round board. I purchased the 12" wooden circle from the Dollar Tree. In fact, I bought quite a few!
I covered the board with white vinyl instead of painting it. I created the board design in Cricut Design Space using multiple elements. Like all my projects, it started one way and then warped into something different and of course, I love the final result.
This was the first time that I made the daisies and I am so happy how they turned out and how easy they were to create! The key is to use a lighter weight cardstock and/or patterned papers.
All vinyl and paper were from scraps except the white vinyl to cover the board and the printed vinyl on the bottom of the circle. Even the messy ribbon bow are from scraps!
Watch the process video below to see how it all came together:
Here's the link in Design Space to create your own.