Monday, August 31, 2020

Bitten By The Bug 2: Back to School


Time for another challenge at the Bitten By The Bug 2 website. This two week challenge theme is...Back to School. What does that look like in your area? Like most, our school district is starting the school year with Distance Learning.

Even though students are not physically going back to the classroom, they are still starting a new school year via Web Ex and Zoom class time. They still need new school clothes and school supplies.

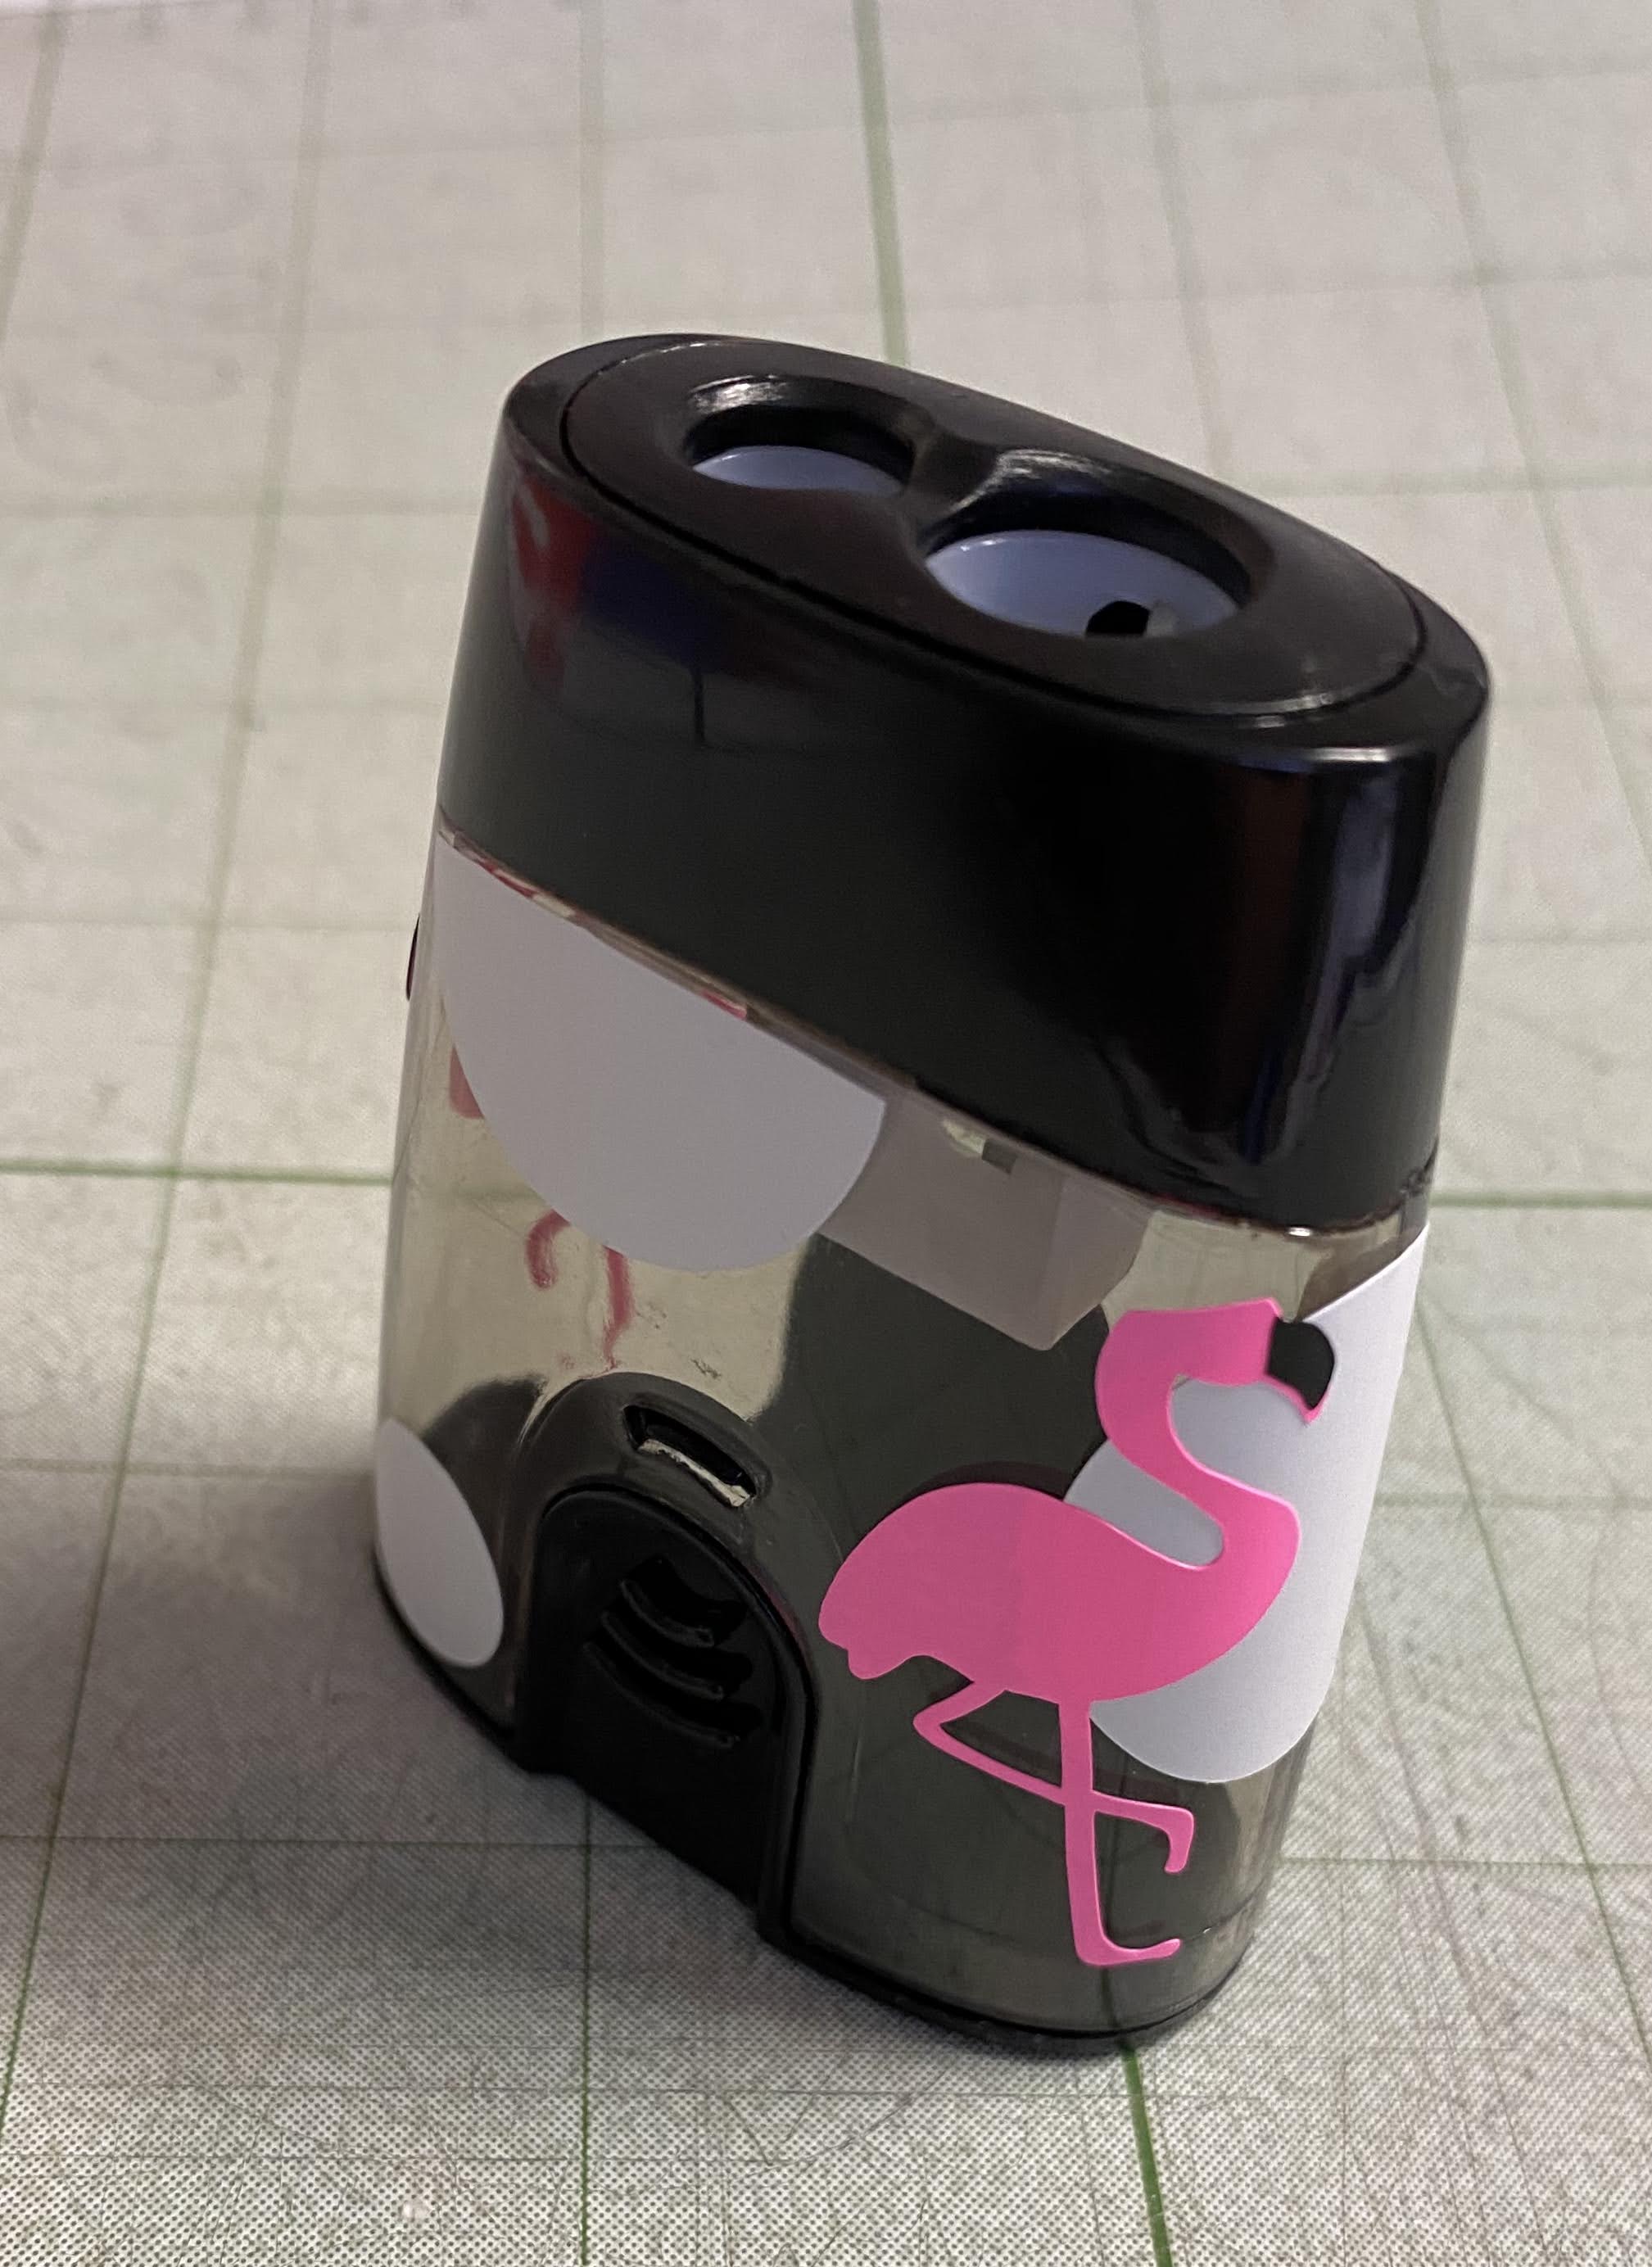
When I saw this clear fanny pack at Hobby Lobby on clearance, I had to buy it! Since I also purchased a cute flamingo umbrella, I went with that theme. I went with a basic flamingo from Design Space and cut an assortment of circles from .5 to 2".

I had a hard time with one of the circles and just couldn't get rid of the bubbles.  I tried using a pin to release air, heat gun to heat it, but no luck. Everything else was so easy to adhere - just like applying stickers!


I really, really liked the white circles. I love the way they look and will probably use them again as an added decoration to other projects.  The flamingo is from the Summer Vibes collection and the font used for her name is Babette.

I also decided to add some vinyl to a pencil sharpener to coordinate with the fanny pack.


Now it's your turn...link a photo of your back to school project using your Cricut. Click HERE to get to the site. I can't wait to see what you create!

Wednesday, August 26, 2020

Guest Room Revamp II

It's funny because the reason I chose the Hawaiian theme for the Guest Room is because I had made some Hawaiian print curtains for my son years ago and I didn't want to toss them. Guess what? I decided I'm not going to use the curtains after all. The print is so busy, I feel they will clash with the bedspread I purchased.

I think that is hilarious!

I made these cute Hawaiian themed pillows using old pillow forms that hubby wanted to throw away and the Cricut. The dancers are from Design Space and the Aloha SVG was a freebie on the Pineapple Paper Company website HERE. The freebie is given once you sign up for her email list.


Stay tuned for more posts on the revamp. I'm super excited about it!

Thanks for looking!

Saturday, August 22, 2020

Am I The Cricut Queen?

I'm joking, but sometimes I feel like the only crafting I'm doing is with my Cricut. And for someone who used to say, I'll rarely use the HTV, I'm using it more often than not.

I'm sharing some Cricut projects I've made lately:
I made this tank top for DIL1. The tank was a jersey knit so I had to use the Sports Flex HTV.
TIP: Search under Images for word strings. For instance, I searched for "Best freakin'", found an image that I liked and then used the contour tool to remove words I didn't need. (This one had dad in the image.) Then you can either search for the words, "auntie" and "godmother" or use text. I used text for these two. Sized & moved them around until I liked the way it looked.


The "93" is Iron On Mesh HTV. This was the first time using this - easy, peasy. Just like regular HTV! I used the Extreme Font for this jersey type shirt.

I also made these awesome kitchen towels for DIL3. Do you watch Schitt's Creek? Hilarious! I'm on the last season and my DIL said it had the perfect finale. I must savor it!
These were made with Strong Bond black HTV and flour sack towels from Walmart.

And I never did show you guys the finished onesie I made for my granddaughter. Now, my sewing skills need a little work, but I added some eyelet ruffles to the bottom area too. This image & words were from Design Space.
Super cute, right?

So, what do you think? Am I the Cricut Queen or what? I sure feel like it!

If you love to make things with your project, be sure to click over to Bitten By The Bug 2 (BBTB2) to join a current challenge. The Design Team has inspiring projects for you to try!


Friday, August 21, 2020

TGIF; Thankful Friday #143

Friday is here and I'm officially on vacation! We're taking a Road Trip to Utah and Arizona. I'm letting the guys plan the trip and all I want to be is a passenger! I was very reluctant to go because of the hotel situation, but I gathered some items to create a COVID-19 Kit. I got the idea from one of my coworkers.

This week, I'm thankful for the anticipation of a vacation from all the things.

I really do plan on letting it all go...truly appreciate God's creations/nature and of course the 100+ degree weather.

Our first stop...

What are you thankful for this week? Leave a comment and let me know.


Wednesday, August 19, 2020

WOYWW #585

Happy Wednesday and Happy WOYWW! I missed posting last week and realized it about halfway through Friday. LOL

I've had a pretty clean desk the last few weeks but it's back to it's usual style this week. I've been busy making a cake topper for my granddaughter's birthday, a shirt for my daughter's birthday, some kitchen towels for a DIL and a custom order card for a friend.

What I really need to do is work on my scrapbooks. I'm already a year behind. Here's my desk this morning:
The wood panel paper is used for the background when taking photos of my projects. I also use a light box that my son bought, but sometimes it’s easier to just grab this roll.

My daughter and I went to Hobby Lobby last weekend and I was disappointed in the amount of sales or lack of sales. I was really good and only bought sale/clearance items. With the exception of the scrapbook album I so desperately needed - but I did use the 40% off coupon for it.

They did have a great clearance on their Spring Items so I bought some towel blanks and a few things for my oldest granddaughter. You know the next week, all their Paper Studio line was 50% off. Was that good or bad...?

Click on over to Stamping Ground and visit Julia and the other deskers for the WOYWW day.

Tuesday, August 18, 2020

Sunflowers & Sushi

Round One: What does sunflowers & sushi have in common? I had a request for an anniversary card from my daughter's friend incorporating sunflowers & sushi. Whoa! I had to really think about how to make this work. I felt like I was on one of those competition shows where you have to mesh random things together to make a project!

I went to Design Space to search sunflowers. I wanted something whimsical to match the sushi die cuts I already had. I used the Walk In My Garden image set for the full sunflower and two flower heads. (although the final project, you can't see the stem or leaves from the full image.)

As I was fiddling around with all the elements, I just wasn't feeling it. Then I remembered that my daughter has sushi Washi tape. So...I grabbed those and decided to use this instead of the sushi die cuts.

Originally, I had a brocade look patterned paper for background which was too heavy for the overall feel so I grabbed this small dots paper from a 6x6 pad in my stash. The sentiment is from FSJ, swiped glitter pen around the edge & added some tiny pearls plus the one red enamel heart.


Everything color coordinates. I didn't want it to be too amorous since it's a first year boyfriend/girlfriend anniversary. Good news...she loved it!

Yup...I beat Round One of the competition! LOL

Monday, August 17, 2020

BBTB2; Watermelon

There's another new challenge theme at the Bitten By The Bug 2 site. It's perfect for the summer and it's WATERMELON. Since my granddaughter's birthday is in August, we decided to use it as her birthday theme.

I made these cute watermelon treat toppers using the Treat Toppers - Summer collection in Design Space. I pretzel stix treat bags which measure 2.5" across. I cut these toppers at 3" to have a little overhang.


I also designed a small cake topper too. Search "watermelon" in Design Space and create your own cake topper! This one is a Miss Kate’s Cuttable cut.

Lots of 3D adhesive to create interest. What you can’t see is the glitter on the seeds and part of the rind.

With COVID-19, she wasn't able to invite friends so she had a small pool party with all her favorite people - her parents, sister, grandparents, aunts & uncles!

What are you going to create with the watermelon challenge theme? Link up your project at BBTB2 so we can see.


Friday, August 14, 2020

TGIF; Thankful Friday #142

Another Friday and it's time to tell you what I'm thankful for this week. This week I'm thankful for free SVGs. There are so many sites that giveaway freebies and I've been using a lot of them. My Cricut sure is chirping lately.

I took a screen shot of what was shared in one of my FB groups. If you use SVGs, check out these sites. I try to purchase SVGs from these sites as well since I do take advantage of the freebies. I feel I should support them when I do need to purchase one.

How about you? What are you thankful for this week? Let me know in the comments.


Tuesday, August 11, 2020

Upcycled Canvas - Guest Room Revamp

Over the weekend, I decided to upcycle a canvas that my son brought home years ago and start decorating our guest room. We painted the walls a light blue with no idea what/how to decorate it. I saw some cute palm tree pictures at Hobby Lobby for only $4 each (after a 75% off clearance). I bought two. That is how the theme blossomed into tropical/Hawaiian.

The canvas went from this:
I grabbed my white, tan and blue scraps and started decoupaging them to the canvas to create some texture.

I used up a bunch of scraps for this project. I was so happy!

Once I added all the scraps, I painted two layers of white gesso over the top.
Then I started painting. I started by defining the horizon by painting a dark blue line across the canvas. From there, I added a little white and slowly moved down until I had a strip left to add some "sand". Once that dried, I squiggled white paint between the sand and water line to emulate waves.

To create the sky, I went with a lighter blue and just blended different hues of it to create some interest and then smudged some mostly white paint for the clouds.

Before I finished, I used the tip of a fine brush to add small white dots and lines across the water here & there.

I am really happy how it turned out!

Stay tuned to see the entire revamp of the Guest Room.

Sunday, August 9, 2020

Using Bleach w/HTV

I have been on a t-shirt making spree. I wanted to make another one for my oldest granddaughter but only had one shirt. This t-shirt was dark gray and boring so I decided to bleach it.

Of course I didn't take a photo of the shirt before I sprayed it with bleach, but you can see the shape and original color around the edges. I put an old towel inside the t-shirt to protect the bleach from going to the other side, but apparently it did soak through a little.

Once the towel was inside, I poured bleach into a spray bottle and just sprayed. I let it sit for awhile until it got to the place where I wanted it. Then I ran it under cold water to stop the bleach from continuing to...well...bleach. Once it dried, I sprayed more bleach in the center to make the center even lighter.

I also snipped a little "v" under the center collar. Not too low, but just to add a little extra grunge to the shirt.

I purchased the Freddie Mercury SVG from Apex. It came in a set of five images for only $2.99. I added the words by searching in Images in Design Space. I've been doing this a lot since I can find some cool words that have a unique font and/or shadows. Most times I have to remove other words to select only the words I want. For instance, this "Rock You" was actually "You Rock" so after ungrouping and then duplicating a layer of the "image", I used the contour tool to remove one of the words - then rearranged the two new single words to create the "Rock You" word. Be sure to subscribe to my YouTube channel to see me do this in action.

I sliced the silver glitter which was the top layer from the shadow so I didn't have to layer the HTVs. 

This next trick I learned from Holli Mostella. I layered the HTV together but ironed them on one layer at a time. So below you see the two layers on top of each other. I wanted to adhere the silver glitter first since I knew it would need more time under heat (I checked the Heat Guide). I didn't want to guess where to put the silver glitter HTV, so by laying them on top of each other for placement first allowed me to know exactly where to place the glitter HTV. 
I peeled up the white HTV sheet & removed it before pressing the glitter HTV.
Once the glitter HTV cooled, I removed the backing sheet and then placed the white standard HTV to the shirt and over the glitter HTV. Viola!

My daughter and I are trying to create pleasing photos with props. It's not as easy as it looks. LOL But it is fun. We wanted a rock n' roll feel and she pulled out these old earrings from her jewelry box that she had since middle school. LOL

Friday, August 7, 2020

TGIF; Thankful Friday #141

Happy Friday and Happy TGIF; Thankful Friday. This week I am thankful for my kiddos. The two that are home during the day are kicking butt doing some deep cleaning around the house. They are tackling specific areas at a time and it looks so good. Yup, they are also tossing stuff that should have been tossed years ago. I get sentimental over stupid items and can't seem to throw them away so I gave them full authority to toss anything that is old, broken and looks like it hasn't been used in a long time.

(Unfortunately, that also included some dying houseplants, but it was time to let them go!)

We have a big house and it's always going to be a little dusty, dirty and messy, but as long as we don't let it sit too long, it'll be fine.

So thanks to my kiddos for taking care of it! One less thing for me to do.

*cross off husband and insert kiddos*

Thursday, August 6, 2020

Cricut Haul

Ok, I may have gone a little crazy with Cricut products, but they were on sale and I really, really need a variety of colors in HTV. So, I bought a lot of rolls. Most of the ones I purchased were sampler packs so there was a variety of colors in each roll. I think this will hold me for awhile.
And I bought some Infusible Inks - I'm excited to use this product! I already have my project prepared.

After I received these 13 items, I received an email that Cricut was having a 50% off sale of their Infusible Ink blanks so...

Box #2:

The final cost of the girls' shirts were $3.00. You can't beat that. Cricut had the 50% off sale, an additional 10% off since I'm a Cricut Access member and then free shipping and another 10% off using a code that was given by Holli Mostella. Cricut allows you to stack codes! How cool is that?!? (Unfortunately I didn't realize that when I purchased the rolls above, but I'll be sure to use her codes in the future.)

If you don't know who Holli Mostella is, check her out and follow her. She has many YouTube videos and is constantly hosting giveaways.

Be sure to check back for Cricut projects that I highlight here and on the Bitten By The Bug 2 blog. I am always posting projects on IG, FaceBook and YouTube too. Come follow me!

IG: @3sons_and_astar


Wednesday, August 5, 2020

WOYWW #583

Happy WOYWW and Happy Wednesday! Today we get to share a photo (or two) of our desks, room, space, or whatever it is that we create.

I’ve been working on some shirts for my granddaughters. I haven’t finished this one but it is so cute! I still need to iron it on and then I plan to add some ruffles to the back. (In case you can’t tell, this is a onesie.)

Be sure to click over to Stamping Ground to read more about the WOYWW linkage and to take a peek into others’ craft areas.

Monday, August 3, 2020

BBTB2; Summer Fun Challenge


Hi there Cricuteers! Is that a thing? It just popped up in my mind. LOL  Today starts the new two week challenge on the Bitten By The Bug 2 (BBTB2) challenge site. The current challenge is Summer Fun!

There are so many activities that could be lumped into the "Summer Fun" theme. I decided to make these customized sunglasses to wear while enjoying them.

Check out the YouTube video:
Be sure to subscribe to my YouTube channel to see all my videos!

Here are some photos:


Of course while I was taking the photos, I realized that I probably should have put Summer on the left side and Babe on the right...but it's not so important for them to read this way.

I used the Palm Tree from the Luau image set, "summer" from Summer Forever set & "babe" from Pumpkin Spice and Everything Nice set in DS. I mention it in the video, but just wanted to let you know, I searched for the words, summer & babe in the images in DS. I do this often since you can find cute fonts or designs instead of typing with your font choices. This is a great idea if you're searching for a font with a mat and/or shadow.

Sunglasses = $1 at Dollar Tree
In the video, I mention that was going to give them to my granddaughter, but the "BABE" was not right for her (she's only 10) so I decided to give them to Kati. Kati is my DIL's teenage sister and is family. She modeled them and sent me this picture. She's so silly! You best believe that I'm making another pair just for my granddaughter! I know she'll love them.

This is a perfect project to use scrap pieces of vinyl. Can't you see doing something like this for a wedding, birthday, family reunion...anything really!?!

Your turn...create a project using the challenge theme of Summer Fun and link it on the BBTB2 site.


Saturday, August 1, 2020

LTSCB; August Challenge For The Kids

The challenge theme at Love To Scrap Challenge Blog this month is...For The Kids! I decided to do a page of my granddaughter’s birth in my Junk Journal for this month’s challenge.

This is a magazine page that has been painted over with a variety of mediums such as acrylic paint, watercolor markers, ink, and pencils. I covered the entire thing with white gesso.

The tag on the right is an old clothing tag which was covered with white acrylic paint. Once it dried, I stamped the daisies and hand wrote the baby’s name and birth details on it. I used paint markers for the leaves and flowers.

I printed two wallet size photos to fit this 5.5x7” journal page.

If you’re interested in seeing other junk journal spreads, click on the “Junk Journal” label to the right. These are so much fun to put together and a great place to experiment with techniques, supplies and other ideas.
I decided to add a little more to this page by using the paint pens to add “grass” at the base of the flower stems and the tag, stamped the word “love” to the top and added some journaling. I also added some gemstones and a sprinkle of hearts.
 I added a little bit of yellow around LOVE and a black Uni-ball pen to create a border and used the same pen to add some borders around the tag.

I had this alphabet stamp set since I started stamping back in 2000! I love using what I have!

The painted plaid on the bottom is actually from a page behind this one!

Now it’s your turn...click on over to the LTSCB and link your “For The Kids” project before the end of the month.


LTCCB; August

Summer is here and the challenge is Anything Goes at the Love To Craft Challenge Blog (LTCCB). Link your project before the end of the month - any project as long as you created it with your hands!

This month I used my Cricut to alter a predesigned image in Design Space. As you may or may not know, my granddaughter’s name is Daisy and I thought this would be super cute on a pair of leggings!


And here she is modeling them!

I removed the two daisy flowers next to the word “daisy” and added two larger ones on the top and bottom.

I love how the Cricut allows you do personalize and decorate any and everything!

Your turn, create anything as long as it’s handmade and link it to the LTCCB before the end of the month. And more importantly, have fun!