Friday! How happy I am that you are here!
This week I'm thankful for Etsy. My future DIL ordered their wedding invitations on Etsy and they are gorgeous and so unique! They are having a destination wedding to Acapulco and this vendor creates watercolor art of the landscape as the background of the invitations.
The cool thing is when DS3 got married, they also ordered their unique wedding invitations from Etsy. How cool is that?
If you haven't had a chance to shop on Etsy, give it a try. Hey, a little plug here, while you're there, check out my store at Three Sons and A Star. LOL
Have a great weekend. Can you believe it's going to be December 1st tomorrow? Christmas is coming quick. Are you ready?!

Friday, November 30, 2018
Thursday, November 29, 2018
Anniversary Card
Hi there, I'm sharing a card I made using the Autumn Brillance paper collection from Quick Quotes. My 32 year wedding anniversary is today so I decided to make a card for hubby.


This was a quick card to make since I really wanted to showcase the beautiful paper. I started by cutting a 4x5 1/4 piece from AU100 of the Autumn Brillance paper collection. I inked all four edges with Kokomo PowderPuff Chalk Ink.

The first thing I did was create two faux “Polaroid” frames using some cardstock scraps and a square punch. Both frames were inked with Kokomo PowderPuff Chalk Ink. Then I wrapped natural twine around the card base and tied a triple loop bow. I placed the leaf die cut under the bow and added a tiny punched heart to one of the frames.

I was going to stop there, but decided to stamp “Love You” multiple times in the top left corner. I used Kokomo for this too!

That's it! I believe in beautiful and easy!
Quick Quotes Products Used:
Autumn Brillance Paper Collection
PowderPuff Chalk Ink Used: Kokomo
Other Products Used:
Cardstock
Twine
Die Cut Leaves
Friday, November 23, 2018
TGIF; Thankful Friday #68
Happy Friday and the day after Thanksgiving! This time of the year, lots of people look back and express what they are thankful/grateful for. Since I’ve been doing this weekly, it has changed my outlook of my days/weeks. It’s nice to see there really is always something to be thankful for.
This week, I’m thankful for the rain that has come. The horrible Camp Fire that has been destroying the town of Paradise and surrounding area is 95% contained as of yesterday. The air quality in our town (and we’re over 200 miles away) has been horrible and dangerous. I can’t even imagine how bad it is the closer you get to the area.
Thankful for the fire fighters and volunteers who have been and are still working so hard!
Thank you Lord for the rain!
I hope you had a wonderful Thanksgiving with family and friends yesterday and now for the Christmas season.
Wednesday, November 21, 2018
Universal Flip Through
Wow! I didn't realize it was so long since I posted a YouTube video. Well, I did this one through my phone and realized after I loaded it and viewed, I forgot to lower the volume on the background...sorry...you'll get some low moans but luckily I just talk right over it! LOL
I could not sleep at all on Saturday/Sunday night so I went in the Command Center and finished all the details and filmed these layouts and the flip through.
This sketch is from Stick It Down. I said Let's Scrap in the video (I think) because that's another site I find sketches as well. I'm also joining the challenge at Scrap Our Stash.
From this sketch:


To this:

And the flip through of all the Universal Studios layouts/pages:
Details of the featured layout:
I cut the yellow patterned paper in half diagonally and adhered the back of the paper (the solid black) to the other side by using washi tape. Yup, I actually used washi tape to adhere something instead of just for embellishing! (I used regular tape on the back as well.) I was trying to finish all the pattern papers from a collection and used every bit of it! The light blue/aqua strip was also from the collection. I just added it to coordinate with the shirt of my hubby in the photos.
I've been on a quest to SHOP MY STASH and that's what lead me to the blog, Scrap Our Stash and the star ideas which of course was perfect for the Universal Studio photos. I went through my embellies and grabbed a bunch of things yellow, aqua and dark blue. I just started adding items until I felt it had a good look.
A close up of the quote:

"Don't Settle for the Little Dream, Go on to the Big One".
WOYWW #494
Happy WOYWW! Click on over to the Stamping Ground blog for more information regarding this craft room share and join the linkage - show us your desk!
If you follow my blog, you know that for the past couple of years, we take Christmas decorating pretty serious at my workplace. My norm is last minute, but this year I made a plan for my area and I've already started on it. You'll have to wait and see...
So, my desk and room are filled with projects for this.

I'll post more photos once it's done. If you are interested in looking at past Christmas decorating, click HERE and HERE.
Last WOYWW, I posted an incomplete layout and asked for some color advice. I ended up adding a little bit of green per Shaz and Neet's advice. You can scroll down the blog to see the layout or click HERE.
Thanks!
Tuesday, November 20, 2018
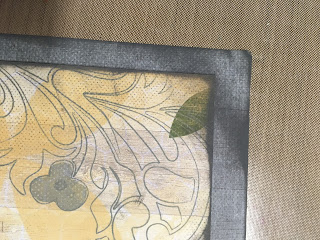
Young and In Love; QQ Layout
Hi, I'm sharing a layout using the Autumn Bliss paper line from Quick Quotes. Autumn Bliss is the featured paper collection in November’s Club Q. This paper is so gorgeous and perfect for a photo of a young newlywed couple.
I used the front and back sides of two pieces of paper. I love the grayish/denim looking side and knew I wanted to use it for the base. I inked all edges with Cool Gray PowderPuff Chalk Ink. Then cut the front side at 11.25x11.25 inches. I inked those edges with Cool Gray as well. I adhered that piece slightly off centered towards the bottom right corner.


 Then I cut a small portion of the chevron piece for a border underneath the photo. This was inked in Vanilla Cream PowderPuff Chalk Ink. I punched a piece of the back side of this and cut two strips (polka dots) of this for more eye candy.

 I wanted more floral without the bulk so I stamped some leaves and flowers using Light Moss, Cactus, Vanilla Cream and Cool Gray PowderPuff Chalk Inks.

 I added a variety of embellishments from my stash and a title to complete the page.


 Love the colors of this paper collection! It’s so beautiful and perfect for a Fall wedding.
Quick Quotes Products Used:
Autumn Bliss Paper Collection
PowderPuff Chalk Inks Used: Cool Gray, Vanilla Cream, Cactus and Light Moss
I used the front and back sides of two pieces of paper. I love the grayish/denim looking side and knew I wanted to use it for the base. I inked all edges with Cool Gray PowderPuff Chalk Ink. Then cut the front side at 11.25x11.25 inches. I inked those edges with Cool Gray as well. I adhered that piece slightly off centered towards the bottom right corner.


Quick Quotes Products Used:
Autumn Bliss Paper Collection
PowderPuff Chalk Inks Used: Cool Gray, Vanilla Cream, Cactus and Light Moss
Thursday, November 15, 2018
Universal Studios Layout
This is a weird week for me as I’ve been home from work all week but not doing any crafting. My blood pressure is doing crazy things and my doctor & I can’t get control of it. I only feel ok if I lay down and do nothing. You’d think that would be a dream come true, but it’s kinda boring.
I finished this layout over the weekend with some help from my WOYWW friends. I love adding clusters to layouts for two reasons...the first, I get to use many, many supplies to my layout and second, it looks great on my layout!


 Those white clip things I’ve had forever! It was fun to gather white, blue and red embellishments to use and then added some green so it didn’t have a patriotic theme.
Enjoy your week!
I finished this layout over the weekend with some help from my WOYWW friends. I love adding clusters to layouts for two reasons...the first, I get to use many, many supplies to my layout and second, it looks great on my layout!


Enjoy your week!
Monday, November 12, 2018
A Day of Thanks; FCCB Challenge #339
Happy Monday and welcome to another Monday challenge on the Fantabulous Cricut Challenge Blog (FCCB)!

Challenge #334-Thanksgiving or Thanks
Make a project using anything Thanksgiving, or Thanks related. But there has to be a least one cut from the Cricut Library!
Make a project using anything Thanksgiving, or Thanks related. But there has to be a least one cut from the Cricut Library!
This Weeks Sponsor is-
FCCB
And the prize is-

Two brand new Close to My Heart Stamps sets!
To qualify for the prize, be sure to use at least 1 Cricut cut on your project and if it's not obvious, let us know what cartridge you used. If you use a Cricut Explore machine, at least one cut must be from the Cricut catalog of images.
If it isn't a card, you will get two entries into the drawing!
Here is my project-


Tied some twine to the top and hand wrote the name.
Now it’s your turn...create a project for Thanksgiving or Thanks and link to the FCCB website.
Friday, November 9, 2018
TGIF; Thankful Friday #67
Happy Friday everyone! Without getting into too much detail, I'm thankful for my life. Wow, I am so blessed. I don't have everything but I surely have enough.
The weather is slowing turning cooler and I'm so looking forward to the holidays!


Enjoy the weekend and leave a comment on what you're thankful for this week.
The weather is slowing turning cooler and I'm so looking forward to the holidays!


Enjoy the weekend and leave a comment on what you're thankful for this week.
Pocket Page & QQ
Hi there, today I'm sharing a different type of layout but a much needed one especially when you’re a pack rat like me. I created a pocket so I can put in the maps, tickets, brochures, receipts and miscellaneous photos that I collected during my trip to San Antonio.
I used the Secret Garden paper collection from Quick Quotes since I used this collection for my other San Antonio layouts. I used three pattern papers for this layout.
Here's a snapshot of the finished layout:

The details:
Cut the patterned paper for the pocket at 6.5” and adhere it to the bottom sheet after inking all edges with Lipstick PowderPuff Chalk Ink. The base page was inked with Deep Sea PowderPuff Chalk Ink.

 Cut a 2" strip of patterned paper to top the pocket. Use a scalloped border punch for added interest and Tropical Punch PowderPuff Chalk Ink around the edges.

 Add photo, die cut and journaling card to the pocket front;
 and add two fishtail banners to the top right corner.
 Place memorabilia into the pocket and done.
 I also added some interest to one of the shopping bags by punching a half circle in the center and backed it with a piece of coordinating patterned paper. This bag holds receipts, business cards and extra photos that didn't make it on a layout.

Click on over to the Quick Quotes blog for more inspiration.
Quick Quotes Products Used:
Secret Garden Paper Collection
PowderPuff Chalk Inks Used: Deep Sea, Tropical Punch and Lipstick
Other Products Used:
Cricut and the Ole cartridge
Black pen
Circle Punch
I used the Secret Garden paper collection from Quick Quotes since I used this collection for my other San Antonio layouts. I used three pattern papers for this layout.
Here's a snapshot of the finished layout:

The details:
Cut the patterned paper for the pocket at 6.5” and adhere it to the bottom sheet after inking all edges with Lipstick PowderPuff Chalk Ink. The base page was inked with Deep Sea PowderPuff Chalk Ink.


Click on over to the Quick Quotes blog for more inspiration.
Quick Quotes Products Used:
Secret Garden Paper Collection
PowderPuff Chalk Inks Used: Deep Sea, Tropical Punch and Lipstick
Other Products Used:
Cricut and the Ole cartridge
Black pen
Circle Punch
Wednesday, November 7, 2018
WOYWW #492
Wednesday! Here already and that’s A OK! I’m sharing my desk today as part of the WOYWW on Stamping Ground. If you don’t know what I’m talking about...click on the link above.
My desk:
 So I’m working on this layout but noticing that it’s too red, white and blue. This is not a July 4th layout. I think I’m getting caught up in being matchy, matchy, right? HELP! Should I add another color in there...yellow maybe?! I’d appreciate your recommendations. These photos are from our Universal Studios trip this summer.
Don’t forget to click on over to the Stamping Ground to see more desks!
My desk:

Don’t forget to click on over to the Stamping Ground to see more desks!
Tuesday, November 6, 2018
Wilderness Baby and the Cricut
How cute are these cupcake toppers? I made the cuts using the New Arrival cartridge for all the baby items and then used Design Space to cut the bears. I cut the bears by creating a SVG with a couple of clip art images.
 I had both Cricuts chirping since the baby items were cut using my Cricut Explore and the bears with the Cricut Air. Yup! Taking advantage of having more than one machine!
Can you believe I had to go to three stores to find that red/black checked paper? I swear it's so popular right now, I couldn't believe I couldn't find it anywhere. I thought I had some so I waited until the last minute (of course) before I realized that I didn't. But Hobby Lobby to the rescue! And the patterned papers were 4 for $1! SCORE! Now, here's a shocker...I actually left Hobby Lobby spending only $1.08!

 Details:
The circles were cut at 2".
The "white" cuts were actually the back side of "ugly" papers. I have tons of white cardstock but since these didn't need to be photo safe, I didn't want to use them. So I did the first thing I could think of...use the back side of "ugly" papers.
I used glue dots to adhere the toothpicks and then a smaller punched white circle to cover the backs. These white circles were also punched from "ugly" paper.
I'm entering these in the Die Cut Divas challenge this month since their challenge is "Anything Goes" this month. Click on over to check out the other entries.

Can you believe I had to go to three stores to find that red/black checked paper? I swear it's so popular right now, I couldn't believe I couldn't find it anywhere. I thought I had some so I waited until the last minute (of course) before I realized that I didn't. But Hobby Lobby to the rescue! And the patterned papers were 4 for $1! SCORE! Now, here's a shocker...I actually left Hobby Lobby spending only $1.08!


The circles were cut at 2".
The "white" cuts were actually the back side of "ugly" papers. I have tons of white cardstock but since these didn't need to be photo safe, I didn't want to use them. So I did the first thing I could think of...use the back side of "ugly" papers.
I used glue dots to adhere the toothpicks and then a smaller punched white circle to cover the backs. These white circles were also punched from "ugly" paper.
I'm entering these in the Die Cut Divas challenge this month since their challenge is "Anything Goes" this month. Click on over to check out the other entries.
Friday, November 2, 2018
TGIF#66
Happy Friday!
It's been a crazy week with Halloween in the middle of it all. This week I'm thankful for my coworkers and our Halloween fun! Here are photos of the group costumes and one individual:


 Great fun! I hope everyone is doing great and had a ton of fun on Halloween!
It's been a crazy week with Halloween in the middle of it all. This week I'm thankful for my coworkers and our Halloween fun! Here are photos of the group costumes and one individual:


Subscribe to:
Posts (Atom)