Friday, November 27, 2020

TGIF; Thankful Friday

 TGIF! This week I’m thankful for all the Thanksgiving helpers this year. I hope everyone enjoyed Thanksgiving and had a wonderful day!


(Our oldest son went to AZ to enjoy the holiday with my mom and sister)


Wednesday, November 25, 2020

Junk Journal Page and Video; Rainbow

Hi there! I just posted another YouTube on this junk journal page:


Like I mentioned in the video, I don’t love it, but I don’t hate it...I may go back and do something different, but for now, it’s good.

I did want to stress that sometimes that does happen. I just enjoy the process and playing with the different mediums and techniques. That’s why I decided to keep filming this. Not every project is going to be perfect or what you envision, but in the end, it does become something you like!

Products Used:
Acrylic Paints: Apple Barrel - Key West, Bright Magenta, Bright Yellow, Black & White
Sprays: Distress Spray Picked Raspberry (Ranger), Sour Lemon Color Splash (FSJ) and Heirloom Blue (Mister Huey’s)
Ranger Texture Paste; Transparent Matte
Modge Podge
Acrylic Gesso
Stencil; Joggles
Paint Pen:  Posca White Bullet Tip
Black Archival Ink; FSJ Black Licorice
Papers: all from my Junk Journal stash

Monday, November 23, 2020

BBTB2: Coffee

It's time for another two week challenge at the Bitten By The Bug 2 (BBTB2) challenge site. Click on over and see the great DT submissions and join the fun! The current challenge topic is...coffee.

What a great time to create a Cricut inspired coffee project. The days are getting cooler and nights are definitely colder! 

Here's my project:


My daughter bought a sweatshirt and I challenged myself to do something similar. It looked like it was bleached but it looked different than the bleached shirts I've done before. So I googled it...there is such a thing as reverse tie dye. Basically, you "tie dye" with bleach to remove color.

I used a black sweatshirt that I already owned and gathered sections with rubber bands
then sprayed & poured bleach.

Once I was happy with the new "color", I removed the rubber bands & soaked the shirt in cold water to stop the bleaching process.
There were lots of spots that were still too black so I dripped some bleach here and there until I liked it.

I washed the sweatshirt before adding the HTV. I went to Design Space and searched for "coffee". I selected the image/words from Drink Up image #MB356503. I didn't want it to have a big contrast so I used blush HTV from Cricut. I also like how the pink gives it a feminine look too.


I hope you join this challenge and link your Cricut made coffee project to the BBTB2 site.

Friday, November 20, 2020

TGIF; Thankful Friday #154

Happy TGIF; Thankful Friday! This week I'm thankful for my daughter and my decision to join the 49 in 49 Challenge; Virtual Marathon this year. It really did encourage me to walk every day. It ended last weekend, but I'm still walking - hopefully, I'll continue.

The weather may not agree with it, but there's still the treadmill.

Here's a photo of my daughter and I with our shirts & medals.

We did it!

Have a great week and leave me a comment on what you are thankful for this week.

My granddaughter also turned ONE this past weekend. They didn't get to have the big party that they wanted, but it was still fun and she's such a cutie!


Wednesday, November 18, 2020

Cheers to 60 Years Layouts & Video

I filmed another YouTube video talking about making base pages for an event. In 2019, we had a 60th birthday party for the hubby and it was a beer theme.

I purchased this paper pack specifically for the party. It came with great patterned papers and a 12x12 sticker sheet which I used for most of the embellishments for the layouts.
Check out the video here:

Now, read on for more details:

For the First Layout: I made the masculine embellishments years ago for a swap & finally had the chance to use them. They were made with a variety of punches and stamps. Take a look:
 I used a ticket punch for the base & stamped the beer mug & cheers to create the fun 3D embellie. You can't tell, but I also used liquid crystal effects for a glass feel.

 This one was also on a ticket base. Even though the image & sentiment are one stamp, I stamped them twice in two different colors and then cut them apart.
This one, I added some tiny brads. In the center oval (covered with the mug) is actually a car stamp, but it didn't work for this layout so I adhered a mug that I cut from one of the patterned papers.

I also stamped the white w/black labels. The green & yellow circle stickers were left over from another sticker sheet and housed in my sticker book. Each cluster has a little bit of all to tie them all together.


Another thing to note, the four photos on the right were originally 4x6, I trimmed them down to 3x4. The title is a combination of stickers and Cricut cuts. I handwrote "years" on one of the mugs.

The Second Layout:

With the exception of the beer mug on the top left, all embellies were from the sticker sheet - even those black and yellow dots/triangles.


Each cluster was grounded by a black circle.

I purchased the 8x12 flip flap from CTMH and the craft beer kit from Scrapbook.com.

If you're not already, please become a subscriber to my YouTube channel.


WOYWW #598

 Happy Wednesday and Happy WOYWW! Click over to Stamping Ground to read more about the WOYWW linkage and go take a peek at others’ creative stations.

My desk as of last night:

I finally brought out my old jewelry box and decided to sort through it. I got rid of missing or broken pieces, created a pile for my granddaughters and reacquainted myself to some pieces I completely forgot about.

I’ve been watching The Home Edit on Netflix and those ladies know how to organize! Now I’m not going to organize like them, but they have some wonderful information and tips - sure did encourage me to sort through some things around the house.

Come back later this afternoon as I will be posting another YouTube video. This one is about scrapbooking so if you’re interested in watching that, come back! You can also subscribe to my channel and receive notifications. I’m really getting into a groove with the whole posting videos thing. It’s fun!

Until next week...enjoy the weather in your parts and stay safe & healthy.


Tuesday, November 17, 2020

Baby Girl & A Pineapple

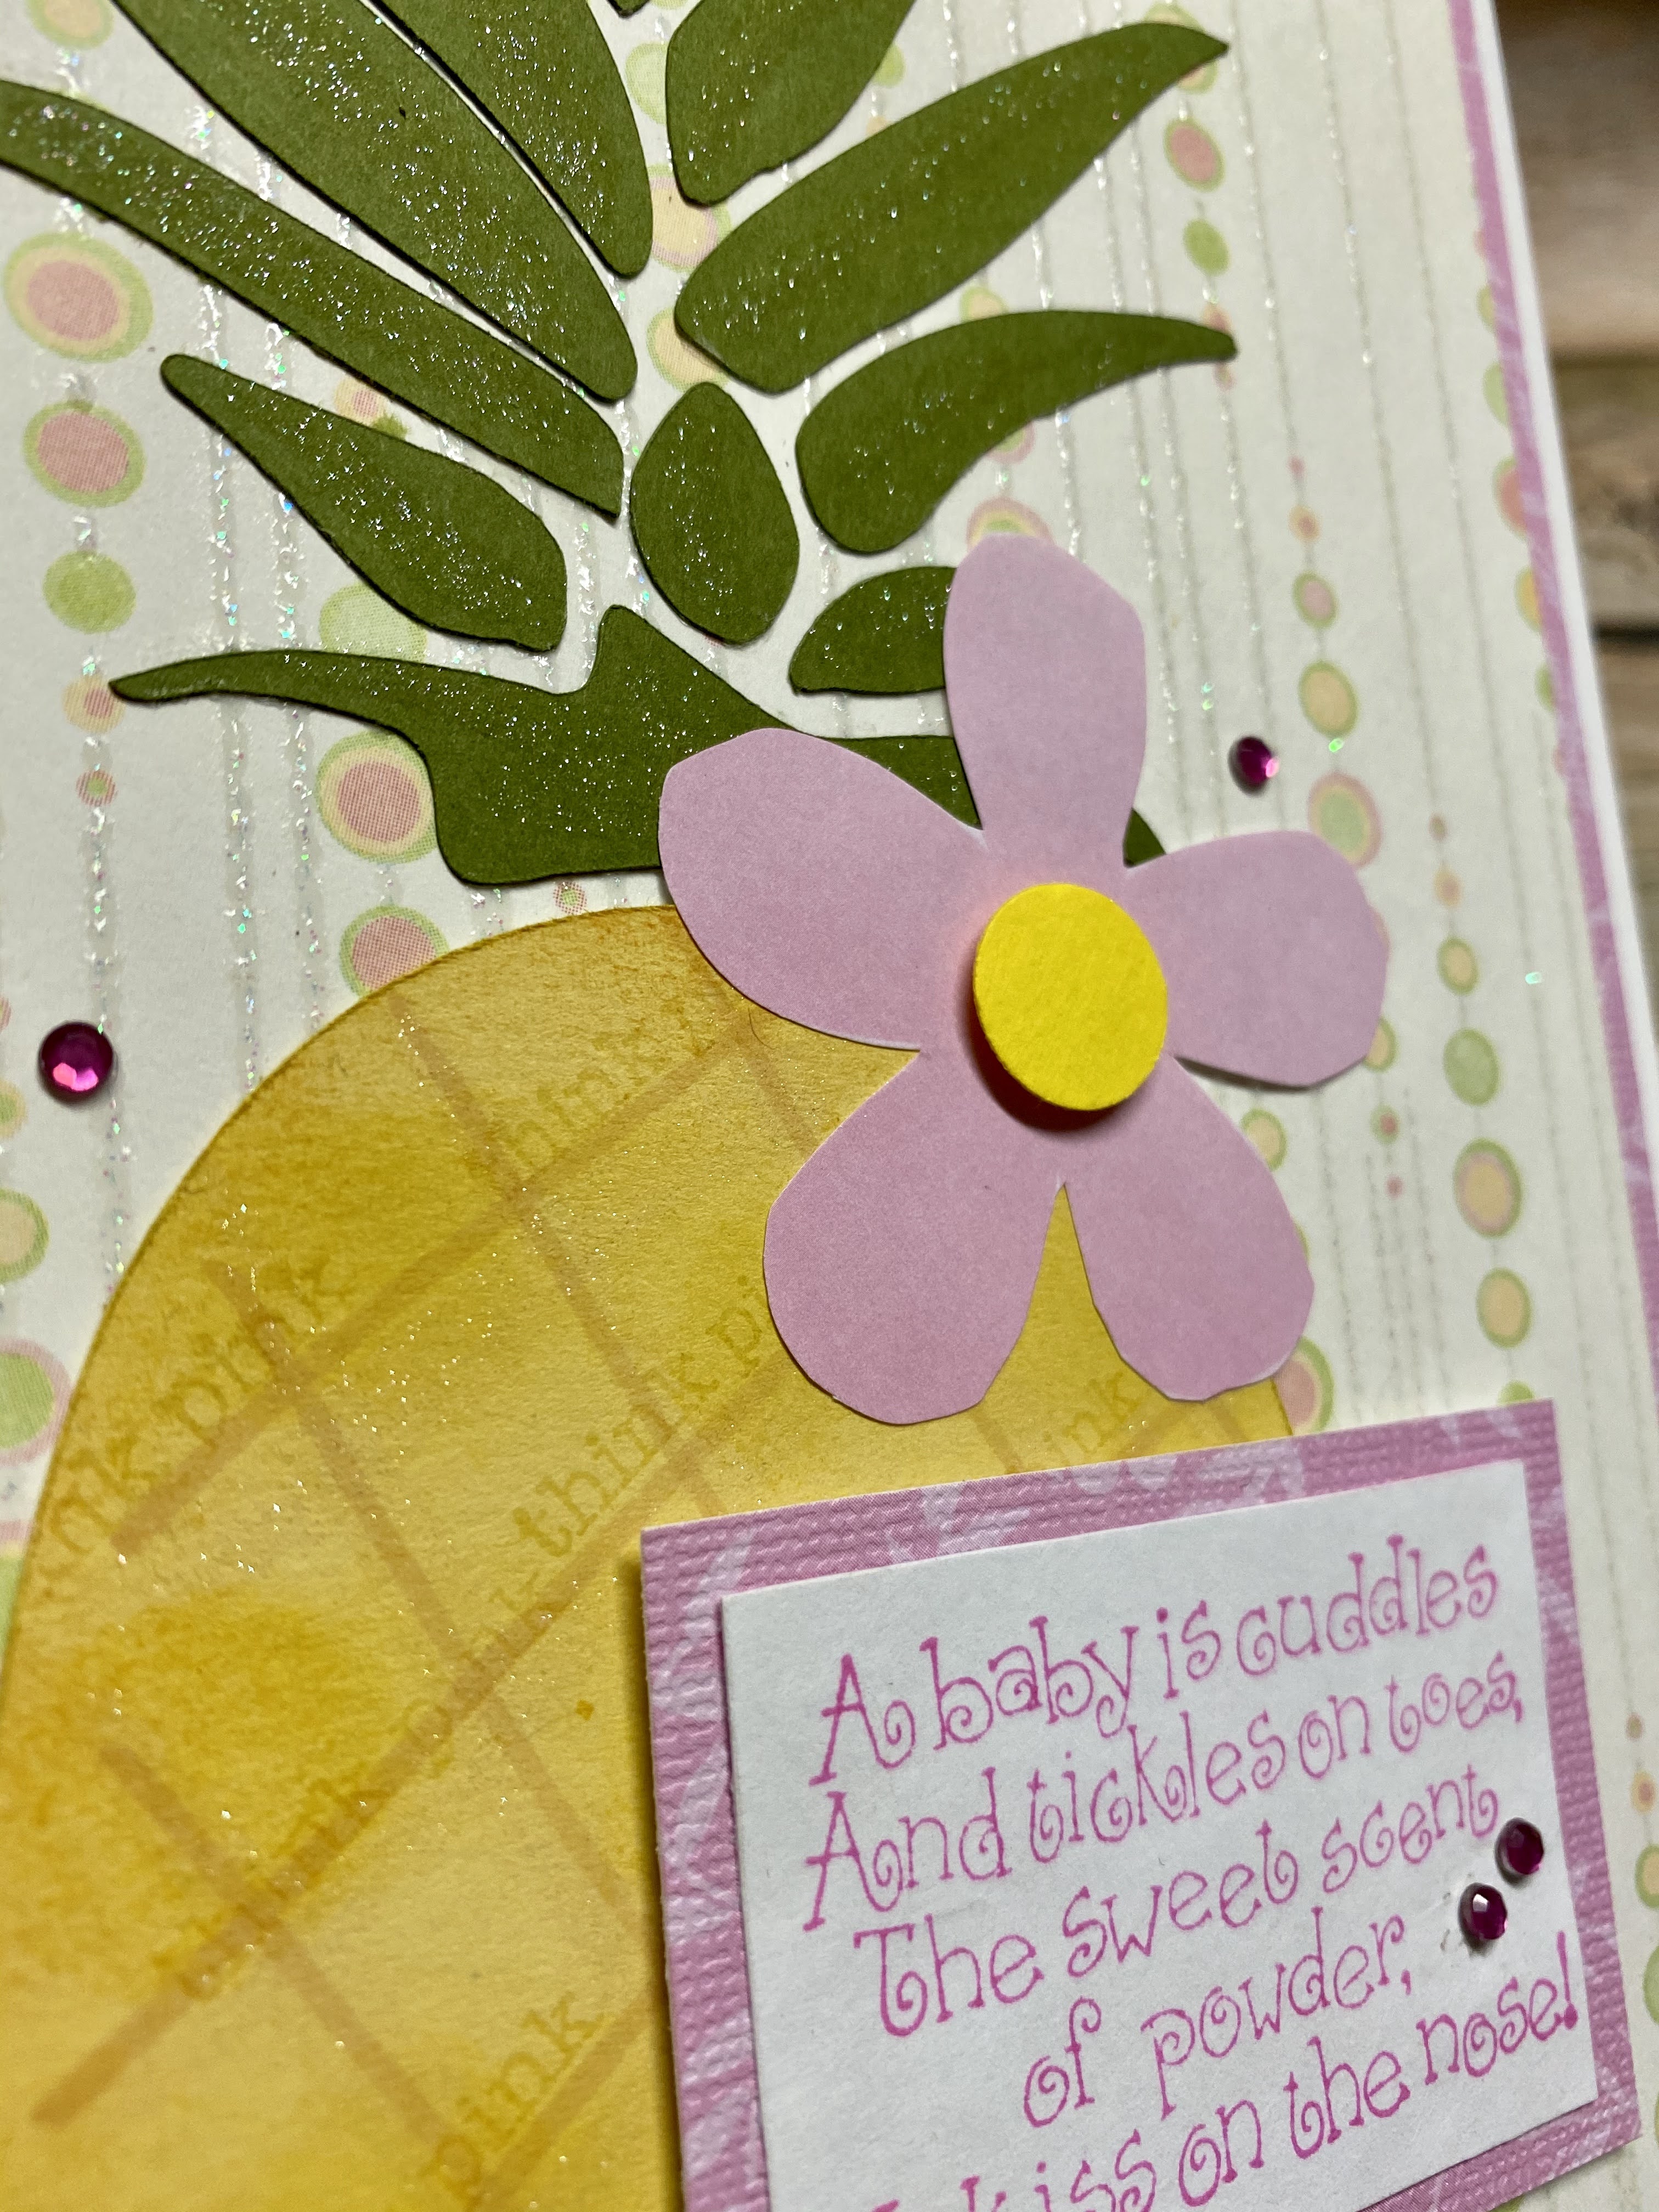
Boy, I sure get some interesting combinations when asked to make a custom card. This time is was a baby girl baby shower incorporating a pineapple.

I don’t have a pineapple stamp so I knew I’d have to use my Cricut for the card. I used the Cricut for the pineapple and the flower but used three different sentiment stamps to finish the card.


I layered two different patterned paper for the card base. I used a light brown marker to create some interest to the pineapple along with versamark ink and “think pink” stamp within the yellow portion. I also used a glitter marker to add some sparkle to the leaves. 

Add a cute baby sentiment and some rhinestones to finish the card! I used a simple “congratulations” to the inside of the card.

I rarely make 5x7 cards but I did this time since it’s for a group gift.

I’m entering this in the Always Fun Challenge this week. Click on over to see the Anything Goes cards.


Friday, November 13, 2020

BBTB2 Sports Winner & New Project

I hosted a previous challenge on the Bitten By The Bug 2 (BBTB2) challenge site and it's time to select a winner! Click on over to the site HERE.

I wanted to show off another "sports themed" project that I created. Sports is a common subject in my household and I was commissioned to make a birthday banner with a Raiders theme.

I gotta tell ya, I love Design Space! It's so easy to create SVGs so you can create spectacular projects!

Check this out...


I hope you can see the details on the banner. I didn't have "Raider" paper or silver/gray patterned paper so I stamped these footballs using Versamark ink on the gray pieces to create an interesting base.
I believe you can tell by the top "Y", that the letters in "HAPPY" were raised up by using 3D adhesive.
I adhered the "BIRTHDAY"  letters directly to the black paper, but then I splattered both silver & sparkle Color Shine all over these. The "Raiders" on the "B" & "Y" were the negative from the actual Raider logos - waste not!

I sure hope the birthday boy loves this banner as much a I do!

Don't forget to click over to the BBTB2 site for the Sports challenge winner and to check out the newest two week challenge.
 

TGIF; Thankful Friday #153

 Happy TGIF; Thankful Friday! This week I'm thankful for friends and family with unique talents. This week we got assistance from a mechanic friend, a cookie baking/decorating friend, and a house painter cousin.

We had/have a lot going on this week. Our youngest granddaughter turns one tomorrow so we're looking forward to celebrating her Mickey & Friends birthday party. 

I hope your week was wonderful and that your weekend will be fantastic!

Leave a comment with what you're thankful for this week. I'd love to hear all about it!


Tuesday, November 10, 2020

Cards Tie Dye 4; YouTube Video

Hi there! I made the coolest cards the other day (if I do say so myself). Surprisingly, I remembered to film the process so you can check out the YouTube video below:

Please hit the subscribe button to see more videos!

Then admire these fun cards!


I stamped "Happy Birthday" sentiments on two of the cards. I almost did for the big card, but decided against it. I plan to use this one to send to a friend. She loves tie-dye and will adore this card! I can't wait to send these out. I love the way they turned out. So fun!

The following supplies were used:
Stamp Set: Hero Arts, Tie Dye
Inks: Electric Lime, Orange Rave, Cosmic Grape and Black Licorice from Fun Stampers Journey* (FSJ)
Inks: Yellow from Stampin' Up!
Color Splash: Sour Lemon and Cosmic Grape from FSJ
Color Shine: Citrus Cooler from FSJ
Glimmer Mist: Almost Black from Tattered Angels
Wobblers: Adhesive Springs from Close To My Heart (CTMH)
All Cardstock: CTMH
Die Cuts are all done by the Cricut

* Fun Stampers Journey is now Spellbinders


Monday, November 9, 2020

BBTB2; Thanksgiving


Happy Monday! It's the start of the two week challenge at Bitten By The Bug 2 challenge site. This challenge is...Thanksgiving. 

I don't normally send out Thanksgiving cards but since there won't be a lot of family gathering this year, I decided that I'll send some this year.


I searched for turkey images in Design Space and saw this Turkey Day card from the Simple Holiday Cards set; and duplicated it so I could create multiple cards. These were so simple to do. I love that turkey and I added some interest by putting glitter marker on the feathers. One has a gold glitter marker and the other is clear glitter.

This is a great way to send THANKS to everyone that you are thankful for. I do a TGIF; Thankful Friday post every Friday and it helps me to be grateful and thankful for all the little things.

Come back on Friday to see what I'm thankful for this week...even I don't know yet! LOL

I also have set a goal for myself this year to send at least one card a week. Click on the Card Goal 2020 label to read more about that.

Create your Thanksgiving themed project using your Cricut and link it to the BBTB2 challenge site HERE.

And remember...


Friday, November 6, 2020

First Birthday Cake Topper and Video

I'm having so much fun creating this cake topper for my granddaughter's first birthday. They are going with Mickey & Friends theme but with a heavy emphasis on Daisy Duck.

Check out the YouTube video:


Photos:


I really, really wanted to incorporate Mickey and Friends but it was just too much so I created these Mickey head shaped balloons instead. I did this by combining a regular balloon bouquet from Design Space and welding Mickey ears to the top of them. I LOVE how they turned out! Originally, I was going to use the Mickey heads for the balloons, but I love how these are obviously balloons. Just like the ones you'd buy at Disneyland!

I used a lot of 3D adhesive because I didn't want this to be flat - it definitely adds fun & interest as well as much needed dimension.

My son and DIL originally were going to have a big birthday party of little miss Daisy's 1st birthday, but with COVID, they decided for the small gathering with just immediate family. Her parents, sister, grandparents, aunts & uncles. There aren't any immediate cousins...yet.

  • Cardstock from my stash
  • Glitter marker from CTMH (clear)
  • 3D adhesive from Stampin' Up, CTMH and Dollar Tree
  • Wet adhesive from Nuvo
Watch the video for more details. If you have any questions or comments, let me know.

Also, if you're not already, subscribe to my YouTube channel. I post videos on scrapbooking, Cricut projects, cards, mixed media, junk journal, etc. I love to craft so I have quite the variety!

TGIF; Thankful Friday #152

Hello & Happy Friday! This week has been a long one. We're still waiting for the presidential election results and that may be why it just seems like a long week.

This week I'm thankful for the change in weather. It's been in the mid-70's all week and so nice! Leaves are falling and changing colors so my evening walks have been great. I actually had to cut one off early because I was getting too cold!

What about you? What are you thankful for this week? Please share in the comments, I'd love to hear it.


Wednesday, November 4, 2020

WOYWW #596

Happy Wednesday and Happy WOYWW! My desk is full of a project that I’m making for my granddaughter’s first birthday. It’s a cake topper! I’m also creating a YouTube video for this project too so if you’re interested in seeing the end result and how it was done, please come back.

In the meantime, my desk:

 
If you’re wondering why I’m sharing my desk, click on over to Stamping Ground to read all about it. I love this weekly desk share. I get inspired by so many great creatives and artists and it’s a great way to catch up with these friends from all over the world. Click on over to check out the other deskers!

And now the deskers and everyone else in the US anxiously await the election results.


Monday, November 2, 2020

Guest Room Re-Vamp III

We’ve been working on our Guest Room - making it a Hawaiian themed room. I love themed rooms because it’s so easy to get things done. There’s no guess work on what to put in there, etc. I posted some items earlier - pillows I made, a painted canvas and now this upcycled tv stand.

My sister gave this to us so I decided to repaint it and etch the glass door fronts. Honestly, I was a little nervous about the glass etching since I would have had to buy new glass panes if it didn’t work, but it was perfect.

Before:

 And after:


Don't you love it! After removing the drawer and cabinet door fronts, I painted the entire thing with flat interior white paint+primer from Valspar.

The drawer and cabinet doors were painted with Coastal Sage from Rustoleum. Yup...a spray paint. This was also a paint+primer.

Although both products said no sanding needed. I did sand a little after I cleaned them and before painting. Once dried, I sanded spots to distress it.

The hibiscus flowers were etched using my Cricut to create a stencil with vinyl and then Armour Etch Cream. I was a little nervous about the glass etching since if it didn't work, I would have had to toss the glass panels and purchase new ones, but it turned out perfect and only took about 10 minutes.


The room is coming along!

Sunday, November 1, 2020

Love To Scrap Challenge Blog; November Challenge

Happy November! The monthly challenge theme at Love To Scrap Challenge Blog (LTSCB) is...Anything Goes. I’ve been working on these super cute Halloween embellishments/tags.

I used a Christmas gnome stamp set to create these Halloween themed gnomes. All I did was color them in Halloween colors. Gnomes are so popular right now and I can see why. They are so adorable!

Each gnome was colored with alcohol markers and details were added with glitter pens, white & black markers. Boo was stamped with an old alphabet stamp set that I haven’t used in a long time.

I used two different pumpkin stamps and a bat & 2.75” circle punch to put these tags all together.

The gnomes are popped up using 3D foam adhesive the rest are adhered flat to the circle base. I made these for a Halloween swap with some fellow stampers. Aren’t they fun!?!

Photo of the supplies:

Close Up of just the gnomes!

Now it's your turn. Create a stamped project - any project - with the Anything Goes theme and link it to the LTSCB site. Have fun!