Wednesday, September 29, 2021

Using Just Cardstock; CTMH Challenge

I made this card for the Heart 2 Heart CTMH challenge site.  I was gifted a die cut machine recently-thanks Karen-so I wanted to test out these these stacking floral dies that I've held onto for a long time.  I won them years ago and kept them even though I didn't have the machine to use them. Anyhow I used two shades of “red” cardstock for this card. Each piece has a different shade on the other side so I was able to get four shades of "red". This is the same with the green. Awhile ago, Close To My Heart had some shades of cardstock in packs and I grabbed quite a few of them!  

Isn’t this cute?!? And so simple 


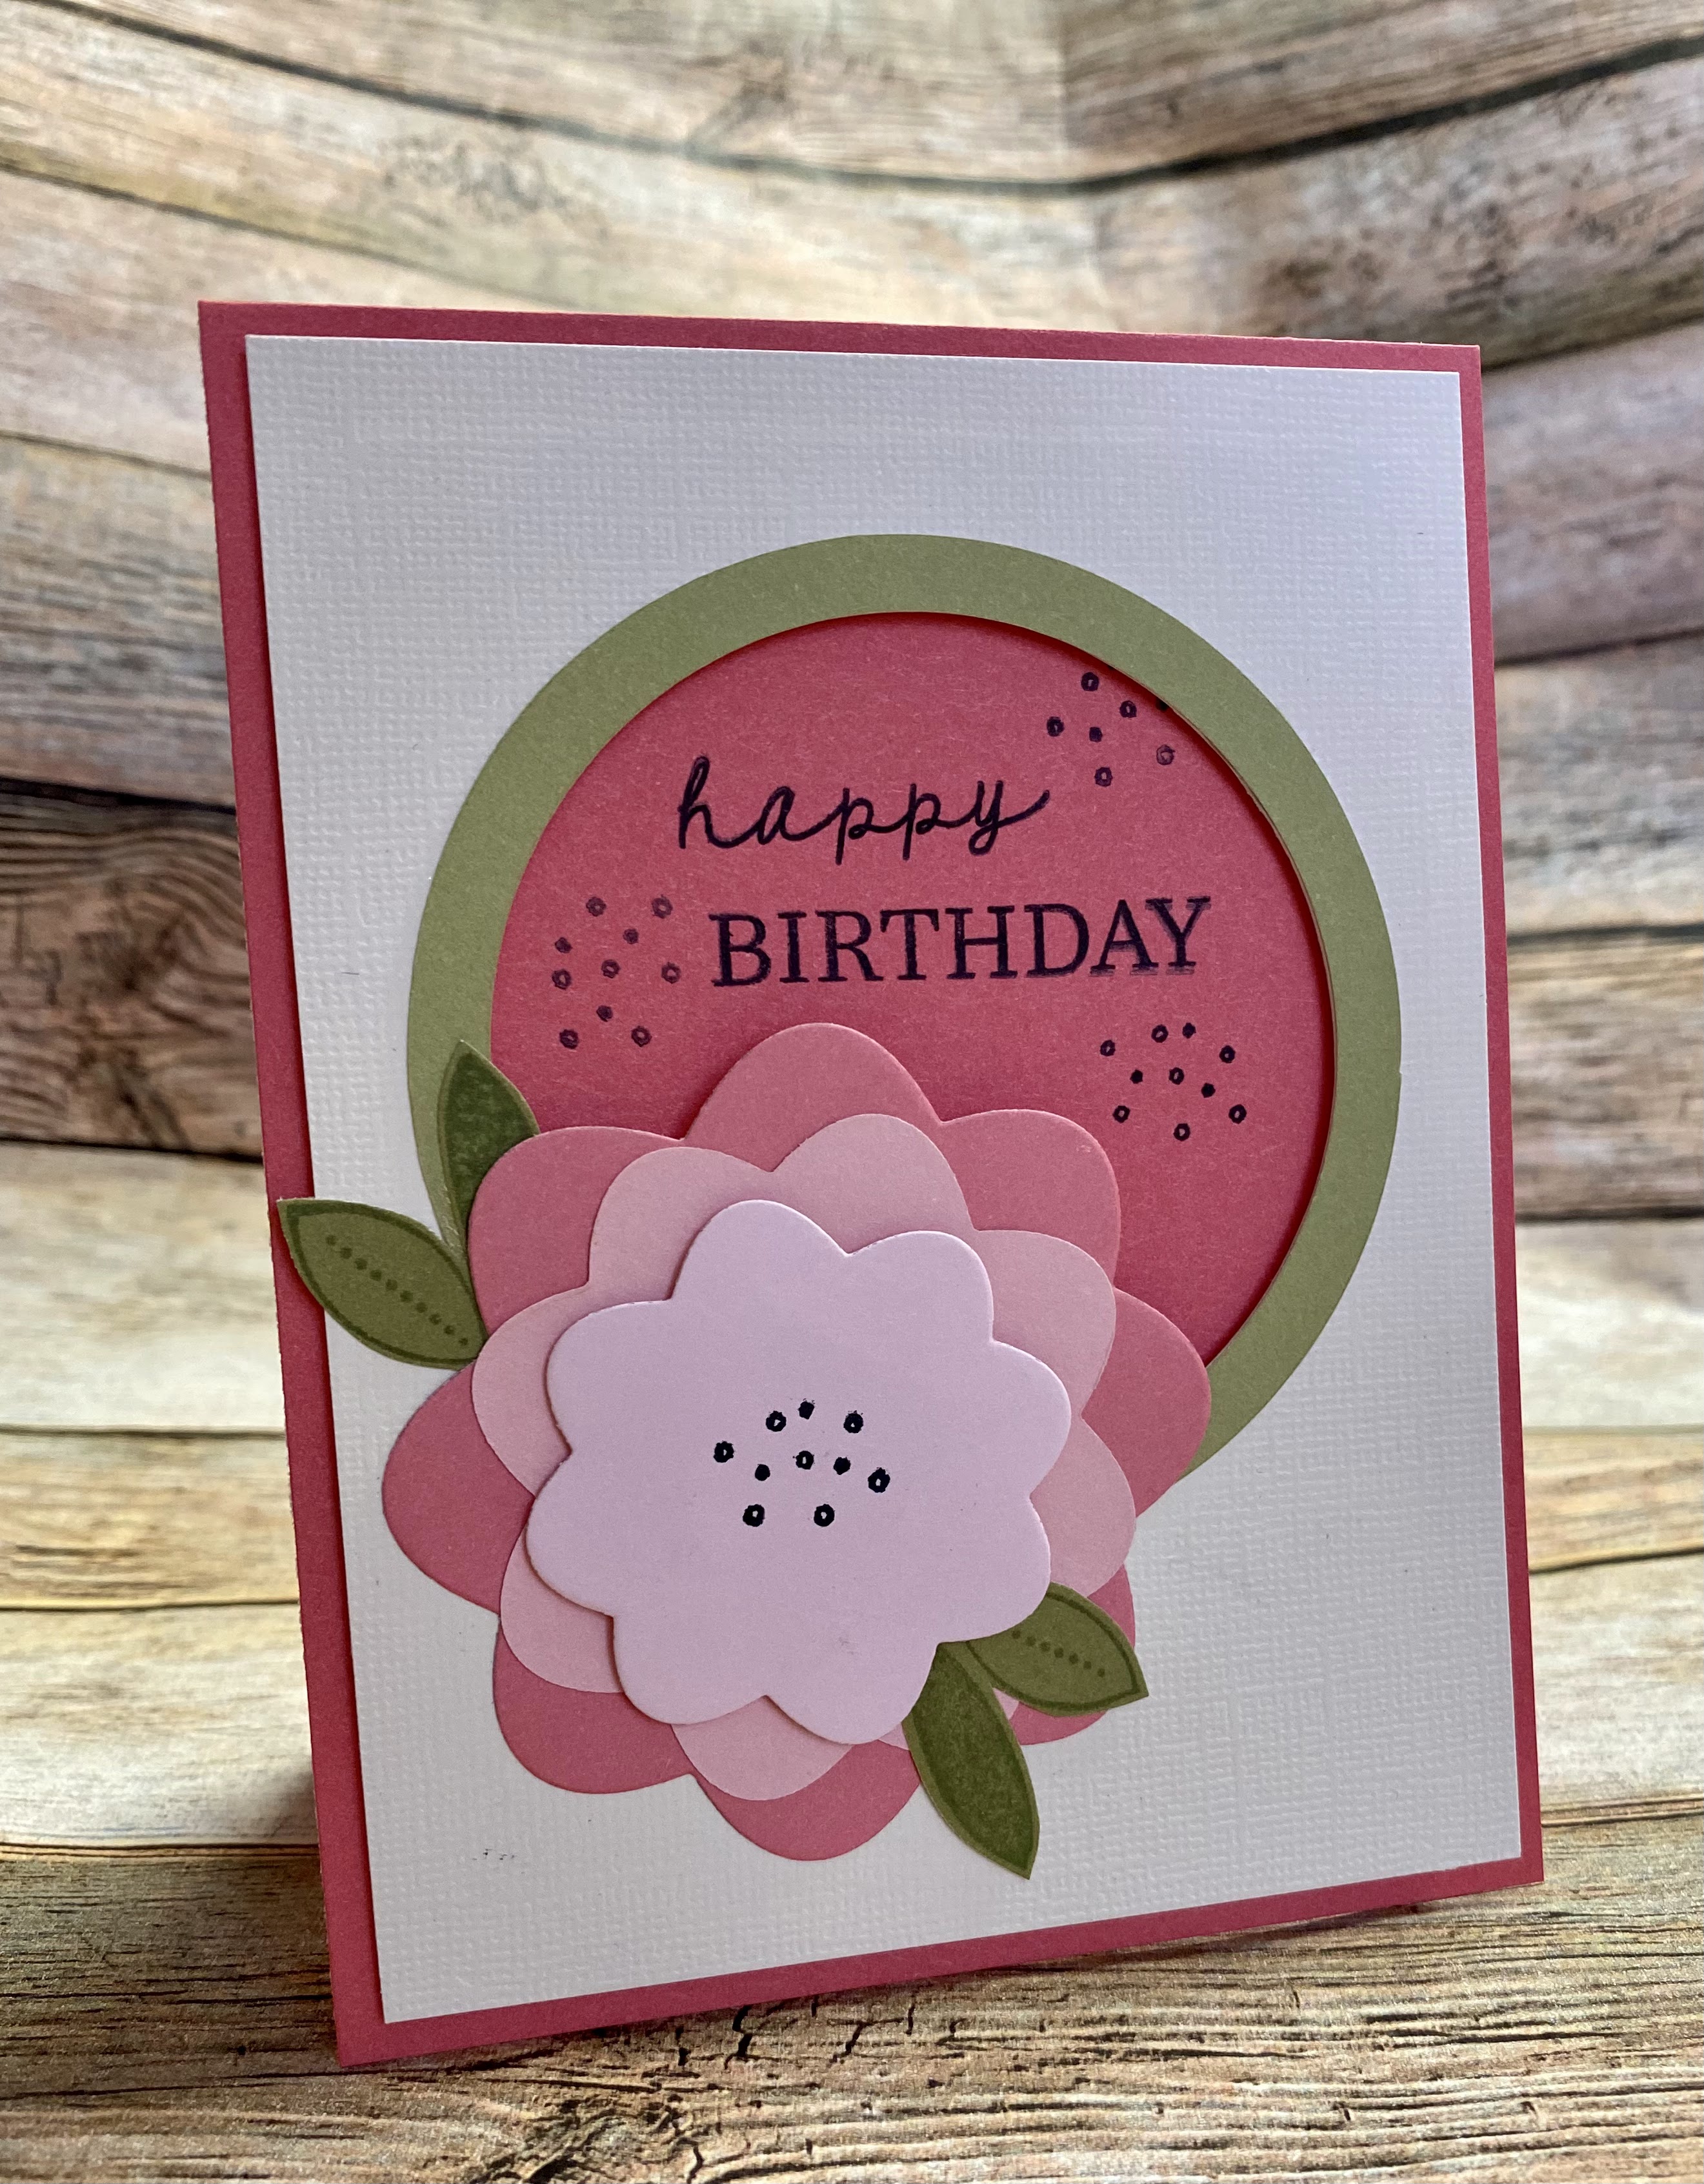
All products are from CTMH with the exception of the cream paper and leaf stamp.

The sentiment and dots stamps are from one of the monthly stamps. You can get these stamps for $5 if you spend $50 or free if you are a VIP - which I am.

Be sure to check out the Heart 2 Heart challenge site especially if you use CTMH products!

Tuesday, September 28, 2021

Stamp-tember Card #9; Faux Watercolor

Only one more card after this one to complete my Stamp-tember Series 2021. If you haven't noticed already, each card has used wooden block stamps from my floral collection and a new technique.
 
For this card, I used a faux watercolor technique which basically means I spritzed the inked stamps with water before I stamped on the cardstock base. The stamps that I used were perfect for this technique and the sponged colors that I added, really made them stand out! Be sure to check out the process video below:

After I created the card front, I decided to make this card an easel card. I'm making all these cool cards in my Monthly Card Kit and decided to chose one of those card types.


The addition of the rhinestones and triple tied bow on the top make it so much prettier and I can't wait to send it out!

Products Used:
Ink Pads by SU!:  Wild Wasabi, Groovy Guava, Tangerine Tango and Purely Pomegranate
Colored cardstock, Groovy Guava, also from SU!
Rhinestones from Queen & Co.
Twine from FSJ
Stamps are all from Stampin Up!

Monday, September 27, 2021

BBTB2; Witches & Ghouls


There's a fun new challenge on the Bitten By The Bug 2 Cricut challenge site. I'm normally not much of a Halloween gal except for cutsie Halloween. I love the pink & orange Halloween color scheme that seems to be the thing this year and it's perfect when you have two granddaughters! But my project sticks with the traditional orange & black combo.

This is how it started...


I used Witch Gnome and Without This I Would Scare People from Design Space. Both free as a Cricut Access subscriber!

As an afterthought, I probably should have used white for the witch gnome since the bag is a dark gray, but she's still cute...I mean scary!

I gotta tell ya, ironing HTV onto felt was hard. I don't know if it was the felt or the bulkiness of the bag, but it took awhile before it stuck.

Now it's your turn, create a project using your Cricut and link it to the BBTB2 site before the challenge ends. 

Sunday, September 26, 2021

Stamp-tember Series Card #8; Masked Area

As you know, I started my own Stamp-tember Series this year and my goal is to use older wooden block stamps with techniques I haven't used in a long time.

I think I've been pretty successful so far. If you haven't seen all the posts and videos yet, I recommend that you do. I'm having a lot of fun with this series.

This card I used painter's tape to mask off an area on the cardstock base to make this a one layer card. Check out the process video below. 

I had to redo the stamping/inking on another piece of white cardstock since the painters tape peeled off some of the cardstock. So the second time, I rubbed the tape along my arm to take away some of the stickiness and that made a huge difference!

Check out the card here:

And a second card I made using the oops of the first try:

I love them both! Very simple but so very pretty!

Products I used:
Ink Pads from FSJ:  Electric Lime and Orange Rage
Cardstock from FSJ:  Outrageous Pink
Stamps are older stamps from SU!
Black Licorice Color Silk and Black Twine also from FSJ


Friday, September 24, 2021

Stamp-tember Card #7; Masking & Mixed Media

For this Stamp-tember card #7, I used the masking technique which turned into a mixed media card! It  took a whole different turn and I kept working on it and working on it until it became something that I liked. You'll see all the steps in the process video below.

I hope this is a good lesson...lol...keep at it until it becomes something you love!


What do you think? Do you like it? I sure to!

Products Used:
Stamp Set; Stampin Up!
Ink pads from SU!: YoYo Yellow, Lavender Lace, Pink Passion, Melon Mambo, Green Galore
Silver metallic ink pad
White fine point POSCA pen
Black fine tip gel pen
Tombow watercolor markers
Finger sponge daubers
Recollections glitter glues
Black licorice Color Silk from FSJ


TGIF; Thankful Friday #195


Happy Thankful Friday! What am I thankful for this week? I'm thankful for my friends and family that support my crafty habit/hobby/business...I'm not sure what I call it, but it's nice when I get positive feedback on items that I'm creating.

I love being creative - it sure does keep me busy - and I love creating for all of them.

What are you thankful for today? Leave me a comment below!


I made both these shirts for my granddaughters! Aren't they such cuties!!

Wednesday, September 22, 2021

Stamp-tember #6; Baby Wipe Technique

Card #6 of the Stamp-tember series. I originally was going to stop at five, but I'm having so much fun! My hope is to complete ten projects - one new one every other day!

For this card, I used the baby wipe technique. Basically making my own ink pad by using stacked baby wipes & some re-inkers. The stamp that I used for this card is another one that I've had for a long time but only used a couple of times. I remember when I bought it - I loved it so much but I just wasn't sure how to use it. It's pretty large & solid! This technique is perfect to get some color variation.
Check out the video here:

More photos!


I combined the baby wipe technique with a 3D effect. Making my own 3D image by cutting parts of the image. 

This might be my favorite so far in the series. I didn't expect it to be so awesome! And if you view the video, you can see that I was able to create many other projects using my baby wipe ink pad.

Products Used:
Re-inkers from SU!; Melon Mambo, Blackberry Bliss, Rich Razzleberry, Old Olive and the yellow (I'm sure it has some fun name, but I couldn't read the label).
Re-inkers from my stash: Gold and Hot Pink
Sentiment Stamp from the Flowers For You monthly stamp set from CTMH
Embossing Folder
Flat Back Pearls
Black Licorice Color Silk from FSJ
Cardstock from my stash

And by the way, I am keeping these stamps!

Monday, September 20, 2021

Stamp-tember Project #5

It's September 20th and I'm continuing my Stamp-tember series. I'm not sure how long I'm going to continue, but I'm having a lot of fun pulling out my older stamps & doing techniques I haven't done in a long time!

You'll see at the beginning of the video, a pile of floral stamps I am unsure whether or not to keep or donate. For this card, I used two of the stamps from this pile to create cute and simple cards by coloring them in using alcohol markers.

Even though I didn't film the actual coloring process (thought I clicked video but instead took a photo), I kept the video so I could talk about it. 


Card #1: I used two shades of alcohol markers for the pot and flowers. I accented the flowers with a white gel pen. The base was created by using a gray alcohol marker and marks using a black fine tip pen. I love the lines & dots on this part! I used washi tape and a cut out look with the patterned paper.


Card #2: I used three shades of alcohol markers for the tulips & leaves and a blue/gray for the shading I added to the right of each image. I used a black fine tip marker for the dots above the flowers. Fun patterned paper, silver thread and some enamel dots finish the card front.

In case you're wondering...I decided to keep these two stamps!

Saturday, September 18, 2021

Stamp-tember Project #4

I am so happy I decided to pull out the ol' wooden-block stamps. Many of these have years on them and they are over 15 years old! I really need to go through my "floral" drawer and Bash the Stash!

This fourth project was created by using the stamping technique, Rock & Roll. Basically, you want a full solid image (that's why I used a circle stamp) and then rock the stamp on the ink pad to get most of the ink around the outside edges.
Check out the video - some circles came out better than others, but you can certainly see the technique.

Once I stamped the circles, I chose a random floral image and stamped it over them; wrapped yarn around it; splattered some silver ink and then adhered a sentiment.

I love how it turned out - great for a masculine card, even with the flowers.

This is the fourth card of my Stamp-tember series. I hope you've been following along on YouTube and the blog. I'll also post these on my IG account.

Products Used:
Ink Pads from SU!; Night of Navy, Marina Mist, Pacific Point, Soft Sky
Sentiment from FSJ Remarkable You
Floral & circle stamp from SU!
Twine from my stash
Silver Color Silk splash from FSJ

Friday, September 17, 2021

TGIF; Thankful Friday #194

Happy Thankful Friday! This week I'm thankful for the MicroSoft Office course I'm currently taking. All these years of using MicroSoft Office, I have never attended a class. Most of the information, I already know since I have a basic+ knowledge of it, but I'm learning so much in Excel right now that it's pretty exciting!

I know...nerd moment...but learning new things is so fun! So thanks to my instructor and all things Office.

What are you thankful for this week? Please share in the comments!


Thursday, September 16, 2021

Stamp-tember Project #3

Happy Stamp-tember! I'm seeing lots of stamping companies promoting this new holiday during the month of September so I thought I'd do some extra stamping this month too! Check out my process videos on YouTube!

I'm pulling out some old wood-block stamp sets and stamping techniques for these projects. How fun to just play & stamp!

For this project, I'm using the generation stamping technique; well at least it started that way...the ink pad I used is also an oldie. I had many of these ink pads since the early 2000's! But they still have some ink but not much for this particular technique.

The card is simple and I love the yellow & black color combination. It's an old technique but with the ink splatters & fun patterned papers, it sure does look modern!

What do you think? Do you agree?


Products Used:
Flower stamp set by Stampin' Up
Ink Sahara Sand by Stampin' Up
Black twine by FSJ (Spellbinders)
Color splash in black & yellow by FSJ (Spellbinders)
Papers from my stash
Sentiment from FSJ (Spellbinder) Special Lady

Wednesday, September 15, 2021

Sketch n Scrap Layout Sketch #233

Boy, do I love sketches! This is another great sketch on the Sketch n Scrap challenge blog. Be sure to click on over for this sketch and others. Each month there are two card sketches and two layout sketches - all are fantastic!

The sketch I'm working on is sketch #233:
And my layout:
Close Ups:

Isn't this a fun layout! I love that yellow patterned paper background and those sushi embellishments cut from my Cricut.

It sure seems like we had a lot of sushi in February - good thing we got our fill since everything closed down shortly after.

Now it's your turn. Go to the SNS site for sketches and link up your own layouts!


Tuesday, September 14, 2021

Stamp-tember Project #2


I'm stamping away during the Stamp-tember holiday! For this project, I pulled out another wooden-block stamp set from the early 2000's and worked on the ghost technique. I love how my patterned paper turned out and the cards are fabulous!

Check out the process video:


See the cards:


Products Used:
Floral Stamp Set by Stampin' Up
All Ink Pads from Close To My Heart; White Daisy, Cotton Candy, Honey, Indian Corn Blue and Olive
Black archival ink pad
Lace stickers from the Dollar Tree
Sentiments: Hey Y'all from CTMH and Feel Goods from Stampin' Up

Card #1: I cut a 4 x 5.35" panel from the patterned paper I made, added a scrap piece of black cardstock & then that fabulous lace sticker! After stamping the sentiment, I added some flat-backed pearls.
Card #2: I cut out a rectangle to make a frame out of the patterned paper for the second card and then used 3D adhesive to pop it up from the card base. I added some clear yellow enamel dots too!
 

Monday, September 13, 2021

BBTB2; Celebrating Grandparents


It's my turn to host the current challenge at the Bitten By The Bug 2 (BBTB2) Cricut challenge site and I have chosen the theme as...Celebrating Grandparents!

I know Grandparents Day was officially September 12th, but we can still show off those projects that were made to celebrate grandma and/or grandpa!

This year, I decided to make these color changing cups for my mom, myself and my granddaughters' other grandma - sorry guys, no grandpa gifts this year!

I purchased the circle image & words from Design Bundles (Keychain Bundle) and the hearts wrap was a freebie from the Ambitious Crafter Company, but you could just cut out a variety of types & sizes of hearts. Since I used a variety of colors for the hearts and I wanted to use scraps, I cut the hearts separately and not in a wrap form. I adhered them to the cup randomly. They are hard to see, but there are also little tiny circles/dots all over too.


I love how they turned out! I used scraps of two different pinks, black, white and holographic red vinyls.

Now it's your turn, create something to celebrate grandparents and link it to the BBTB2 challenge site and please let us know how you used your Cricut.


Sunday, September 12, 2021

Happy Stamp-tember Kick Off


So apparently there's a thing called Stamp-tember. (I've also heard of Scrap-tember, but that's a whole other thing - maybe next year!). Oh, us crafters sure do love to make up occasions, huh?!? LOL

Well I decided to jump all over this "holiday" and pull out my older wooden block stamp sets & revisit techniques I haven't done in a long time.

Here's the card I created during the process YouTube video:


For my the Kick Off project, I used a two part stamp. Boy, you sure do realize how important the MISTI is when you're trying to line up stamps, but I think I did a good job. In fact, my "mistake" ended up making a pretty fabulous card! Be sure to check out the process video here:

What I did:
After realizing I did not get a solid stamped image, I decided to pull out my watercolor pencils and add some shading & dimension to the stamped flowers. I LOVE how this ended up and really did update the look of these petals & leaves. Adding the color splashes really made it pop too.

I used a piece of a gel print on the card front as well. Although the stamped image is pretty basic, the addition of the shading & gel print really made it artsy! Don't you agree?!?

Products Used:
Tulip stamp set by Stampin' Up (from the early 2000's)
Ink Pads:  Mellow Moss and Pale Plum from SU!
Watercolor Pencils by Close To My Heart
Waterbrush
Color Silk in Black Licorice and Gold from FSJ (now Spellbinders)
Gold thread (purchased from JoAnne's Fabric Store)
Purple flat-back pearls from Queen & Co.
Sentiment from Altenew
Cardstock, patterned paper and gel print papers are from my stash

Stay tuned for more Stamp-tember fun! I'll post a new YouTube video and blog post every other day during September.


Friday, September 10, 2021

TGIF; Thankful Friday #193


Don't you love a short week! Starting the work week on a Tuesday is always nice. This week I'm thankful for our local Veterinarian. Our dog, Gracie had to get a stye removed from her eye and a large "wart" removed from one of her paws. 

I don't know why, but I was so worried over how she'd react. She's not a very social dog and I kept thinking she'd be scared in the office while waiting for us to get her. Of course she was fine!

I'm thankful for our vet since they found two other "warts" on different areas on her body and after getting approval from us, they removed them for free. They took such good care of her and you can tell they love animals. It's comforting to know that when you leave your pet, she'll be in good hands!
Gracie's home now and was super hungry & thirsty but she's doing fine.

Wednesday, September 8, 2021

JJ; Love Where You Are

Inspiration is everywhere but I rarely take action when I see it. I saw an ad in an AARP magazine for Portugal. Nah, I'm not going there any time soon, but I loved the photo so much I decided to use it as inspiration for my latest Junk Journal entry.

The inspiration ad:

Here's the completed spread:


Check out the YouTube process video here:

Products I used:
Acrylic Paints in white, yellow, honey yellow, tan, blue, green, tan, silver/gray, hot rod red (I use a variety of inexpensive acrylic paints usually purchased at Walmart - no need for expensive paints here)
Black Stabilo pencil
Black S-Gel Sharpie pen 0.7 tip
Posca white paint pen
Beach Ball Blue Color Silk (Fun Stampers Journey/Spellbinders)

Tools:
Bubblewrap, Q-tips, Old Starbucks gift card and my all time favorite...my fingers!