Friday, March 29, 2024

Snackle Box?

Snackle boxes. Have you heard such a thing? I saw these boxes for $1 at Target and grabbed three! One for each of my granddaughters for Easter. It says they are food safe but dry food only. I plan on putting parchment paper in some of the compartments for the salami and cheese.

I went a little nuts on St Patricks Day so I’m keeping it simple for Easter this year. I plan on filling these up with snacks and then wrapping with ribbon.


Check out the quick video showing how I added their names using vinyl and the Cricut!

These will be perfect for games and road trips too!


Watch this short to see how I filled them THIS


TGIF; Thankful Friday #311


Oh another Friday to be thankful! This week I'm thankful for the new floors that are arriving at our home. We're pulling out the old stained carpet and replacing with new tile (entryway), new Pergo laminate (front room) and new carpet (family room).

A whole new look for our downstairs floors! I'm thankful that we can afford to do it and that we're finally taking care of it!


What are you thankful for this week?

Thursday, March 28, 2024

Joy Layout


This layout was a little tough to create because it brought up so many feelings. I remember this moment and how sentimental we all got. This photo reminds us how my son was in life - fully aware of his emotions and completely fine with showing them.

The layout started with one goal...use as much of this collection as possible. There’s only a little bit left and I didn’t want to hold onto it any more.


I chose to use the pocket insert sheet as the base of the layout and then I used as many of the scraps as possible. The bottom right corner was covered with a tag (that's part of the collection) and that's where the word "JOY" came in.

I handcut and embellished the holly leaves & berries and I stamped the word 'joy' using all sorts of different stamps from my stash.

The idea of multiple stamping was a complete afterthought and one I am so happy with! Check out the YouTube process video to see how it all comes together.


Product Line:  Theresa Collins Candy Cane Lane

Monday, March 25, 2024

Card Making Frenzy Round Two


Hey there, I just want to brag a little...I made an additional NINE cards using stuff on my desktop. You know all those scraps of paper or little items that didn't quite make it on the original project? Well, I decided to make cards using only what's on my desk.


I still have lots of random scraps & supplies left on my desk but now they are more organized. I may have to do a Round Three. I'm always happy to challenge myself and some of these were surely a challenge.


The YouTube video does not show how I made all the cards, but you can see the process on four of them and of course if you have any questions, please leave a comment.


Card One: Rectangles are 1.75x2.5 and then cut diagonally
Card Three: White mat is 4x5.25; Green 3.75x5 and the strips are 
Card Four:  Cut two sets of four 1.25" squares plus one extra.

Raggedy Ann & Pumpkin Spice cards:  Rectangles are 2.5x3.75 and cut diagonally (check out THIS post for more details) As a matter of fact, this card is why I have these scraps on my desk!


Friday, March 22, 2024

TGIF; Thankful Friday #310


It's Friday! YAY! Are you thankful? Yes, me too. But I'm also thankful for the wonderful spring weather we've had all week.

I think it's supposed to get cold again but that's ok. We had a peek and it was nice! 

I was able to get in the garden this week and surprised to see this little guy sprout up. Honestly, when I saw it growing, I thought it was a weed. I'm so glad I decided to wait a little bit before plucking it because it is certainly NOT a weed!


What are you thankful for this week? Share in the comments.


Adding a Cricut Title to a Layout

Check out the YouTube process video showing how I added a title to a layout. Although the title changed from the time I created the title in Design Space to the layout, the idea is the same.


I'm getting close to finishing the wedding album and can't wait to share it with my nephew & new niece!


Reminder:  I started this album project by making lots of base pages so when the photos were ready, all I had to do was add photos and embellishments. This was such a huge timesaver and I did the same process when making wedding albums for my two sons.

I gathered all things Navy, Orange and Gold and placed them in one 12x12 container. It also helped with the construction of the layouts by having 'all the things' in one place.


Wednesday, March 20, 2024

I Love Lucy; Sketch n Scrap Sketch #262


I am so excited to show off this card using a stamp set from Scrappy Boys and a sketch from Sketch n Scrap

I'm using sketch #262 but I decided to turn it to it's side and make a vertical card instead.


Here's the card:


and the inside:

Oh my gosh! This cracks me up! I'm not a big wine drinker but how perfect is this for a wine loving friend?!

I colored the Lucy image with alcohol markers and used foam adhesive to pop her up on the card front. I'm showing my age, but do you remember the hilarious episode when Lucy was stomping the grapes? I love this stamp set and can't wait to make more cards using these Lucy images as well as the great sentiments.

Can I tell you a secret??? I didn't originally plan on stamping the grapes on the inside of the card. I smudged some ink in that lefthand corner so I needed to cover it up. Check out the YouTube video for another oops and how I fixed it.


Be sure to click over to the Sketch n Scrap blog for all the sketches and challenges - they're also on Facebook!

Products:
Stamp Set:  Chocolate Wine and Best Friends stamp set by Scrappy Boys
Patterned Paper:  6x6 paper pad Brilliant Life by Refined; ivory/gold scraps from my scrap pile


Tuesday, March 19, 2024

Rock Painting

My nephew called to let me know that he liberated a rock today and I thought that was so funny. I know this is something that shouldn't be done at someone's private residence and probably not even in nature, but you know what...I did it anyway. I liberated a rock while on an afternoon walk out in the fields by my work.

The rock is a little larger than the size of my palm and it's perfect to add to my garden. 

Just so you know...I'm not normally a person who can grow things. I do not have a green thumb. If anything, I have the complete opposite effect in my garden. HA! I'm not even sure I should call it a garden, but every year, I try again.

Last year I was determined to cultivate a corner in our backyard as a memorial area to our son. I added two trellises, a windchime and a nice little border fence. You know what...plants are growing! In fact, they are thriving! This makes me so happy!

You may recall the garden bricks that my daughter and I made last year (you can see the post HERE) but I also want to put this painted rock around there since I painted it for my son who loved Batman.

I know it's wonky and definitely not perfect but I love it!

I placed it in the bird bath for now until I find a better place. (The side is cracked so it doesn't hold water anymore - thinking about adding succulents???)

Although it's basically just me painting a rock, you can check out the YouTube video to see what I did with the leftover paint. Never waste art medium :).


Sunday, March 17, 2024

Easter Chick Cake Topper; Printable Cuttable Creatables


When I saw the Easter Chicks cut file E596 on the Printable Cuttable Creatables website, I knew I needed to do something with it. These little chickies are so adorable! I decided to make a cake topper for Easter. After designing the topper in Design Space, I cut all the pieces and started assembling them. 

I love to use a lot of foam adhesive for dimension on my cake toppers as shown here.


Before adding the chicks to the banner base, I needed to decide which were going to be adhered flat and which were going to have more dimension.


I added a stamped "Happy Easter" sentiment to the banner to add more color and of course wish everyone a Happy Easter!

Close Up:

Back:

And final project:


Check out the short YT video on how I put this quick cake topper together. 


Be sure to click on over to the Printable Cuttable Creatables site to purchase this and more cut files. If you do, use 3SONS15 to get 15% off your order. Now that's a great deal!

And if you're looking for inspiration, check out the BLOG.


Friday, March 15, 2024

TGIF; Thankful Friday #309


Thank you Friday! It's been a busy week and I'm glad for the upcoming weekend! What am I thankful for this week? I'm thankful for coworkers who have become friends. 

Cristina loves my spaghetti. I mean LOVES my spaghetti. Folks, I do not do anything special with my semi-homemade spaghetti but it is surely a compliment. Everytime I make some, I always set some aside for her and surprise her with it the next day.

Well, she knows I love chicken mole and everytime she makes it for her family, she returns my container with chicken mole & rice.

It's a fun exchange and one that I am going to miss. This week she brought me some. I should have taken a picture, but I was so excited to eat it that I thought of it after I ate it. :)

So that's what I'm thankful for...coworkers who have become friends AND chicken mole!

What about you? What are you thankful for this week?

Sketch n Scrap Layout Sketch #293


Normally, I like to say that I'm a scrapbooker who makes cards but lately I've really been more of a cardmaker that sometimes scrapbooks. I guess there's no surprise that I'm behind in my scrapbooking!


Well, to help get started with creating a layout, I love using sketches. This sketch from Sketch n Scrap was perfect for some selfies of my oldest granddaughter. I must have left my phone unattended because when I checked my photos later, I saw these silly photos of her.

She's probably going to hate this layout but hey, that's the price you pay when taking selfies on grandma's phone. Especially when you know she's a scrapbooker!


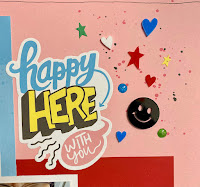
I used a paper & sticker pack from Close To My Heart called Wet Paint. It's so fun for a preteen/teenage vibe. Adding pink as the cardstock base really gave this a feminine look and helped coordinate it to her shirt.

I cut the blue vertical strip at 4.5x11 and the heart graffiti strip at 3.5x11. As you can see in the YouTube process video, the black/white checked paper is .75" and about 8" long but I did some magic to extend that piece. Here are some closeups of the two embellishment clusters:


The acrylic pieces were part of the Wet Paint collection and add some cool dimension. I added pink and black splatter all over the layout as well as some bright enamel dots. So fun!

Check out the video:


Be sure to check out the Sketch n Scrap Blog for all the sketches and inspiration. There's also a Facebook page if you prefer that.

NOTE: It's going to be interesting to learn more about the future of CTMH products, etc. I've been hearing rumors but not sure of what is true or not. I guess I'll wait and see. Either way, I'm a fan of Stampin Up! as well so...win-win for me.

Tuesday, March 12, 2024

Card Making Frenzy Round One

As you may or may not know, we've been giving the Command Center an updo. It looks so good and organized. There is still more to go but there is such a huge difference already and it's pretty exciting. 


Well, as we're in clean up and organize mode, I gathered all the miscellaneous items on my desktop and placed them in containers to bundle 'like' products. I gotta tell ya, there is a lot of junk on my desk! I decided to create cards using only what's on my desk.


This is Round One since I got tired after six cards. I filmed three of them on this YouTube video and THIS one that was posted earlier.


Here are more of photos of some of the cards:


I can't really say where I got the items since they've been on my desk for so long, and the focal point images were either created earlier by me or received in a swap. I can tell you that these two lady stamps are from Unity Stamps. I have about five different ladies and I love them all!


Be sure to come back for Round Two! I have plenty of supplies for lots of cards!


Friday, March 8, 2024

Final Touches; Wedding Layouts

I don't know about you but when I attend a crop, I usually focus on getting photos on the page and other big items. And when I get home, I cut out my titles and add smaller details. Well, I don't always do this but when I don't have all the 'stuff' with me, this is always my plan.

I did just that when I attended the last crop. I put together 5 two-page spreads of the wedding album I'm working on and this post focuses on completing them.

I'm almost done with the wedding album and cannot wait to gift it to my nephew and niece. We're having a family gathering in April so I hope I'll be done by then.

The left side of this two pager was shown before. I used a cut file from Printable Cuttable Creatables for the champagne glasses and Cricut Design Space for the "cheers". I finished the right side of the spread during the crop.


Check out the flip through YouTube layout as well as putting on the finishing touches on one of them:


They'll be more videos coming soon!


TGIF; Thankful Friday #308


Friday! You're here! I'm going to be honest, I didn't even realize it was Friday when I woke up this morning. The week went by so fast for me. I love that!

So this week #308, I am thankful for being busy. Not too busy but busy enough to not realize it's Friday.

What are you thankful for this week? Please share below.

Tuesday, March 5, 2024

Easter Chick Treat Boxes; PCC


Spring is in the air which means Easter is right around the corner. I’m so excited to show off what I made using the Easter Chick Treat Box D085 cut file from Printable Cuttable Creatables.  These little treat boxes are so adorable and so easy to make.

Follow the instructions with the cut file because you do have to make changes to the cut/score lines before clicking the MAKE button on your Cricut.  Once this is completed, cut out all the pieces and place them in groups on your work table to keep them in order. 

Fold the box at the score lines and assemble. 


I have to say, not only do I love these because they are so adorable, but you don’t even need adhesive for the boxes!  Yes, you read that correctly.  The notches on the boxes fit into the slits on the sides and since they curve down, they lock together. No need for adhesive but of course you can add some if you prefer. 

Adhere the three pieces for the chick head before placing all the other pieces on the box.  The black piece is sandwiched between the two yellow head pieces. 


What another great design feature!  The chick has a finished look whether you are looking at the front or the back!

You can really tell from the side view that I used foam adhesive on the outside of the chick wings to give it some dimension.


And can we just sit for a moment and admire the marbled teal paper?  Perfect for Easter eggs, right?

I cannot wait to fill these with goodies for my granddaughters’ Easter baskets and I may even make more for my coworkers.

Be sure to use the 3SONS15 for a 15% discount on your orders on the Printable Cuttable Creatables website.

Saturday, March 2, 2024

Desert is Calling Layout

If you're like me, you have a love/hate relationship with beautiful patterned papers. This is definitely true of the Prima Marketing Golden Desert collection. I LOVE it so much and I HATE to use it and cover any of it!

Once I decided I was going to cut into the paper, I took a deep breath and went for it! The combination of the cactus papers with blue & a little pink solid cardstock is so beautiful and then I added the beautiful photos. Whoa! This might be one of my favorite pages.


I bought the puffy stickers from this line much later than when I first purchased the papers and I'm so glad I did. They coordinate perfectly and give this page some fun details and dimension.


I love how I used journaling strips to the 4x6 pocket card and how I used the smaller pocket cards for another journaling block and to embellishment the page. 

Be sure to check out the YouTube process video:


FUN FACT: My son, who is in the photos, is 6'5 and you'd never know that he's so tall when standing next to the saguaro. Really gives these huge cacti some perspective!