Tuesday, May 30, 2023

Mass Produced Thank You Cards

I had the need to make a lot of Thank You cards so I decided to mass produce them.  The first thing I did was select the stamped image and which Thank You stamp to use. This was actually pretty easy because I already had an idea of what the cards would look like.

Once the image was stamped (14 in all), I added the inside sentiment in each card base. I cut patterned papers down to fit the card front and also stamped the Thank You sentiment on the lower left side.


A variety of alcohol markers were used to color in the bird images. I colored four at a time.


It sure does save time when you do this assembly line style. Here are most of the cards. 


Check out the process video:


Patterned Paper is from Farmhouse Paper Company 
Neutral Twine, Clear Glitter Marker from my stash


Tuesday, May 23, 2023

Cake Topper; CCS Design Team Project


I had a last minute request for a cake topper and of course I jumped at the chance. I think cake toppers are my favorite party decor to make! This month is the first of my daughter's friend group to turn 30 this year. I can't believe it!

Here's the completed topper:


Once I selected the font and found this fun skull balloon from Cricut Design Space, it was just a matter of arranging them and then cutting the pieces out using cardstock from CutCardStock.  


As you can tell, I kept the colors simple by using Black, Textured Wedding Cake White and Curious Metallic Lustre cardstocks. I also used lots of foam adhesive to give the layers some height.


If you love making projects with paper, you must check out the CutCardStock blog. The DT has such a great variety of paper projects to inspire you.

Here’s a picture of the topper on the store bought cake. My daughter added some black flowers.


Check out this quick YouTube process video:


Monday, May 15, 2023

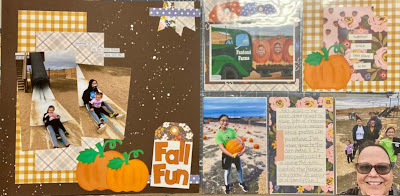
SNS Sketch #273; Fall Fun


I love this simple sketch from Sketch n Scrap.  Sketch n Scrap is celebrating their 11th birthday this month and there's lots of fun going on over there! Be sure to check out the Sketch n Scrap FB page and also the blog.


This simple sketch was easy to work with and I had fun creating a companion page to the pocket pages that I created earlier. Sorry for the glare. It's so hard to take a photo when there's a pocket sleeve involved! (you can check out the process video for the pocket page HERE)


Check out how I turned some scrap pieces to mimic a longer strip of paper and how I turned the drab to fab with a little splatter. The yellow plaid is 10.5x4" and the pink plaid is 4x...that's the secret :).


Once you see my layout and the process video, create your own layout and be sure to post it at the SNS site and/or Facebook.

Products Used:
  • Splatter is from Dina Wakely mixed media collection and well worth it!
  • The pumpkins and title are cut using my Cricut.
  • The small quotes are from Ranger.
  • Paper scraps from the Simple Stories Cozy Days papers that were used with the pocket page. I love all the patterns and pink/mustard yellow combination! 


Friday, May 12, 2023

TGIF; Thankful Friday #270

Happy Friday and Happy Thankful Friday! It's been another nutty week with scheduled and unscheduled hospital visits & stays. I don't know if this is necessarily something to be thankful for, but I wanted to share an experience I had on Wednesday night.


I stayed at the Queen Ann Hotel in San Francisco since my son was admitted to the hospital. I was in the room by myself but sometime in the middle of the night, I heard and felt someone in my room. Eventually this 'person', layed on top of me in a cuddle/hug type of way. Nothing sinister or scary, just freaked me out because I knew I was in the room alone. After reaching down and pushing this 'person' away, I completely woke up and prayed...hard! 

I fell right back to sleep and the next morning I told my hubby the story. WTH!

When I arrived at the hospital, I decided to search for any ghost encounters at that hotel. Yup...one of the most haunted hotels in SF.


Search for it...it's an interesting read. I was definitely comforted by Miss Mary and I certainly needed it. 

Pretty wild, huh? By the way, DS1 is doing ok. They kept him to regulate his pain and calcium level. He's already doing better.

What are you thankful for this week? Leave a comment!
 

Tuesday, May 9, 2023

International Scrapbook Day Challenge


It was International Scrapbooking Day over the weekend so my daughter and I decided to create a challenge for ourselves. We went through and found three different sketches and chose one. We both made the final decision to select this one because we felt the circles would be a challenge.


Then, we asked my son to give us two nouns and a color. He chose, James Brown, animals, and black. What the heck!?! Yes, this is definitely a challenge! 


I loved the way my layout turned out. I don't know why I don't use black as the layout base more often. It sure did make those pinks & greens pop! 

Check out the YouTube process video here:


I love it when I pull random stickers & embellishments from my stash. This was surely a fun page that deserved lots of randomness! I did however, write the wrong song title so I'll need to fix it. The song is actually, Doing It To Death not Til. If you've never heard of it, google it, it's a great dance song!


James Brown - check; Animals - check; Black - check - Challenge completed!


Products Used:
Animal Crackers Paper Pad by Die Cut With a View (DCWV)
Splatter:  White by Dina Wakely and Bubble Gum Pink by Fun Stampers Journey
Circle Cutter by Creative Memories
Cardstock by CutCardStock:  Carnation Pink, Black and Cougar Smooth White
Stickers are all from my stash as well as the black & white pens


Friday, May 5, 2023

TGIF; Thankful Friday #269


Another Friday and another week to be thankful! What am I thankful for this week? Hmmm...well, the rain returned and I'm thankful for how it is assisting me with my quest to grow flowers and veggies! The rain is doing all the work!

I took this photo as I was heading off to work this morning.


Yes,  know my roses need pruning but the leaves are so green and the flowers are just popping out!

Yup, that's what I'm thankful for this week. Rain and my blooming plants!

How about you? What are you thankful for this week? Let me know in the comments below.

Pocket Pages; Pumpkin Patch

Do you use pocket pages in your albums? I love adding pocket pages and other sized pages in my 12x12 scrapbook albums. I think it adds interest to albums and really wows the people going through them. It is hard to take a photo though :). Sorry for the glare!


I took lots and lots of photos when we went to our local corn maze & pumpkin patch but was very selective when printing the photos. I find myself doing that more often lately OR if I need to print all of them, I like to print in smaller sizes.


For this evening, I decided to use a pocket page and after sorting the photos, I realized I needed a lot of vertical pockets. This fun protector has a row of three vertical and the top is two 6x6 areas. Perfect!

I used Simple Stories Cozy Days collection which I bought on clearance at the Local Scrapbook Store (and when I say local, I mean an hour and a half away). Definitely fall themed but not necessarily fall colors - I love the pink & mustard combo!


I also added some small words/quotes from Tim Holtz/Ranger that I thought enhanced the photos.


Be sure to watch the YouTube process video for tips on changing an OOPs to another embellishment opportunity!


This was actually pretty simple - didn't add much more than the papers and photos but super cute and perfect for using lots and lots of photos. Stay tuned because I will have two coordinating pages which will sandwich this pocket page. I may even attempt to do a quick video!


Wednesday, May 3, 2023

Got Scraps? CutCardStock DT Project


Got Scraps? Of course you do! Today's card focuses on using those paper scraps. All of the paper scraps that I'm using are from CutCardStock.


I pulled out two tones of a variety of colored cardstock and some gold glitter cardstock.  I wanted each circle to have a light and dark tone of the same color but you can choose to do whatever you like. Once I decided on colors, I used an inch & a quarter (1 1/4") circle punch and then used my cutter to cut each circle in half. Now my paper cutter has a little well and these circles fit perfectly in there to get a perfect half circle slice.

Once I cut all the circles in half, I used adhesive tape strips to adhere the circles together to make it easier when deciding on the locations on the card front.

I needed 12 total circles (24 half circles) to cover the standard A2 card (four rows of three).


Once I adhered the circles, I added a 2.75" vellum circle to anchor the stamped image of the two China dolls. Aren't they so cute?! I was gifted these stamps as well as many others from a fellow stamping friend of mine.

I used Cougar Smooth white cardstock from CCS to stamp both the images and the sentiment. I also used this cardstock for the cardbase. The Cougar Smooth cardstock is my GO TO especially when stamping!

The white in the circles is the Wedding Cake Textured White cardstock. I don't have a list of which colored cardstocks that I used, but they are all from CCS along with the glitter gold cardstock. I love their glitter cardstock because it's inbedding into the paper so you don't get glitter everywhere!

The China dolls were colored with a variety of water based and alcohol markers. I love the scratchy look to the kimonos! Super simple and nothing fancy!


Here's another angle:

And a YouTube process video:


Be sure to click over to the CutCardStock blog to be inspired with all sorts of paper projects and to see my blog post as well.

Check out the website for all your paper needs. They are constantly having sales on their already low prices! I love using their cardstock for all my paper projects!


Monday, May 1, 2023

Gnome Square Card; LTCCB


Do you love to craft? Yup, so do I. I'm guessing that's why you're here. Be sure to click over to the Love To Craft Challenge Blog (
LTCCB) to be inspired. The great thing is you can post any crafty project, not just paper crafts.

I decided to make a square graduation card. I rarely create square cards, but I just recently purchased some 6x6 square envelopes and that was my inspiration. This card is for a junior high graduate so I thought this gnome was perfect for it.


Don't you agree? Super cute, right? So, are you ready for a secret?

When cutting this image out, the white portions for the diploma did not cut well. They were too tiny. So instead of trying to cut again, I left them out completely! The gnome's beard and base were white so I didn't need to add another layer of white cardstock. Tell me if you notice? And then tell me if you can tell it was a mistake or intentional? hee hee
 

This is a six week challenge so you have plenty of time to link up your crafty project to the LTCCB site. The next question is...what will you craft?