A place to showcase my crafts and talk about it...what's better than that? I hope to inspire and encourage others to create things for themselves, friends and family.
It's the last Saturday in March and this is the last project of my Sizzix Sidekick and Dies challenge. Since I'm out of town, I was limited to only a few supplies. I still managed to make a beautiful card for the challenge!
Be sure to watch the final YouTube process video to see how this was done.
Oh, it's time to share two cards that I made using Cute Pie SVG from Printable Cuttable Creatables. I changed the pie colors so I had a cherry and blueberry pie.
The shapes on the card fronts were created on Cricut Design Space using Basic Shapes and offset. The patterned paper is from Lawn Fawn.
Vellum circles were cut using a large circle punch.
Both sentiments are pretty basic so these cards can be used for any occasion. Adding some highlights using a white pen finished them.
Be sure to check out the Printable Cuttable Creatables website for cute SVG cut files and use the code 3SONS15 for 15% off your order! For inspiration, scroll through the blog. You will not be disappointed!
Project Four of my Sizzix Sidekick and Dies card challenge is this cute bows card. Act, it's two cards!
I used this die set from scrapbook.com. I purchased it I love the bows but figured there are some delicate bows that could be hard to cut with the Cricut.
Watch the YouTube process to see how these cards were made.
Happy Friday and another week to be thankful! This week went by so quickly. I'm thankful for volunteer opportunities. I never had a chance to volunteer when I was working and it's nice to be able to now.
I helped a friend with the Book Fair at her school site. I was exhausted but it was fun!
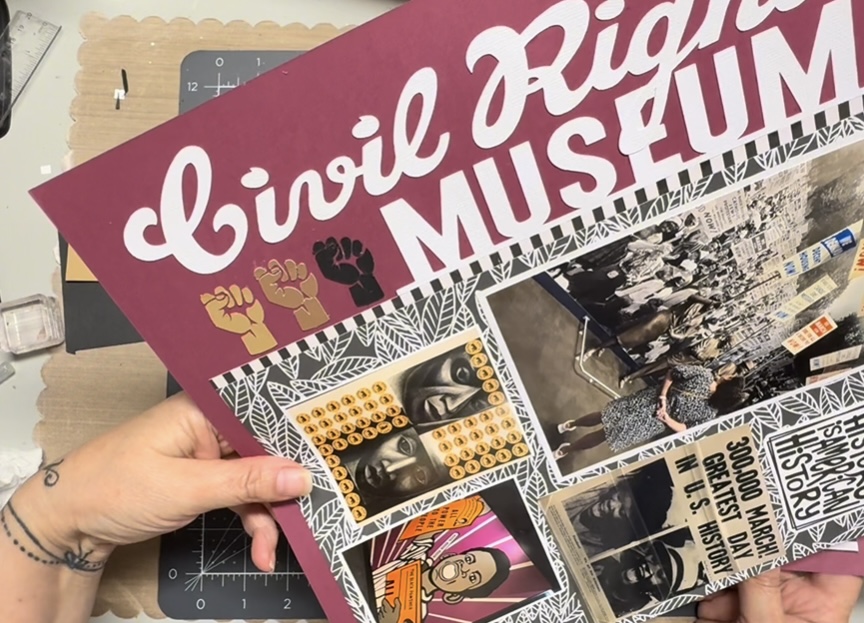
Join a fun group of crafty peeps each month as we take on the Iron Crafter Challenge! Each month Tara from @thepapersnob will select a challenge ingredient to use on a layout. Quarterly, we will do a recipe challenge rather than a single ingredient. This hop goes live on the THIRD FRIDAY of the month. We will have a hop on YouTube and Instagram to show how we used the challenge ingredient(s) for the month.
The mystery challenge for March is a recipe challenge. For March, the challenge is to create a layout using the following items: Stamps, embossing powder, and a cutfile (or a die cut if you don’t have any cutfiles).
Here's my layout:
Closeup of the Peanuts gang:
Here is a playlist with ALL the videos of the participants:
I pulled out my Little Golden Book Junk Journal the other day and decided to attempt some flowers. I know most of my pages have flowers but I wanted to try something different.
Honestly, I am not happy with the two sunflowers but I love the other flowers. I had a big whoops but fixed it pretty easily.
A little pencil scribbling on the left side was an afterthought and I like it!
My son did the Ancestry.com and we found out we're 4% Irish. We decided this St Patricks Day we were going to do a little more than just wear green. My daughter made soda bread and brownies with Baileys. We also made some mint chocolate shakes.
I made these cute cupcake toppers using Print then Cut function in Cricut Design Space. You can see how I used images in DS and changed them to something different. Easy Peasy!
Hey there! Not only are these cards fulfilling my Sizzix Sidekick challenge but also the Create Three Ways IG challenge. The IG challenge is to take one item and create three different cards using it.
I used the Hello Puddles stamp and die set to make 3 cute Get Well cards:
FSJ is no longer in business but that doesn't mean you can't make a similar card. There is a process video so you can see how two of these were created. Here's a hint, I used stencils, vellum, and a circle punch.
Check it out:
And don't forget about the IG hop to see what others created! My IG is @3sons_and_astar
Happy Friday and another week to be thankful. Hubby and I went on an overnight trip to LA to watch my niece play softball. She goes to college in NY so this is not something we can do on a regular basis.
It was a nice road trip and I'm thankful we were able to do it!
Welcome to Rainbow Crush – a Social Media hop where we share projects that feature a color of the rainbow each month! This hop is hosted by Tara on her Facebook Group. Anyone is welcome to play along. This hop takes place on the 2nd Wednesday of the month! The color for March is GREEN.
You can sign for the next month’s hop over on the The Paper Snob Community Facebook group:
My sister turns 65 this month and I knew I had to make a special card for her. The cut file for this card is from My Scrap Chick. I love her cards and she has lots of different cut files. If you sign up for her newsletter, you'll be notified of her monthly freebies!
Before cutting the pieces, remember that you will need to change the inside lines from cut to score and then attach them to the image. I really need to do a tutorial on this!
The only thing I did differently is create a special front design to make it extra special!
Hello there! I've got a sweet project today using the Sweet Woodland Deer cut file from Printable Cuttable Creatables. When I saw this sweet image, I knew it would be perfect for a new baby card. Most of PCC's files have more than one image and this one is no exception. The deer is available with eyes open or closed. I chose the image with the eyes open.
After I cut all the pieces, I placed them on my mat and then laid them out before adding adhesive.
I used a pick tool and liquid adhesive with a fine tip to put the sweet deer together.
Once the image was completed, I worked on the card front.
Watch the process on YouTube
A piece of colorful plain paper from Lawn Fawn is perfect for this card so I cut it down to 5.25x4". Once I centered and adhered it onto the oatmeal card base, I felt like it needed something.
An oval! Using my oval cutter from Creative Memories (fun fact: I've had this tool for over 25 years!), I cut an oval and then used a stylus to emboss an oval inside the cut oval.
It's so subtle, but it looks so good! A little white pen details on the oval and the deer just adds more details for this card.
No need for foam adhesive for the deer since there are five paper layers on the deer and gives the perfect height to the card.
Do you love it? I certainly do and can't want to send it out.
Make sure to click over to Printable Cuttable Creatables blog to get lots of great inspiration from the Design Team. When you're placing your order on the website, be sure to use code 3SONS15 for 15% off your order!
It's Saturday and March so it's time to share a card as part of my Sizzix Sidekick & Die Card Challenge for March. I love hosting my own challenges since it gets me to use products that I forget about.
For Project Two, I die cut a lighthouse birdhouse that I purchased from Spellbinders. I'm also combining it with a sketch challenge at sundaystamps.blogspot.com. I love using sketches for cards because it just makes it easier to start! Here's the sketch that I'm using:
Here's the card:
Be sure to check out the YouTube process video to see how it was made and come back Saturday for the third card!
UPDATE: this card was selected as one of their top picks!
Happy Friday and for another week to be thankful. This week was a typical Spring week. Rainy one day, sunny the next...repeat.
I'm thankful this week for long time friends. I was able to hang out and go to lunch from one of my work besties. Or should I say former work bestie? She retired last May so she had a little head start on retirement.
We both bought so many baby clothes for our own family's future babies. There was a huge clearance sale at JC Penney's! I bought some plain items that I'll customize for baby gifts. Stay tuned for those!