Monday, October 30, 2023

Candy Pockets; Halloween Treats

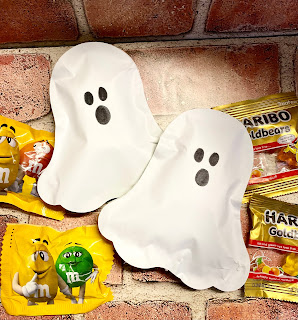
How cute are these candy pillows? Since they were so easy and perfect for classroom treats, I made a lot of them! I made enough so my granddaughters can give them to their classmates.


I found the ghost shape in Cricut Design Space and cut 30 in plain white and 30 in different colored patterned papers. Since the patterned paper ghosts are facing out, I flipped these ghosts on the canvas before cutting. I also changed the color to pink (any color will do) so I knew which ones should be white and which ones should be the patterned paper.

These are about 4.5x5" and two candies fit in each one. The idea is for the recipient to tear open the packet to get the candy.


Projects like these are a great way to use up older papers and I just happen to have a whole pad of color prints that were perfect for this project. I also used white paper that I’ve been saving for something like this. Sometimes when I buy albums refills, the sleeves come filled with a lightweight white paper. Well these are those! 

I used a black marker to add the eyes & mouth to them.

Once the front & backs were cut, I used tacky glue to adhere them together. I left an opening at the bottom so I could add a few candies. Once filled, I used hot glue to close them.


So easy and so cute! Watch the process video:


Change the shape & color and these are perfect for any celebration!


Saturday, October 28, 2023

WCMD Card Sketch #4; Sketch n Scrap


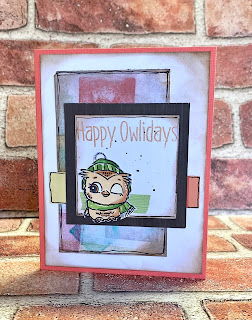
It was World Card Making Day earlier this month but Sketch n Scrap has provided a new card sketch every Saturday this month to celebrate. This is WCMD Sketch #4:


I used a piece of paper from my stash that was used to test ink pads on. I was going to toss it but decided to keep it. I love it as a background piece. The cardbase is Wild Salmon from CutCardStock and the other piece is the backside of a pocket page card.


The owl is from the October Stamp of the Month from CTMH. Isn't it so cute!? I used a tri-blend alcohol marker for the owl and two shades of green alcohol markers to color the image.

Check out the process YouTube video here:


This card started one way and ended up completely different at the end!

If you love sketches as much as I do, check out Sketch n Scrap's blog and/or Facebook Group


Friday, October 27, 2023

TGIF: Thankful Friday #291

Hey there! Happy Thankful Friday! We had lots of activity this week and I want to especially be thankful for family craft nights. We had the kids over on Wednesday to paint pumpkins. 

It's always a lot of fun when craft supplies come out and I'm always so impressed by the creativity of my family members.


I know this is something the granddaughters enjoy since I specifically heard our 13 year old tell whoever called her that she'd have to call them back because she was busy painting her pumpkin! If that isn't love, I don't know what is! :)

Tis the season to get crafty that's for sure!


Be sure to let me know what you are thankful for this week!
 

Thursday, October 26, 2023

Album Title Page

This was a simple title page for the front of the wedding album I'm working on for my nephew & newest niece. I was inspired by a tutorial from Scrapbooking The Day Away. There's a free and paid membership plan for her site and it has all things scrapbooking! I just love it for inspiration, challenges, sketches, and just scrapbook talk. Be sure to check out the website HERE.


My nephew created both of these signs that were set out on the road and at the reception hall. There were a lot of DIY things and you KNOW I loved that!

I struggled with this layout because I didn't want it to be too busy but also, it was just too plain. I do like the final outcome better because I see a diagonal line of embellishments where there wasn't one before. Who knows? I may come back to it later but for now...it's done!

It was lacking something...

I created a fringy heart to add to the bottom. I really like how it turned out but probably could have been a bit larger. It's ok for now. See how it's made by watching the YouTube process video.


Wednesday, October 25, 2023

Succulent Pumpkins

My daughter and I went to a succulent pumpkin workshop and ended up creating more when we got home. These are the ones we created at the workshop.


And these we created at home:


I also decided to paint one of them for a pumpkin decorating contest 


So awesome! I love the way they turned out! Don’t you?!

Monday, October 23, 2023

Recycled Fence Boards


My son has lots of old fence wood and I asked hubby to cut a few down for me. You know I LOVE a good recycling project and this one did not disappoint!

DISCLAIMER: My hubby is not normally a DIY person but he jumped in two feet first and I was so happy! He was also my photographer on the "action" shots.

After hubby cut them down, I used a sander to sand the edges and any rough spots before spray painting them.


The orange paint we have was more of a reddish orange. Even though I didn't like it for this project, I didn't want to buy another one so I decided to spray a layer of white paint first and then a coat of the orange. It was still too reddish for my liking so brushed on some orange acrylic paint to lighten it up and add more color variation to these pieces.


Once that dried, I dry brushed a little black around the edges to give it a distressed look. These are very rugged looking!


During the painting process, hubby cut 3" stems from a branch from one of our trees - yes, you guessed it. I'm making pumpkins.

I used my Cricut to create stencils for the letters and the jack-o-lantern face - I did not like the stencil vinyl on my last wood project so I just used some scrap vinyl for these. Once the vinyl was adhered, I used my fingers to add a thin layer of Mod Podge to seal the edges before adding black acrylic paint with a sponge. This helps avoid paint leakage under the stencil.


I used E6000 glue to adhere the stems to the top of each pumpkin and wood pieces on the back to work as a kickstand for these. 


Now to add some leaves and raffia to each stem to complete the project.

What do you think?


So super cute! I am so in love with how these turned out! The only question is...what are we making next?!

I made a photo montage of the project on YT that you can see HERE.


Saturday, October 21, 2023

They Say It's Your Birthday Card; CutCardStock


Paper projects are my fav and I just love this VW Beetle Bug card I created using the Cricut and cardstock from CutCardStock.com. I decided to make a few of them since I was already taking the time to cut out the image.

Along with a variety of colored cardstock fro CCS, I used a watercolor cactus paper that was purchased from Hobby Lobby.

Before adhering the pieces together, I used a Cricut blue glitter pen to outline the Bug pieces.


I started putting the pieces together and realized I needed to cut a base for them to sit on. So I went back to my Cricut and created an offset with 0 so it was a base versus a border. Liquid glue was my adhesive of choice for this because of all the small pieces.

So cute!

The colors chosen coordinate so well with the watercolor paper. Don't you agree?


The VW Bug was adhered with foam adhesive to lift it up a little. I considered using a wobbler, but decided against it because I thought it would get caught in the frame.


A few white pen accents makes it pop even more!


So, is it a coincidence that the Beetle card has a Beatles song lyric as the stamped sentiment....? What do you think?

Be sure to check out the CutCardStock Blog for all sorts of paper inspiration and sign up for their newsletter because they are constantly having sales on their already great prices!


Friday, October 20, 2023

TGIF; Thankful Friday #290


TGIF and Happy Thankful Friday! This week went by so fast. We had great weather and I had a lot going on. This week I'm thankful the fact that I didn't have to cook dinner at all. Mostly because I had two nights of dinner plans, one of leftovers and of course tonight PIZZA.

I do not like to cook and always prefer someone else cooking or going out and this was one of those weeks.

So yes, that's what I'm thankful for this week.


Poppies Card; Sketch n Scrap


In between all the projects I’m working on, I decided to organize my junk journal papers. While doing this, I found these cut out poppies. I wish I could tell you where I got them but I have no idea. 

I’m working with a card sketch from Sketch n Scrap and I decided to incorporate these poppies and these cool postage stamp stickers (also found with the JJ papers).

Here’s the sketch 


And here’s the finished card:


The bottom half of this card was created using faux postage stickers and the top part I used a fun stencil with some blue ink. I used the Cricut to cut the scalloped & regular circles. Watch the process video to see how it was put together:


Be sure to check out the sketches on the SNS blog and Facebook page. They post two card and single layout sketches a month!

Thursday, October 19, 2023

My First Boo; Printable Cuttable Creatable


It’s my granddaughter’s first Halloween so I had to create a cute ahem, I mean spooky Halloween onesie.  Luckily Printable Cuttable Creatables has many images to choose from.  I used the My First Boo T122 cut file since it really is her first Boo!

There are lots of layers with this one, but once everything is pressed, you get a super cute onesie for your loved one!


Be sure to click over to the PCC website and use 3SONS15 to get 15% off your order!

Wednesday, October 18, 2023

Hot Ones Layout

One of the best things about scrapbooking is you get to relive your memories. This day was so hilarious as my family decided to do the hot ones challenge. This layout is the companion page to a layout I did earlier and because I took so many photos, I'm going to use a pocket page protector to add all the rest.

I used the Freaky Fast Friday October formula from The Scrap Room. I follow them on IG.


I had some trouble with figuring out the pieces, which is so fun about these challenges, but I ended up just placing them down wonky. I love how I was able to put all the things on this layout...title, journaling block, embellishments and SIX photos!


Here's another look at the layout.

You can get the cuts from my Cricut Design Space file HERE. Be sure to check out the YT process video: