A place to showcase my crafts and talk about it...what's better than that? I hope to inspire and encourage others to create things for themselves, friends and family.
TGIF and Happy Thankful Friday! There are so many things to be thankful for and every Friday, I post here and on my IG what I'm thankful for during the current week.
This week, I'm thankful for my family and friends that are also my customers. Not only am I thankful for the orders, but I'm so thankful when they send me photos of the products in action.
Here's my nephew in his new shirt and a photo of a car decal on the back of a truck window. So fun!
What are you thankful for this week? Please leave a comment here or on my IG (@3sons_and_astar). I'd love to read all about it!
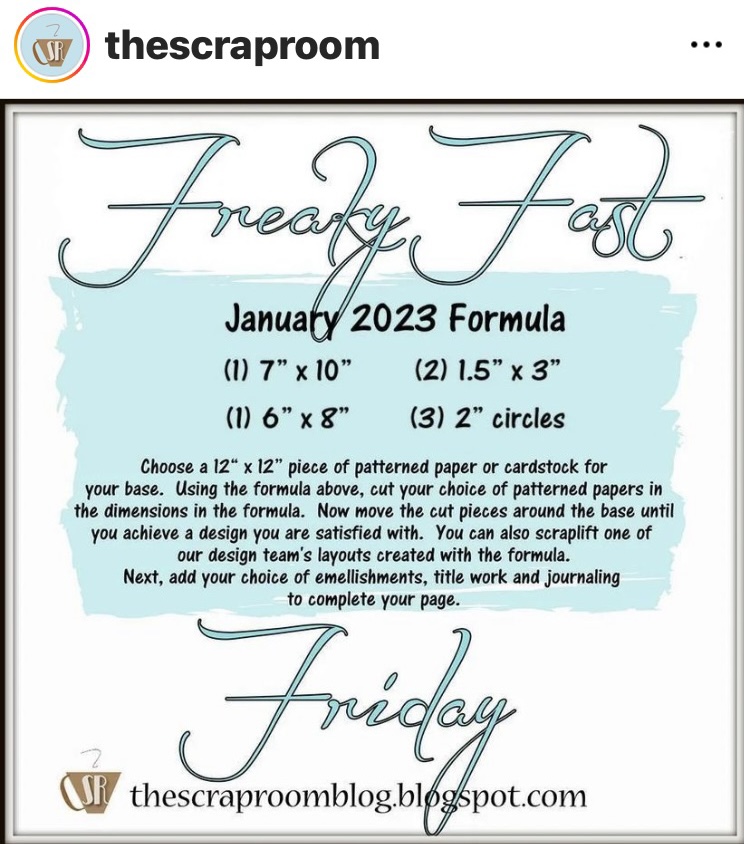
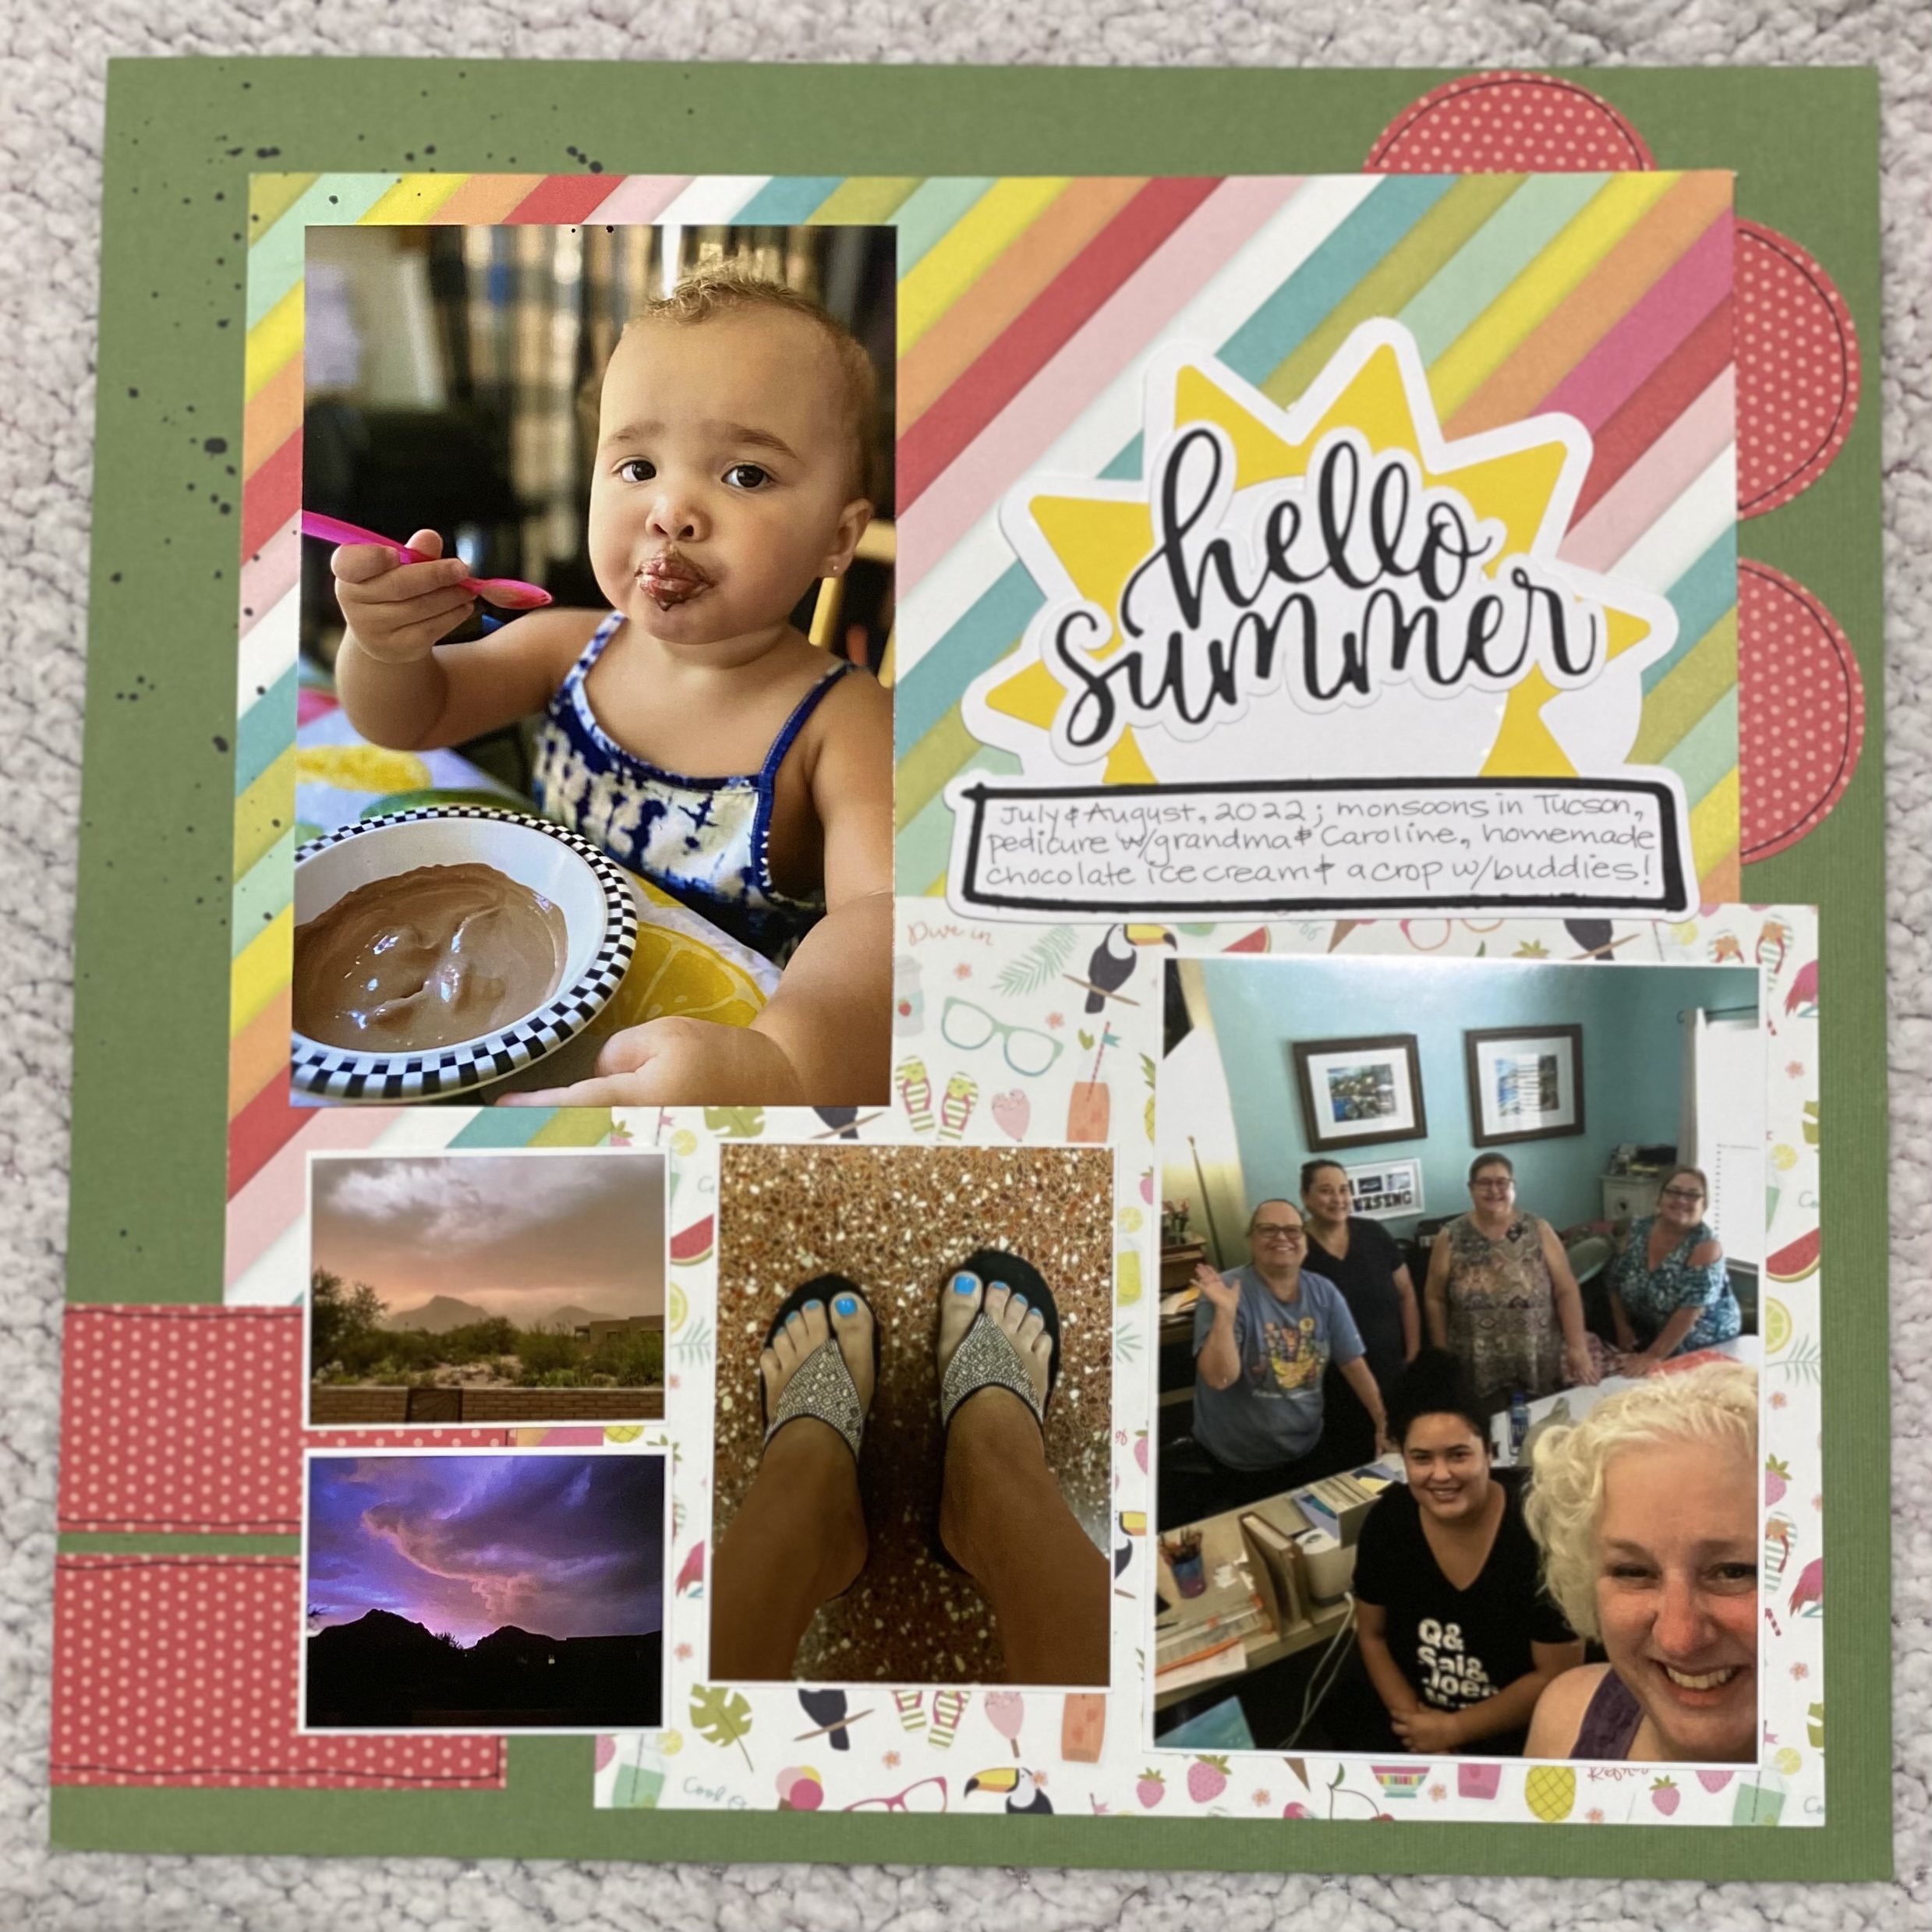
I worked on a new layout today using the For the Love of Summer kit from Photo Play and a challenge from The Scraproom. If I’m being honest, this was a tough one.
Freaky Fast? Not for me. I had some trouble with the three 2" circles but it all worked out. After I filmed the process video, I added some enamel dots to the page. I couldn't figure out what it needed and those little additions made a difference!
What's your go to when it comes to scrapbooking?
The Hello Summer title was created in Cricut Design Space. I combined an image of a sun, the words Hello Summer and the banner together and then added an offset. The offset button is such a game changer in Design Space!
Check out the layout process video here:
The best thing about IG, FB and any other social media is seeing all the challenges, sketches, and of course inspiration out there! This is a great way to stretch your norm and get out of your comfort zone!
I have received lots of orders this month for T-shirts, cards, cups and water bottle stickers. I love the orders, but it's been a lot.
I created this special request and just love how it turned out. After adjusting the image to the correct size, I attached the words to the yellow layer of the SVG. By using Attach in Design Space, it cuts through the image that it's attached to. In this case, the yellow layer of this SVG.
My youngest granddaughter is obsessed with Jack & Sally so I can't wait to make a shirt for her. Honestly, I should have made a couple more of these cups because I love it so much!
I purchased the SVG from MagicalCutStore on Etsy. Just to clarify, the SVG did not include the words "Love Never Dies", I added them in Design Space before cutting.
The cups are from Cups 4 Us. I love supporting small businesses and she has a great variety of cups + lots of free SVG files on her site as well.
Do you gel print? If you do, you know exactly what I mean, when I ask, "What do I do with all these gel prints?" If you follow any of my social media channels, you know I use many for my Junk Journal, mixed media projects and even cards, but I still have so many!
As you know I host a Monthly Card Kit and when I package them, I use flat bags. I normally make these bags using a large roll of white and/or kraft butcher paper. Once I create the bags, I then decorate them. I was getting ready to do that when I thought, "hey, I'm going to use some gel prints!"
I have so many and need to use them! So here you go!
I love my local Dollar Tree! I've been collecting these vinyl sticker brick panels for a short time now and finally decided to add them to an old closet door for a photo backdrop (or floordrop - is that a thing?). I'm constantly taking photos of my projects and some need a larger background than what I have.
We did some rearranging a while back and I removed one of my closet doors. Well, that door wasn't made of wood, it was a thin pressboard type of thing. I kept it for a long time and finally I decided to add these vinyl panels to it.
Before adding the vinyl, I measured and cut the door by using a box cutter and long ruler. Once that was done and after a good cleaning, I adhered each brick panel to it making sure to line up the bricks.
These vinyl stickers are a pretty good quality considering they came from the a dollar store.
Check out the short video HERE and take a look at the backdrop in action!
Happy Thankful Friday! This week I'm thankful for Netflix. I'm pretty sure I mentioned this one before, but aren't these streaming channels wonderful? I started watching The Crown. It's been my "show to watch" while creating in the Command Center. The bad thing is that I sometimes find myself just watching and not creating. LOL
I'm still on the first season. It's good so far. Have you watched it? What do you think? Did you like it?
Share in the comments what show you're currently watching. I'd love a recommendation!
I dug into my artsy scraps to create this fun and funky card. Using a card sketch from Sketch n Scrap made it easy to come up with a plan. SNS has two card sketches and two layout sketches each month.
Check out the sketches and post your creations at the blog or FB Group.
Here’s my interpretation of the sketch:
Now I have to confess. I always tell people to keep your fingers between the base and the layer with adhesive until you’re ready to stick it down. Well guess what! I didn’t do that and of course the paper fell and was stuck. Well, that changed the original plan but I wasn't going to worry about it.
The main piece is a colored copy of my original art journal page. I do that a lot. If you create something & you love it - why not make additional copies?
All of the "printed" elements are from my own mixed media collection. The lt. green horizontal piece was a piece of cardstock that I had cut out multiple leaves from. I used it later as a stencil in another project and kept it. It looks perfect for this horizontal addition to the card!
What do you think? Like it? A little funky, right? I love it!
Check out the YouTube video to see how I made it and be sure to post your creation before the end of the month. We love to see your creations!
I am so happy to show off this SWEET layout I created using cardstock from CutCardStock and a sketch by Stick It Down.
I created these fun waves using my Cricut to follow the January sketch at Stick It Down. I searched the word "wave" and adjusted it to fit my needs by welding, offsetting and flipping the original image to create something that I liked.
The free pan dulce (sweet bread) images are uploaded from Bearly Art. They are cute SVGs on the site and all are free!! I chose to use these SVG cuts to coordinate with the Latina Power t-shirt that my daughter purchased for my youngest granddaughter while on a trip to Southern CA.
Another great sketch from Sketch n Scrap! They post two layout and two card sketches a month. You can find them and post your own projects on the SNS Blog and/or SNS Facebook page.
Be sure to check out the YouTube process video to see how this layout comes together.
I had a little trouble with a new trick, but it turned out fine at the end.
I love how I used multiple photos for this layout but it's not overwhelming. The amazing 3D stamped embellishment was received from a swap. Isn't it gorgeous?!
I cut the letters for the title with the Cricut. All the papers are from an outdoor scrapbooking kit that I created earlier to complete my outdoor layouts. You can check out that video HERE.
I'm telling you, creating a kit is a huge timesaver and makes completing layouts so much easier.
Be sure to link your layout before the end of the month. We love to see your work!
TGIF and Happy Thankful Friday! What are you thankful for this week? Me, I'm thankful for books and the fact that I love to read!
The weather outside is frightful but I am so delightful since I've got a stack of books that I need to read. I just finished a book from my aunt, Betty Weatherby called Winnowing Fork. It's a biblical fiction book about Zacchaeus and his life before and after he gets a visit from Jesus. Good stuff!
I'm now reading my Book Club book which is Dava Shastri's Last Day. I just started it and so far so good.
I hope you are staying dry wherever you are and that if you are a reader, you are enjoying a warm cozy spot just to read.
What about you? What are you thankful for this week? Please share in the comments below or on my IG account @3sons_and_astar.
Oh how I love a fun cake topper! Well, this one is super fun as I created a shaker cake topper AND it's only 4" so it's perfect for a small cake, cupcake or even tucked into a plant.
Cricut Official held a Craft Day on January 7th and I was so excited to participate in their challenge and also watched many tutorials. There is so much to Design Space that I didn't even know!
I used one of their editable images #M3F11B875 and edited it to create this fun project! I decided to create it in primary colors so it could be for any gender or age.
Check out the quick YouTube process video:
One more photo:
If you're interested in making your own, I did include this in the Cricut Community and you can either chose to Make It or Customize It to create one for yourself!
All cardstock is from CutCardStock. I'm on their Design Team and absolutely love the colors and quality of their papers. Check their site out and then check out their blog. There are fabulous paper projects and I know you'll be inspired!
I have not worked in my Junk Journal in a long time and every time I crack it open, I wonder, why not?!
I love all the messy goodness already inside and the fact that I am contributing to more inky/painty/scrappy goodness is a bonus.
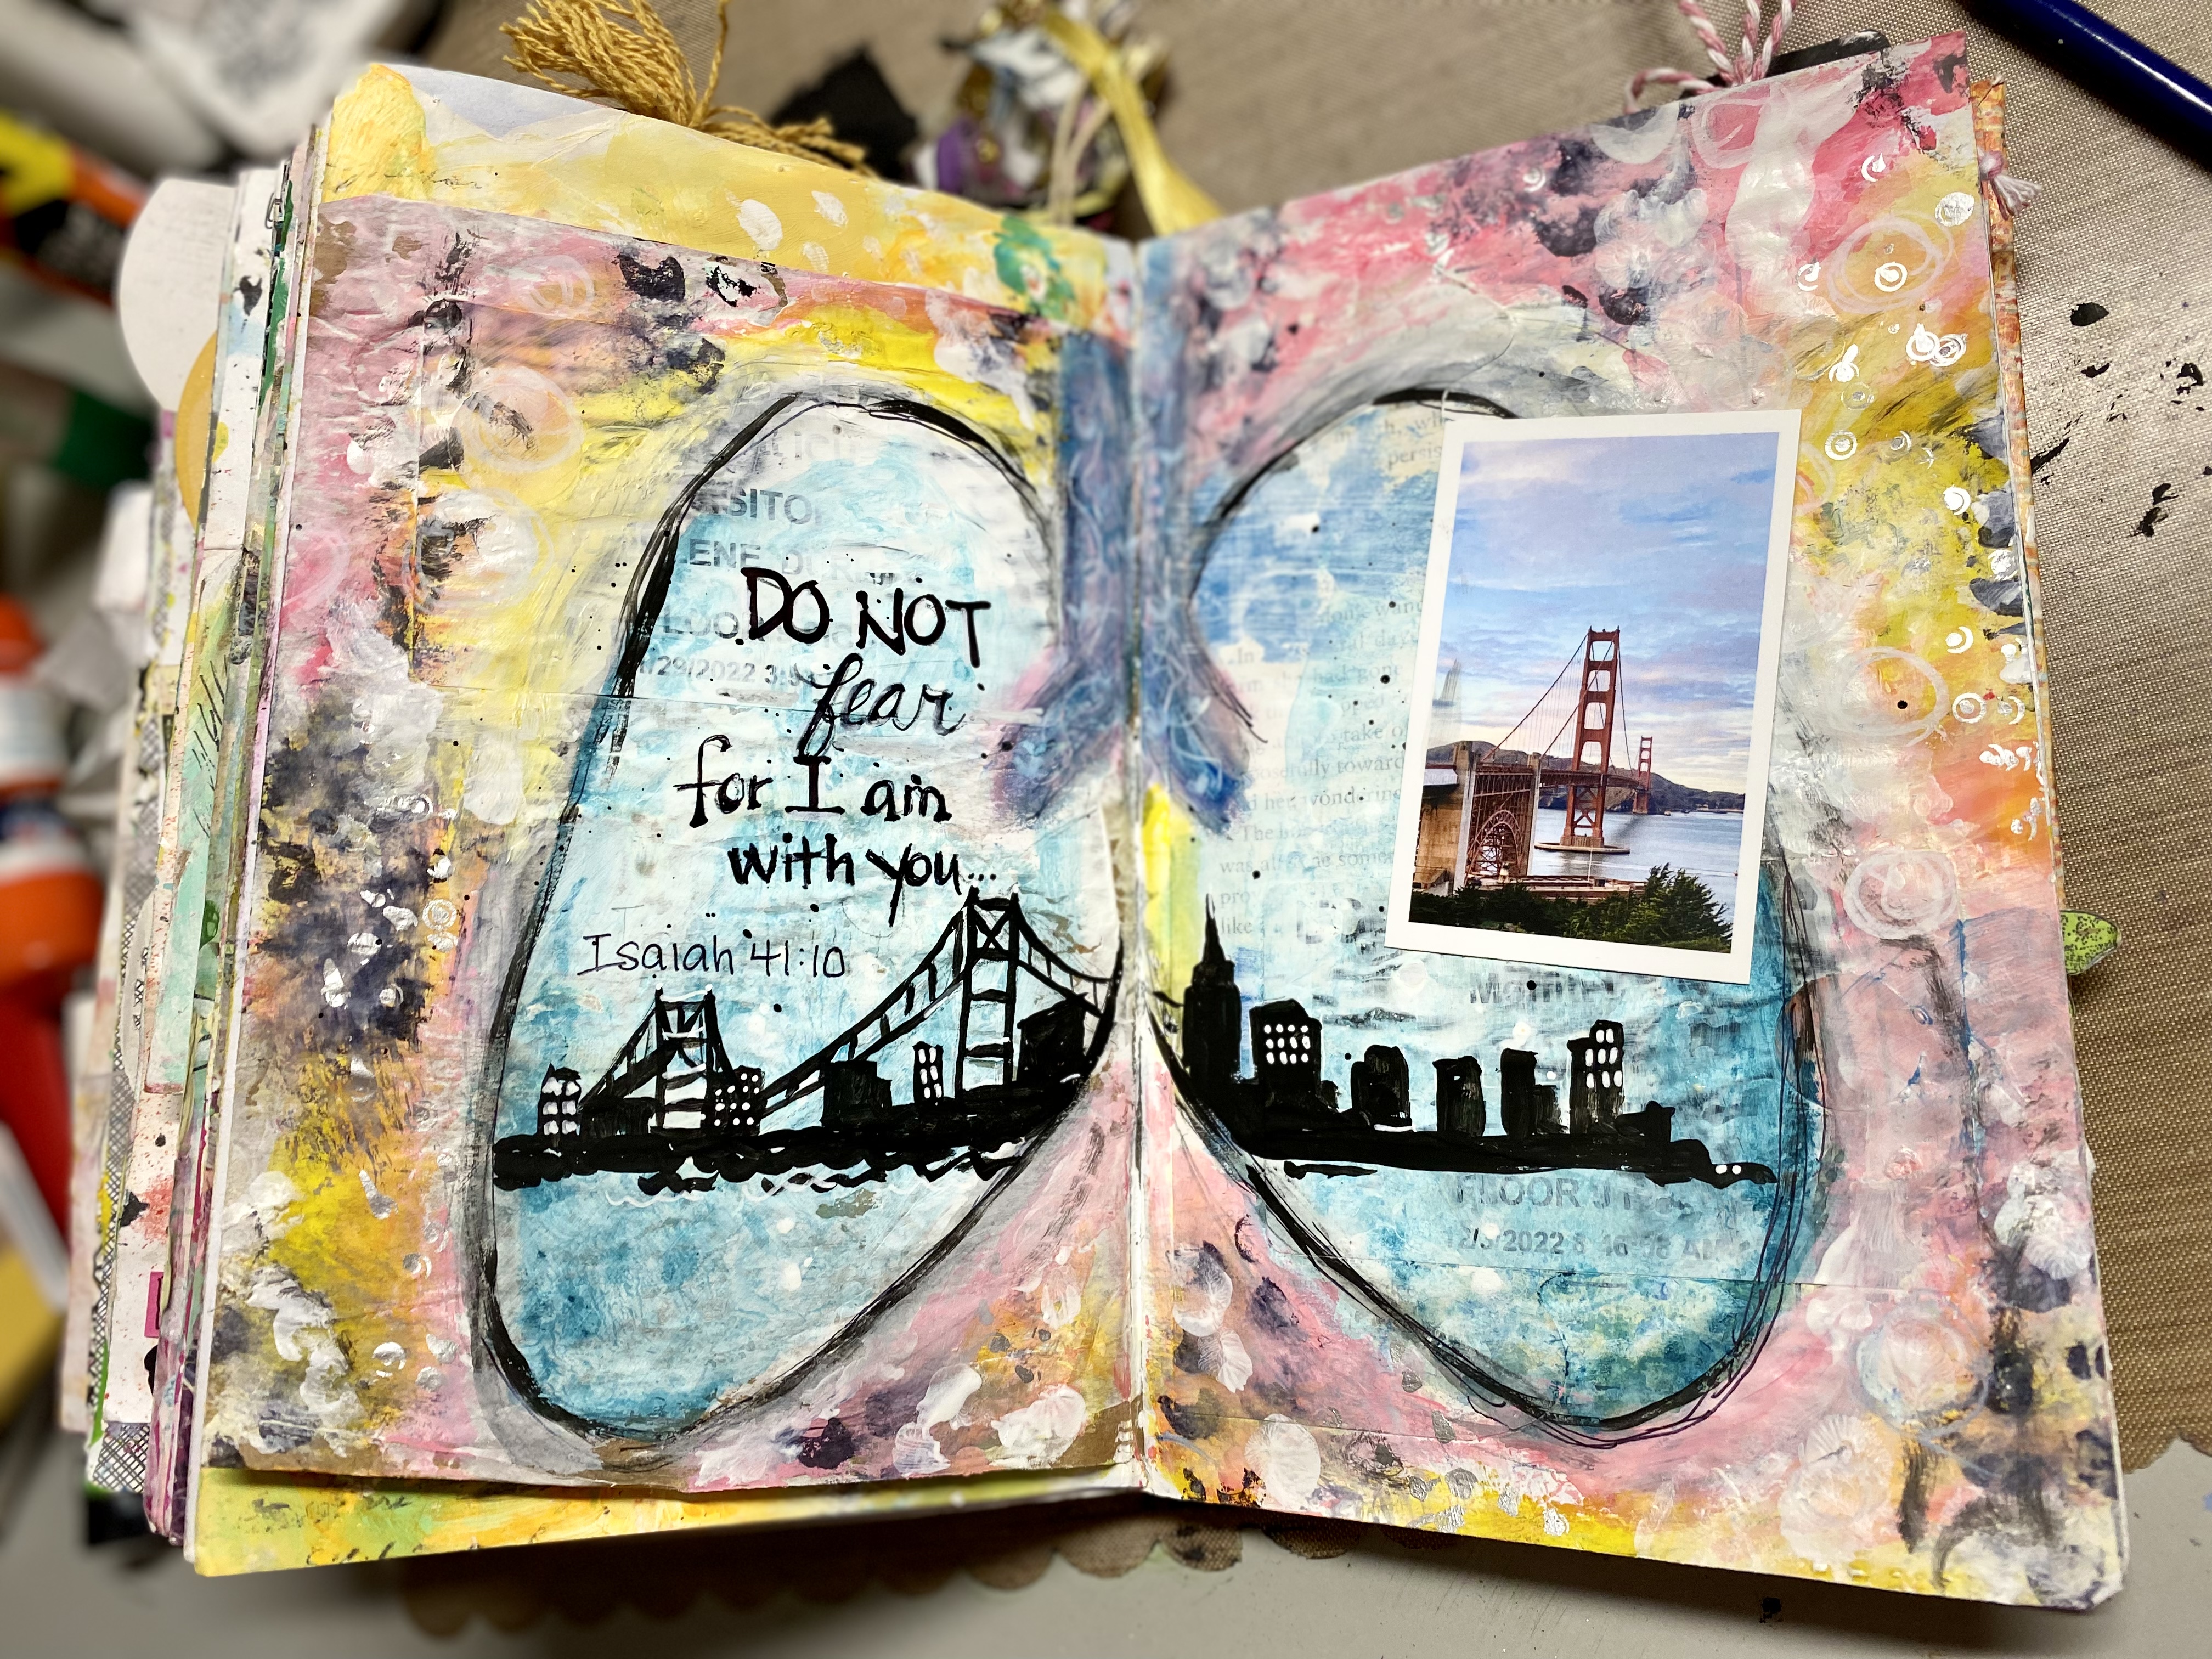
December was nuts and we spent more than half of it at the hospital. I felt the need to document this time in my artsy Junk Journal.
As always, the first thing I did was open up the JJ to find a two page unfinished spread that I could use for it. Once I found the pages, I applied white gesso to them to give me a "blank" space to start. From there I drew a pair of lungs with a black Stabilo pencil (which reacts with water), colored the inside and outside of the lungs with an assortment of Gelato sticks; did some random stamping and mark making to get here.
Check out the YouTube process video below:
Now, the problem with stopping and starting the video camera is I often think I'm starting but often stopping, etc. That's exactly what happened when I was filming this. UGH! Unfortunately, I didn't film while I was doing all the mark making and coloring.
One of the pulmonary doctor's had a logo on his vest that had the SF skyline inside a pair of lungs. I wanted to emulate it in this spread. I found the silhouette skyline of SF online and did my best to copy it across the lungs. I think I did a great job.
I was debating about the small photo of the Golden Gate Bridge, but decided to use it since we could see it out the window on the ICU floor.
If you like this type of post, stay tuned because I am going to be doing more and more of messy play in 2023! My six signature Junk Journal is so close to being finished that I have decided this is an achievable goal - finish this journal so I can create another one!
If you haven't already, while you're in YouTube, check out my Junk Journal playlist. There are many flip throughs and tutorials that I know you'll enjoy.
Products Used:
Gelato sticks (Snowcone, Blueberry, Acqua Dolce, and Banana)
Illustrated Faith crayons
Posca White Marker (fine point)
Ranger White Paint pen
Silver paint pen
Lila Gray/Bloom Art Elements Stamp; her shop is no longer active in Etsy
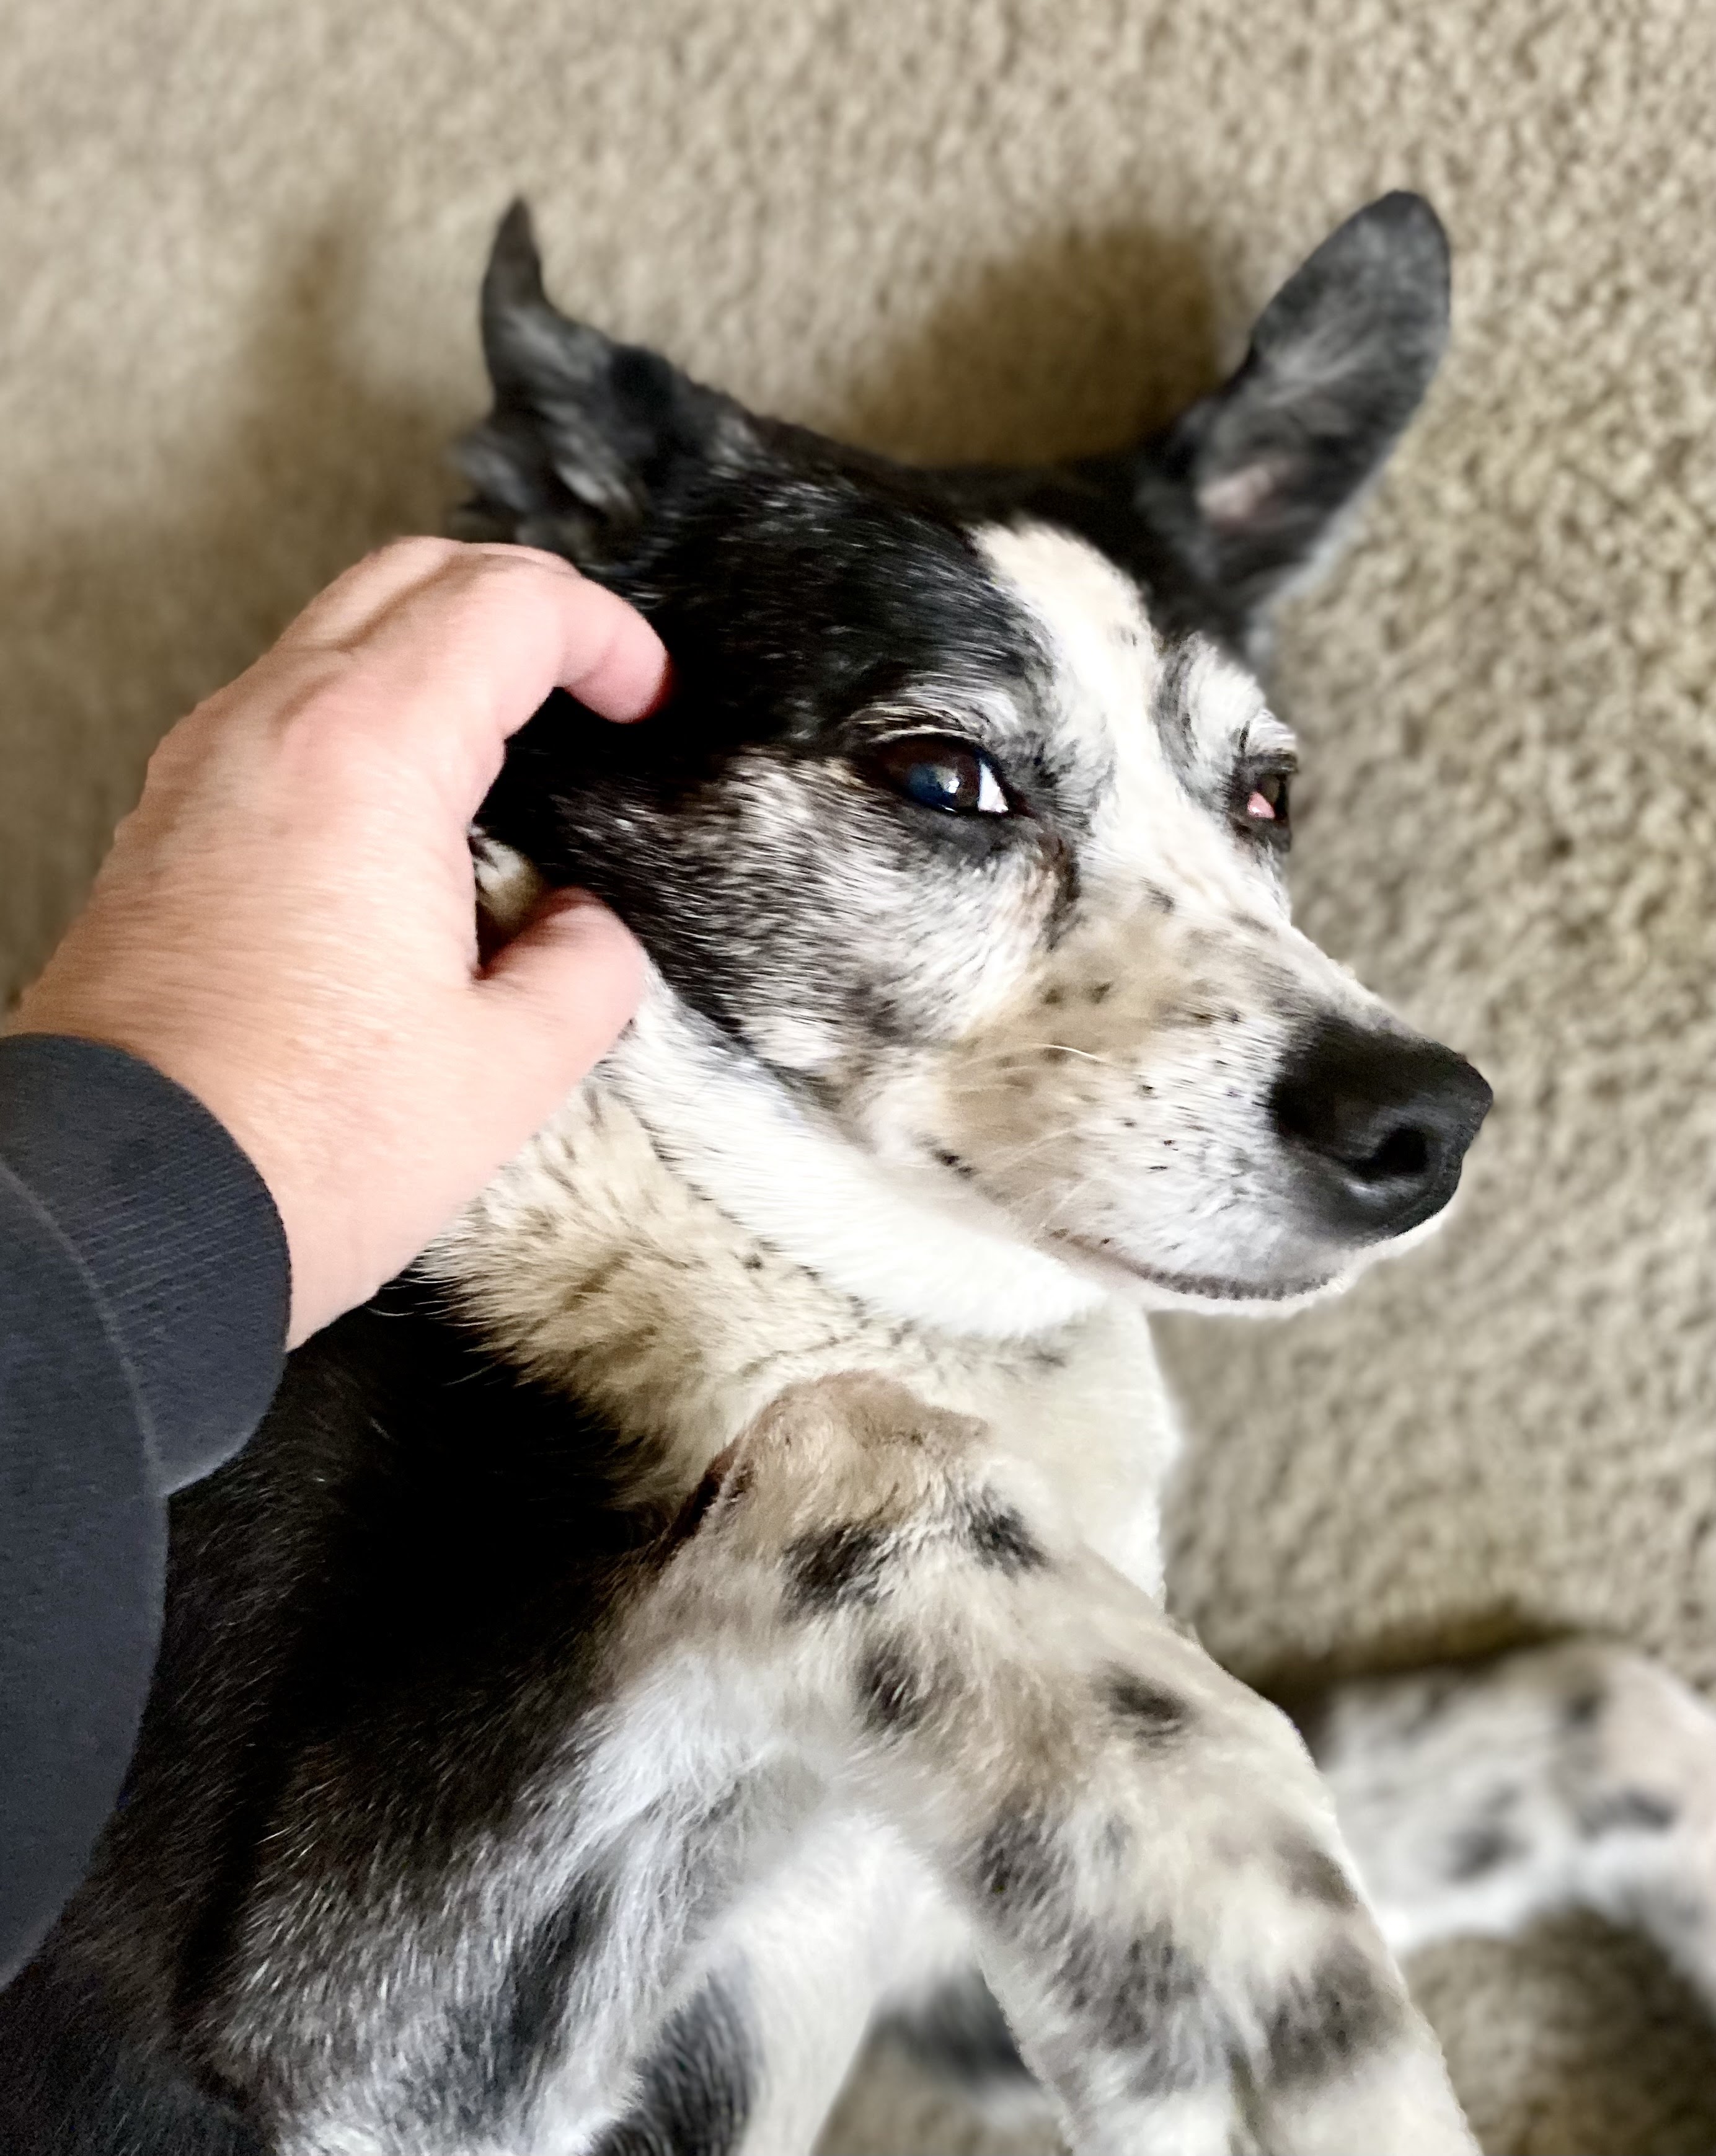
Happy Friday and Happy Thankful Friday! This week I want to do a tribute to our dog, Gracie. We had to put her down on New Year's Day and I don't think I've stopped crying since. I'm trying to keep myself busy, but most times I am just sad.
This little girl of ours was perfect for our family. In fact, we always said, she's exactly like us. Loves to eat and lay around all day.
I won't get into details but she got sick and because of her age the the progressive nature of the illness, it was the humane thing to do.
Our G-Baby, I'm not sure what we're going to do without her.
I'm thankful for the 12+ years we were able to enjoy her - all the memories - all the situations and funny antics she used to do.
Oh how I love an easy fun fold card! This one was quick and actually pretty easy to create. I used Granny Smith green cardstock and Cougar Smooth White cardstock from CutCardStock and the green polka dot patterned paper from The Basics 8" paper pad from Hobby Lobby.
This card is featured at the CutCardStock blog. Check out the blog for other projects! My recommendation is to watch the YouTube video because it may be easier to follow.
Once all the patterned pieces are adhered to their correct places, cut a shape out of the front of the card. I used a circle, but you can use any shape.
Adhere the right side of the accordion piece to the right side of the inside right side of the card. Adhere the tabs to the back side of left side of the accordion piece; then fold up the accordion, add adhesive to the front of the tabs and then close the card. Now the accordion is attached to the inside of the card!
When looking through the cut shape from the outside, adhere the decorated cut shape to the portion of the accordion that is showing through. This allows it to swing.
Cutting Dimensions:
Card Base: 5.5 x 8.5"; scored at 4.25"
Accordion Piece: 5.25 x 6"; scored at 2" & 4" on the 6" side
Tabs: Two .5 x 4"; scored at 2"
Pattern Paper Pieces:
Card Front: 4 x 5.25"
Strips for the Inside: Two 1.75 x 5.25"
White:
Strip for Inside: 1.75 x 5.25
I also used white for the circle that swings out. This is the same size as the circle you cut from the card front.