A place to showcase my crafts and talk about it...what's better than that? I hope to inspire and encourage others to create things for themselves, friends and family.
I added some more cards to my Etsy Shop. I made these beauties awhile ago but finally got around to adding them to the shop.
These are standard sized note cards that are blank inside to personalize yourself. The quality of these cards are fabulous! They are copies of my original mixed media art put on high quality, heavy weight, glossy cardstock.
If you're interested in these cards, check out my Etsy Shop. Click on the Etsy icon to the right.
This week I'm thankful for allergy meds...ugh! Even though I love how the weather is changing and it's officially Spring, it's been a tough one so for with my allergies.
But...I got my meds and now I'm fine. I can now smell the flowers and enjoy the sunshine - well except for those rain clouds that keep coming back. LOL
My daughter and I are going to another crop this weekend so that will be fun. It's a new place or at least new to us so we're pretty excited about it.
I'll share photos of my completed layouts next week!
Now it's your turn...share what you are thankful for this week in the comments and remember, there is always something to be thankful for.
Doctor and dental appointments on Thursday - my son's surgery on Friday - family visit and dinner guests on Saturday and finally some rest on Sunday. And between all of that was March Madness and endless games of college basketball!
My little sis is taking her family on a Disney cruise again and she needed some help with their door hanger. Apparently taking your family on a Disney cruise isn't enough for these families so they have every day gift exchanges with the kiddos (and I guess parents too if they want) and they need something on their door to hold these gifts. Yeah, I'm being sarcastic, honestly I think it's pretty ridiculous but it's a thing and I get why my sis wouldn't want to have her kids be the only ones not getting goodies...but come on...really?!
Anyhow, she sewed up this beautiful thing and wanted help personalizing it. All I did was cut out some iron on letters of their first initials and cut the Mickey head with the "W".
My sis did an amazing job. The Mickey details are either the fabric or patches that she purchased.
If you recall, I made some cut outs for their last cruise and she laminated them to be able to use them again - so smart! Check them out HERE.
This year, it's one of my nephew's birthday so I did create a banner with his name and of course forgot to take a photo!
The current challenge at the Bitten By The Bug 2 challenge site is...It's Easter.
I'll be honest, I haven't done anything for Easter in ages. Every year I tell myself to create things but I never do. Last year I bought some oversized plastic eggs that are to be filled...yeah, didn't do it. But guess what? I pulled them out for this challenge and decorated them!
I used the Create-A-Critter II cartridge for both the bunny & the chick.
I never layered vinyl before so I was really nervous. It was easy except I need to purchase clear transfer tape since the kind I have is frosted. That made it hard so they didn't line up perfectly, but hey...I'm all about being imperfect.
I cut these at 2.5".
I used my Cricut Expression to cut the layers since it was readily available on my table. I like to use my Expression when I just use my cartridges and basic cuts.
I had a little trouble with the chicks since they were harder to adhere without bubbles to the curve of the egg. I used my heat gun after rubbing as much as I could and it helped a lot. I'm sure you noticed the little bubbles in the center of the images, they are due to the eggs (see below). It was really noticeable on the chicks probably because of the lighter color. On the second one, I put the beak over the middle (and larger) circle so it wasn't as noticeable.
Here's another shot of the eggs all decorated and filled with Easter grass.
I can't wait to fill these in!
Now it's your turn, create an Easter project using your Cricut and link it to the BBTB2 challenge site. Be sure to let us know which cartridge, SVG or image you used for your project.
Scrap our Stash, what a concept, huh?! I go to this site often for inspiration and sketches. I’ve been working on this layout for a bit and finally finished.
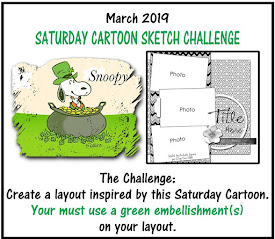
Here’s the sketch and March challenge details:
And here’s my layout:
Some closeups:
I flipped the sketch to the side and only had one photo, but basically used the same sketch. Green embellishments in a visual triangle and since it was a photo of my dog, Gracie, that fit the Snoopy theme. I'm really trying to use more of my stash. This layout has two pieces of cardstock and three patterned papers not including the white cardstock photo mat and small scrap of paper behind the photo.
My daughter and I compete every summer for the past 19 years on our Summer Reading Marathon. Whoever reads the most books gets treated by the other to Baskin Robbins. Well, the story of this photo is that every time I sit to read, my dog, Gracie starts bugging me. She either whines, nudges or even flips the book out of my lap. It’s hilarious but also annoying. I always accuse those two of being in cahoots.
Be sure to click on over to the Scrap Our Stash site for the challenge.
Happy Wednesday! I'm sharing my work area along with many others on the Stamping Ground linkage. Click over there to read more about it and to take a peek into other craft desks/areas.
The layout that I'm working on is a photo of our dog, Gracie. She hates it when I read! Every summer for the past 20 years, my daughter and I have a reading contest "Summer Reading Marathon". We read as many books as possible during the summer and whoever wins gets treated to ice cream at Baskin Robbins.
Gracie hates it when I read in the house and will bug me, scratch at the book, or whine while sitting next to me. It's hilarious! I always blame my daughter accusing them of being in cahoots with each other. LOL
I'm still messing around with paper and photo placement, but I'm almost done.
Don't forget to click on over to Stamping Ground and have a great week!
I love following layout sketches for inspiration so when I saw this sketch at Let's Scrap, I knew it was perfect for the last photos from my Tucson trip.
Since I knew the entire base sheet was going to be covered, I used two "ugly" papers instead of cardstock for the bases. Well...that's using my noggin!
The sketch:
My two page spread:
(I know the photos are not the best, but getting the double layout in one photo, was pretty hard.)
I was able to get ten 4x6 photos on this two-page spread and used the last of my Cricut cut cactus, journaling cards and punched bits for embellishment clusters.
If you need a great sketch, or just want some inspiration, click on over to Let's Scrap. The post a monthly two-page, one-page and card sketch. It doesn't get much better than that!
Hey friends, the current challenge at Bitten By The Bug challenge site is GREEN or St. Patrick's Day.
Like I'm sure most of us did, I initially thought of making a St. Patrick's Day project but decided to make something with a cactus instead.
I took a chance on another HOT MESS CANVAS. My first attempt was unsuccessful since I used shelf liner for the mask and the paint seeped through too much. This time I used vinyl. Huge difference! The vinyl stuck better to the canvas and there was no seepage!
I started painting the canvas and then decided to film...oh my gosh, it is hilarious! I didn't set up my tripod and just used my hand to film and it is ALL over the place. I was going to discard the whole thing, but then I decided to use it. I hope you're not too annoyed and think it's funny too.
So...here's the final project:
What I did:
I used multiple shades of green and purple acrylic paint to cover the canvas. Since it's called a hot mess canvas - don't worry about making it pretty - you just want it to be random.
I purposely put the purple on the bottom because of the pot.
I cut the mask using my Cricut and a freebie image on Design Space. Use vinyl to create the mask. Cut the image; weed it and put it on the transfer sheet.
Once your canvas is dried, adhere the vinyl. I used a little bit of Modge Podge to seal the vinyl to prevent seepage. When I say a little bit, I mean a little bit. I concentrated where the cut out words were but other than that, not much.
Paint over the mask with black acrylic paint. Be sure to pounce the brush over the mask as you would when painting over a stencil - again, this helps with seepage.
This is the hard part...waiting for the paint to dry. Once it does, remove the vinyl.
Don't forget to click on over to BBTB2 and join the current challenge. Create something inspired by the color GREEN.
Oh sweet Friday...you're back! I had a busy week. There was lots of rain and gloominess in our parts, but the landscape is green and that's always a good thing.
This week I'm thankful for my dentist. I've been having some problems with a crowned tooth. Well, insurance won't cover anything with it until it's at least five years old. Yes, I had it crowned in 2017 but there was a crack. I didn't want to pay the moola for it and my dentist said he'd cover all costs except for the actual crown.
SOLD! So like every QUEEN should, I had my crowned replaced this week.
Your turn...share what you're thankful for in the comment section.
Happy Hump Day! And Happy WOYWW! Every Wednesday a group of crafters link a photo of our desk top/work desk for the WOYWW link up. I hope you get a chance to check out these work areas and join the linkage! Click on over to Stamping Ground to read more about it and check out the linked posts.
Here's my desk:
It's actually pretty clean because I just finished a project for a Design Team that I'm on. The covered item on the lower right is the project. If you're interested in seeing it, come back on Monday, March 11th.
It's still raining here and we haven't seen the sun for awhile now, but it's all good!
I worked off a great sketch from Sketch n Scrap blog for this layout. I used six different patterned papers for this layout. I love all the color and how it all coordinates with my daughter’s T-shirt. Even though we took her to a concert for her birthday, we still had cake and ice cream with the family on her actual birthday night.
I still can’t believe that my baby is 25!
Here’s the original sketch:
And here’s my layout:
I used papers from SEI and random embellishments from my stash. The butterflies were given to me on a card strip from my Stampin Up demonstrator to showcase their cardstock colors. These were from the 2015 catalog...yes, I’ve kept this for that long! I’m so glad I was able to use these colors. I feel like they coordinated perfectly. And to finish it off, I added some splashes using my Color Silk in Black Licorice from Fun Stampers Journey.
Some close ups:
NOTE: I have been following a YouTube, RTS Scrapbooking and taking her advice on embellishment placements and design tips. So fun!
Click on over to the Sketch n Scrap blog to get inspired by their layouts. They post several per month and there’s a chance to win a prize! BTW...they also have card sketches for all the card makers out there!
I came, I shopped, I cropped...That’s what I did yesterday at the Stamp & Scrapbook Expo on Saturday. I tried to be really good on my purchases, but overall you just get caught up in the goodies, the booths, the demonstrations and all the sales.
Here’s a couple of shots of my haul:
I forgot to place the magnet bar for my MISTI and the most amazing thing f or scrapbooking...there is something cool from Penless.com. I’m not exactly sure what it’s called, but basically it’s a scan code on a sticker so you can add videos to your scrapbooking pages. I am so excited to use them when I create my son & daughter-in-law’s wedding album.
My daughter used on with her scrapbook page of her class fieldtrip when they made homemade ice cream. So she did the page with photos and then added the sticker/scan. So as you’re looking at her page, you put your phone up to the sticker and the video that she downloaded pops up. MIND BLOWN!
I bought two alcohol markers that are skin toned. These markers have a light, medium and dark pen in one. I’ll try it and hope that it’ll help my skin coloring skills. I also did some damage at the Queen & Company booth - love their doodads!
Today I got to read at my granddaughter's school for Dr. Seuss' Birthday & Read Across America. I'm thankful this week for the opportunity I have to do fun things during the work day with my granddaughter. It's a perk for working in the same school district. On this particular volunteer day, I don't even have to document my time off since I was invited by the school site.
So thank you to the school site for inviting me to perform grandmother duty!
How about you? What are you thankful for this week? Leave a comment to let everyone know what you are thankful for this week.
It's the first of the month which means a new card challenge at Creative With Stamps! This month's challenge is FRIENDS.
When I saw the challenge this month, I knew I'd use this stamp that I won from Unity Stamp Co. last year.
I hope this card and challenge encourage you to create something for that special friend...just because.
The paper on the background is actually a project life card. I stamped the image with gold ink on the paper and also on a piece of white cardstock. I watercolored the image and adhered it over the top of the gold stamped image. I added extra “dots” around the image with a splatter stamp.
I also added three various washi tapes on the bottom of the image. Stamped the sentiment and that’s it.
I felt like the image needed something more so I grabbed a black, brown and white marker and added lines and dots, etc. to add some depth to the stamped image.
Please be sure to link up your card at Creative With Stamps (CWS) before the end of the month for your chance to win a prize.