Showing posts with label Card/Page Candy. Show all posts

Thursday, October 5, 2023

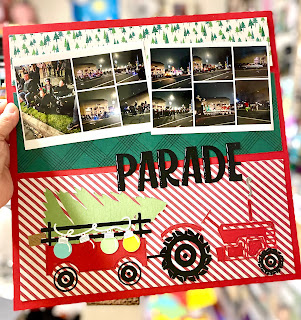
Christmas Parade Layout; CutCardStock

Having good quality cardstock is a must when creating paper projects especially when using a cutting machine like the Cricut. I love the variety of colors, prices and quality that CutCardStock has on the website. Be sure to sign up for their email list because they are always having sales!

I'm close to completing 2021 and I'm now scrapbooking Christmas! There is always so much to do and see during the month of December and I have challenged myself to take at least one photo a day during this month. It's my December Daily challenge but of course as you can see, some days I take way more than one photo!


This layout showcases our town's Christmas Parade. After living here for 20 years, can you believe this is the first year that I've attended? Could it have something to do with the fact that my granddaughter was in the parade?

Living in an agriculture town means there's always a tractor or two in the parade and that was my inspiration for this layout. 


I used images from Cricut Design Space to create cute embellishments and CutCardStock for all the cardstock - see the list & links below. I also used Pepper Red for the layout base. 

Here's a cool tip. After cutting out the tractor pieces, I used the remaining piece of the 12x12 cardstock as the base. The patterned paper strips cover the cut away areas perfectly.


Here's the Design Space link if you'd like to create something similar. I may have selected the hardest image to put together since there are lots of small pieces but it all came together. Each piece was highlighted with either black, white or a clear marker.


The patterned paper strips are cut at 11.5” long and 5, 3.5, and 2.25” wide.

Do you need paper crafting inspiration? Be sure to check out the CCS Blog for a variety of paper projects!


Be sure to check out the process video:


Monday, February 8, 2021

Adventure Swap

Remember, I posted THIS project a few weeks ago? Well, I just received the items from the swap over the weekend. I LOVE all of them and am so excited to use them in my scrapbooking.

I love the hot air balloons and may be prompted to go to a festival or something just so I can use them! LOL

Here's what I got - I also love how one of these matches mine so perfectly!

Have a great day!

Monday, January 25, 2021

Handmade Embellishments Swap

I signed up for a handmade embellishment swap in one of the scrapbooking Facebook groups that I'm a member of. The theme is adventure/outdoors. I signed up because we did a lot of hiking during the Spring/Summer last year and am hoping to get some great embellishments.

I purchased a stamp set from Close To My Heart (CTMH) recently and decided to use this as my base and work from there.
Although it is one stamp, I used it in three different ways. First I stamped the entire image in black on white cardstock; then I stamped the tree portion in green also on white cardstock; the "STAY WILD" was stamped on woodgrain paper in black ink.

I used my oval cutter from Stampin Up! in a beautiful yellow cardstock as the base and inked the edges with chalk ink from Quick Quotes; fussy cut the stamped image and the green trees; adhered the woodgrain paper strip before adding the tree w/foam adhesive.

As an afterthought, I used a watercolor marker & water brush to add some color behind the trees. Once that dried, I used a white pen to add dots.

I'm mailing them out today. I can't wait to see what I get in return!


Tuesday, October 6, 2020

Bash Your Stash; Stamps (Other Holidays)


Hello! I skipped a drawer and decided to tackle the "Other Holidays" stamps (which is any holiday other than Christmas). I know I'm keeping the "Background" stamps but I do need to keep track of what I have.

The first thing I did was separate the stamps by holiday. I didn't realize I have a lot of Halloween stamps for someone who doesn't send out cards for this holiday. SMH...they are super cute though. I also have a lot of Easter stamps. Who knew?

I removed the stamps I'm sure I won't used - which is how I start thinning out each drawer. Then started my projects. It's really hard to create holiday projects when the particular holiday is not here. But I did manage to make a few Halloween cards since I do plan on sending some this year:


I notice that cards are my "go to", but I do plan on making gift tags/cards for Christmas (I've been doing a 12 Days of Christmas Gift Tags for a few years now - click over to the label on the right to see these!) And I may do Thanksgiving cards since we won't be gathering this year.

Remember, if you are interested in receiving a handmade card from me, please send me an email or leave a comment below. My card box is starting to fill up again! Or if you are searching for particular stamps, I can send photos of what I'm putting in my giveaway pile.

If you're interested in seeing other projects I completed while bashing my stash, click on the Bash Your Stash label to the right.

Tuesday, July 28, 2020

Update: Rainbows and Umbrellas Swap

I received my swap items for the FB Love RTS scrapbooking group. If you recall, the theme was Rainbows & Umbrellas. See my original post HERE to read more about it and to see my swap item contribution.

I received them awhile ago and I just remembered that I didn't share a photo of what I received. If you've never participated in a swap before, I highly recommend them. But I will give a warning...don't join up for all of them! I was a little obsessive years ago and was signing up for swap after swap. Many of them, the themes were nothing I would ever use.

I decided to join this one since it's been awhile.

Here's the pile of goodies:

I really enjoyed the variety. Some of the items I will use on cards, scrapbook layouts and even my Junk Journal. I'm excited to use them!

And just so you know...there have been two more and I did not join in. LOL

Have a wonderful week!

Thursday, June 11, 2020

Love RTS Swap; Rainbows & Umbrellas

Hey there, remember back in the day when I was participating in a lot of swaps? Well, that was so long ago and I kinda sorta missed doing them.

When the Facebook group, Love RTS, posted if anyone was interested in a swap, I jumped in with two feet. I missed the first one since I didn't see the post, but I signed up for the second one with the theme...rainbows & umbrellas.

I used this Kindness Is Cool stamp set by Fun Stampers Journey (FSJ)
to create these Faux Polaroids:

Oh my gosh, aren't they super cute? I made extras for myself because I love how cheerful and fun they are!

This is what I did...
  • Used a square punch and cutter to create my own "Polaroids". They are approximately 2x2.5".
  • Cut up an assortment of blue cardstock scraps and adhered to the back.
  • Stamped "smile" on the bottom of each one - some of the right side & some on the left.
  • Colored in the rainbow using watercolor markers.
  • Used a Glue Dot to adhere a bit of gold thread before adding the rainbow with dimensional adhesive to pop it up.
  • The small colorful flat enamel hearts are also from FSJ and came in rainbow colors (perfect!)
  • Cut thin strips into fishtail banners using cardstock scraps.
  • Plopped a enamel dot to the top of the banners.
We had to make & send 15 of the same item and we received 15 different ones. Fun, huh?! I can't wait to see what I get in return.

Fun Stampers Journey is now sold through Spellbinders. If you're interested in their products, click to their website HERE.

Thursday, November 17, 2016

Quick Holiday Cards Using Scraps

Remember the "coloring" page I created using the Bloom Art Stamps holly digi stamp?  Well, I used most of the sheet for the tags I made, but there was some leftover.  My friend, Debbie gave me some random papers and cards so I decided to use these postcard sized papers to border the handmade patterned paper.  I measured and adhered in the center of the card.  I snipped these black borders which were the leftover edges of the postage stamp shaped tags I made earlier.  They are perfect for this scraptastic holiday card!


The sentiment was also in my scrap pile.  I added some card candy on the other two.


This last card was made using an index card that I created while waiting on hold at work.  I grabbed some highlighters and a black sharpie to create this holly background.

I used the black border scraps again, but this time I actually cut the JOY from my cricut machine.


These were so simple to make but I just love them!  Very quick and easy holiday cards.  I love using scraps and bits and pieces laying around on my desk.  These black borders are a perfect example of this!


Sunday, November 13, 2016

12 Days of Christmas Tags: DAY NINE

My tag ideas are getting weaker.  I do like these easy tags and boy oh boy is the Cricut coming in handy!!  I cut these "postage stamp" bases and border with the Art Philosophy cartridge exclusive to CTMH.  This was such a GREAT BUY!  I'm so glad I got it.

These cutie pie snowmen were made by using a circle punch and the rest was just hand cut squares and strips for the brim.  I used markers to draw the face details and even added some pink rosy cheeks!  


The stars are also from a punch and the green "leaves" are from the NUVO dimensional crystal drops.  (Sorry for the terrible photo...I'm sitting in the passenger seat on a road trip and worked on these)


Don't forget to comment on this post and the previous Christmas Tag posts for your chance to win all 12 tags.  At the end of this series, I'll pull one winner!

Sunday, August 10, 2014

49 Crosses

I spent most of the day yesterday making 49 3D pink//white crosses for baby girl baptism invitations. My friend is stamping the card bases with a swirl stamp and then we're adding the crosses.  I'll post the finished invitations once they are put together.

I used the Indie Art cartridge for the crosses.  It took 7 1/2 pieces of white cardstock and 4 pieces of pink to make all of them!  I cut the first layer of white using the shadow option, pink using the blackout option and then the shift key for the top white layer.  The thinner cross was glued directly to the pink base and then that was foam taped (for dimension) to the white shadow base.  Then I threaded 49 pink buttons with pink floss and glued those to the centers.  All the layers were cut at 3".

In case you're wondering why only 49...I made the first one as a sample before making all 50 to make sure she liked the size.


So pretty!

Sunday, March 23, 2014

Spread the Magic

I'm making lots and lots of Disney inspired layouts and combined some embellishments I made for a Disney swap and a My Creative Sketches' sketch.  I love starting with a sketch.  It makes coming up with interesting layouts easier.  Here's the original sketch from My Creative Sketches:


And here's my take:

I love the bright colors of Disney!  Instead of butterflies, I used silhouettes of Mickey's head.  The "banner" is my cluster of pennants - great for some journaling.

The "candy" was made over a year ago and was sitting around waiting for me to use them.  The paper is from an assortment of papers from Creative Memories (red Mickey), EK Success (black words) and The Paper Studio (Color Kaleidoscope paper pack - base sheet).  I bought the Washi Tape from the Scrapbook Expo.

The photo will come later.  

Friday, January 31, 2014

The 6th (Wo)man

I'm playing along with the sketch challenge at My Creative Sketches.  They have such fun sketches and the prizes are amazing!  I hope one day I'll win one of their packages.  Check our their challenge site here.

Here's the sketch:


And here's my finished layout:

Close up of the embellies!

Mom and Dad
 I love the layers and layers of paper.  I think layering patterned paper is my favorite thing right now. I know you're thinking, strange choice of patterned papers since it's not Halloween, but my parents' school colors were orange and black.  They both attended the California School for the Deaf in Berkeley, CA in the 50's.  These photos were in 1958.  I love that my dad was such a jock and mom was his biggest fan!  So cute!

Papers:  K & Company, Spooky Designer Paper Pad
Love Paper:  DCWV; A Type of Art Stack
Embellies:  Made by me for a "candy" swap a few years back.  I finally had the opportunity to use the orange masculine candy.
Striped Tickets:  I received in an embellished ticket swap
Orange Paper Flower:  Paper Whimsies via air mail by Sassafras
Black/white polka dot washi tape; some orange gems and an assortment of alphabet stickers from my stash
Punched Orange Hearts:  Triple Heart punch by Stampin' Up!


Thursday, August 1, 2013

Spread the Magic...

I just finished the pieces for a Disney swap I'm in at Splitcoaststampers.  I love Disney swaps because it's hard to "mess up" embellishments for the Happiest Place on Earth!


I pulled out bright green, blue, yellow, red and black cardstock and one of my Disney patterned paper pads.  Most of the pieces were created by layering circles cut from my Creative Memories circle cutter and I also used my cricut Art Philosophy cartridge for the starburst and scalloped circles.  I used Stampin' Up doily stamps for the blue and red (styrograph looking) circles.

LOVE!

Sunday, March 31, 2013

I Want Candy!

Finished one more swap.  This one was for masculine candy and I chose the color Orange.  I thought it would be a challenge not only because of the color but because it was masculine.  Feminine candy is so much easier to work on.

Here are some photos!

I was thinking of doing something with a tie or bow tie, but it just didn't go that way.  

I made extra tickets so I can use them for my decorated tickets swap.  I love that beer mug stamp and of course the mustache brads that I purchased from the Scrapbook Expo.  

I used an assortment of stamps, paper and punches from my stash.  I really  need to purchase more of the screw brads.  I used all the tiny ones and have only a few left of the medium size ones. 


Saturday, February 23, 2013

I'm Swamped with Swaps!

Well, I found time to relax in the Command Center.  I've joined two more swaps on Splitcoast Stampers and started another one of my own.  I worked on these bottlecap magnets.  I really liked the way they turned out and they were so fast and easy!

I still need to work on the holders which will be can lids.  This is truly a recycled project.  First of all I still have lots of bottlecaps from the beer winnings (woo hoo), the holders are recylced can lids and even the buttons are old buttons that are in a jar.  I did however use a paperpad that I've had for a while now and never used - you know the kind, have to have it right now but of course you forget all about it.  LOL

I also started drifting and made these cute ticket embellishments which encouraged me to start a new swap on Splitcoast Stampers for these:
I love how they turned out.  Another recycled project since these tickets are from old raffle tickets that we never won.  You see, you're always a winner when raffle tickets are involved :).  I have a whole drawer of these and need to do something with them.  They come in such great colors, they are so hard to throw away.

Ok, I'll confess, I'm pretty sure this is called hoarding...but the good kind, right?

If you're a Splitcoast Stamper member and interested in this swap, go here.

Friday, January 18, 2013

Durham Family Photos

Don't you love the tin soldier on this page!  It's from the Joys of the Season cricut cartridge and cut because of a Big Cricut Candy swap that I'm hosting on SCS.

I can't decide if I will add a face to my soldier.


Tuesday, July 24, 2012

July Pink Pajama Slumber Party Group Challenge

The challenge for this month is make a Fancy Fold card.  I don't know if this stair step card counts, but I've been wanting to make one for awhile so it seemed like the perfect time.  It actually took longer than I thought and wasn't as easy as I was thinking it would be.  The samples I've seen are great and I'm not in love with what I made, but it'll do...


I don't know why they never stay right side up when I do this from my work computer.  Probably because I'm doing it at work and technically shouldn't be (except I'm on my break so it's not actually work time).

Turn your head to the right and view...

To kill two birds with one stone, I also used this opportunity to make this for the Scrap Fit workout color challenge #72.  Use brown, sage and coral. 

Enjoy!

Saturday, May 26, 2012

Celle's Virtual Baby Shower Challenge

Create a card based on a boy themed poem...

Here's my card:

I used some borders from a Border Punch Swap that I hosted awhile back on SCS.  I used some chalk pencils and a blending pen for the coloring of the boy/bug image.  I completely forgot I had them...  I tried to add some extra dirt on the knees and his face.

Tuesday, January 24, 2012

Feathered Friends Page/Card Candy

I just made some hen page/card candy for a Feathered Friends swap that I'm hosting on Splitcoaststampers.  What do you think?  Cute, huh?
I put a yellow piece of cardstock under them, but it seems like I should have used another color.  They look sort of boring, but they are really cute.

Saturday, May 28, 2011

Card Candy Swap

I have been participating in a lot of swaps and here's my newest creations... This is for really BIG card candy.  The guitars are shaker boxes and they are about 7" tall.  The tropical drink has layers of paper and inking and they are about 5" tall.