Showing posts with label CTMH. Show all posts

Sunday, May 18, 2025

Faux Postage Stamps Card; Jenlee Schoolcraft


Hey there. I'm showing off a really cool card in this post. You've probably seen this type but here's my version.


Now I've been heart-eying these faux stamp cards for awhile but haven't tried it since I didn't have the dies and/or stencil. Then I thought, hey I can probably make something with the Cricut! And I did. Here's the DS link

I'm using the Happy Thoughts stamp set from CTMH which is from the Jenlee Schoolcraft website. Check out the website for new and slightly used crafty products at budget friendly prices!


Watch the YouTube process video to see how it was done.


Besides the inking and stamping, I also added lots of white pen marks and black pen lines around the edges.

I am so happy with the end result and the black card base really makes it pop!

The Jenlee Schoolcraft website stocks a variety of supplies and many are retired and/or out of commission like this stamp set. If you use the discount code "Dorlene", you'll get 10% off your order!

Saturday, March 29, 2025

Sizzix Sidekick and Dies Challenge; Final Project


It's the last Saturday in March and this is the last project of my Sizzix Sidekick and Dies challenge. Since I'm out of town, I was limited to only a few supplies. I still managed to make a beautiful card for the challenge!


Be sure to watch the final YouTube process video to see how this was done.


Tuesday, January 14, 2025

Elvis Museum Layout

I'm starting my Memphis trip layouts so you're gonna see lots of Elvis themed pages. These pages are photos from the Entertainment Career Museum. I created lots of Elvis, music, and records cuts with my Cricut to add fun embellishments to the pages. 

I went to a four day scrapbooking retreat and finished lots of layouts - 31 to be exact! I packed light and really used my imagination on most of them. This two pager was a sketch challenge with other specifics. I love the paper choices which wasn't part of my plan.


Watch the process video because there's a lot going on with this layout. I hope to inspire you!


Video:


Thursday, November 14, 2024

Multi Photo With Minimal Embellishments

I loosely followed a sketch by A Cherry On Top but added lots of photos. I wanted some embellishments but there wasn't much room for too many.


I was able to get some journaling, a title which expands both pages and a few on there.


There are 18 photos on this two page spread!

To get the small photos, I use the collage prints in a 4x6 format and the more photos you add, the smaller the photos. This is great for those pictures that don't necessarily need to be full photos.


The horizontal strips are 6" and the vertical strip is 2.5" and 10.5" tall.  The circles are 3".

All the embellishments were cut with the Cricut. Check the YouTube process video to see how it was completed.


Friday, November 8, 2024

TomKat Strut Challenges; Part Two

Hey there, I'm sure you had a chance to see the post & YouTube process video for the left side a.k.a. Part One of this two page spread. If not, check out the post HERE.

I used the same sketch to change this one page sketch to a two page spread. I love using sketches for a jumping point when creating layouts. It gives me a place to start instead of working with a blank page. Even when the sketch is not used exactly, you can see how it inspired the patterned papers placement. And of course, I added many more photos!

I basically did a mirror image of the left page for this one and I love how it flows!

Sketch is from Sketch n Scrap

Part One Layout:

And Part Two:

What do you think? Thumbs up?


Wednesday, November 6, 2024

TKS IV Challenges Layout Part One

I love using sketches to add paper to a layout base. It's a great way to start instead of staring at a blank page. This layout is inspired by this sketch from Sketch n Scrap


I turned this one page sketch into a two page layout. Here's the left side:


And here's the right (YT process video will be posted soon)


What I love about these pages:
The sneakers going across the bottom of them
Multi photos
Nautical themed kit used on a non-nautical page
Cute simple embellishments 

Measurements:
Yellow strip 11x3
Word paper 10x5
Star paper 8x8 square 

Watch the process YouTube video:


Monday, September 16, 2024

Fiesta Parade Layout Using Flip Flaps

Parades are so fun and of course we take lots of photos but how do we incorporate all the photos onto one layout? Flip Flaps!!

I was able to get 13 photos on this one 12x12 layout because I used an 8x12, 4x4 and 3x4 flaps!


The paperline I used is an older Stampin Up! line that is circus theme. I used my Cricut for the title letters and the Print/Cut embellishment, journaling strips for the journaling and sticker labels to add some more journaling to the photos.


Check out the YouTube process journaling to see how I created this layout!


Friday, September 6, 2024

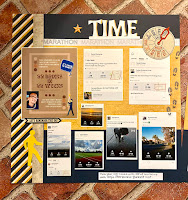
Time To Strut Layout

Lots and lots of photos on this two page spread. I love using sketches to create the background of layouts and then completing the layouts with photos, embellishments and a title.


I realized as I was going through these photos is that I probably made a lot of them too small and maybe don't need to print ALL the photos submitted during our family's virtual marathon. But I really do like reliving the memories and it's hard to weed out some of them.

This two page spread started by using a sketch book by CTMH. I really like these sketches because they give the cutting dimensions so there's no guesswork. The vertical strips are 2.5 x 12 and 1.25 x 12" and the horizontal strips are 9.75x6 and .5 x 9.75". Easy Peasy!

After adding all the photos and a couple of embellishments, I thought I was done but then my daughter said it needed something else. Hmmm, probably a title.


So I created a simple one using the Cricut. I added a skinny bar across the bottom of the letters so adding them to the layout would be easy - it was!


Be sure to check out the YouTube process video


Wednesday, June 19, 2024

Let It Shine Layout; Rediscover Your Stash YT Hop


I’m participating in a YouTube hop with Rediscover Your Stash which is a Facebook group. This month is journaling. If I’m being honest, I’m really not sure what that means. So I talk a lot about journaling while creating this one page layout.


I’m also using a sketch from Stick It Down 


And here’s the layout. Journaling and all!


I used a paper pack from CTMH and embellishments from Pebbles. The rectangles are all 3.5 high; one is 11”, 7.5, and 3.5 square.

What are some creative ways that you journal? 

Check out the following hoppers!

Alex's Intro: https://youtu.be/4XXTf7Zi5Ls 

Sara: https://www.youtube.com/@SaraScraps

ScrapRona: https://www.youtube.com/watch?v=r6av0ACwWrY

Dorlene: https://www.youtube.com/@dorlenedurham

Mel W: https://www.youtube.com/@MelWScrapping


Tuesday, April 9, 2024

Bubbles Layout


This is one of my favorite things to do when creating a layout without a specific theme. Gather all things pink (in this case) and just layer and layer stickers, die cuts, etc

I went through my die cut embellishments and just had fun with them. This layout used three small photos of my granddaughter using her bubble machine. 


Left side and right 


I used patterned papers from CTMH and no solid cardstock!

See the YouTube process video:


Friday, March 15, 2024

Sketch n Scrap Layout Sketch #293


Normally, I like to say that I'm a scrapbooker who makes cards but lately I've really been more of a cardmaker that sometimes scrapbooks. I guess there's no surprise that I'm behind in my scrapbooking!


Well, to help get started with creating a layout, I love using sketches. This sketch from Sketch n Scrap was perfect for some selfies of my oldest granddaughter. I must have left my phone unattended because when I checked my photos later, I saw these silly photos of her.

She's probably going to hate this layout but hey, that's the price you pay when taking selfies on grandma's phone. Especially when you know she's a scrapbooker!


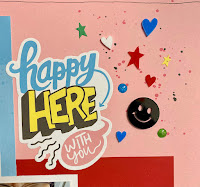
I used a paper & sticker pack from Close To My Heart called Wet Paint. It's so fun for a preteen/teenage vibe. Adding pink as the cardstock base really gave this a feminine look and helped coordinate it to her shirt.

I cut the blue vertical strip at 4.5x11 and the heart graffiti strip at 3.5x11. As you can see in the YouTube process video, the black/white checked paper is .75" and about 8" long but I did some magic to extend that piece. Here are some closeups of the two embellishment clusters:


The acrylic pieces were part of the Wet Paint collection and add some cool dimension. I added pink and black splatter all over the layout as well as some bright enamel dots. So fun!

Check out the video:


Be sure to check out the Sketch n Scrap Blog for all the sketches and inspiration. There's also a Facebook page if you prefer that.

NOTE: It's going to be interesting to learn more about the future of CTMH products, etc. I've been hearing rumors but not sure of what is true or not. I guess I'll wait and see. Either way, I'm a fan of Stampin Up! as well so...win-win for me.

Tuesday, February 20, 2024

Get Better With Age; Sketch n Scrap Card #260


Do you struggle making masculine cards? I know I do. I decided to create one for this card sketch by Sketch n Scrap.


I used a stamp set from Fun Stampers Journey (currently Spellbinders) to create my background and focal images for this card. The sentiment is from CTMH.


To create the background, I placed three of the stamps on the acrylic block and stamped them across the piece of 5x3.75" red paper using Versamark Ink; sprinkled white embossing powder over the images and then used a heat gun to set. I found a blue piece of cardstock in my scrap bin and cut it to 5.5x1". Card making is the perfect time to use paper scraps!

I stamped the sentiment directly on a piece of white cardstock measuring 3.5x2". The two focal images were stamped and fussy cut on more scrap paper before adding to the left of the sentiment box.

The inside greeting was stamped in the middle of the card but also some beer bottles lined the right side. I'll tell you a secret...I wasn't planning on putting those bottles on the side, but I got some ink smudge there so instead of freaking out...I decided to embellish.

I found the little clip on my desktop so I decided to add that with a little rolled piece of twine. That little bit plus some stars were the only embellishments needed to complete the card. Nothing fancy but perfect for a masculine birthday card!

Be sure to check out Sketch n Scrap for your card & layout sketches. They post two of each sketches a month on their blog and on their FaceBook group.

Wednesday, January 31, 2024

Gnome Fun Fold Birthday Cards

Have you checked out your local dollar stores for crafty supplies? I'm telling you, the Dollar Tree in my town is bursting with great supplies. Recently I found some 6x6 paper pads so I bought one. There were others, but even at $1.25, it's not a bargain unless you know you are going to use it! 

Honestly, I don't know if the paper is acid free and all that, but for card use, $1.25 for a pad of 24 sheets of paper!?! Heck ya - that's a deal!


I decided to make some cards using the paper and they turned out so cute! I found the card design from Klompen Stampers Blog. You can find the dimensions there as well as a quick look in my own YouTube process video.


I used gnome stamps from Close To My Heart and colored them in using alcohol markers from my stash. Cardstock is from CutCardStock and the other patterned papers are just from my scraps.


This card is a little different since the base is not folded but the small card placed in the triangle pocket is. It's a great place to put your greeting and a gift card if desired.


CutCardStock: Patriotic Blue, Light Blue, Grape Purple and Cougar Smooth White and Cotton Candy Pink and Pink