Tuesday, January 27, 2015

Pocket Pages Galore

Seriously on a roll...
Here are some photos of some of the pages I've completed in my Orlando trip album.


I slid the photos in first and then just slid in different cards, etc.  I will tell you...it sure does help to have your embellishments in some sort of order and it will make your project life/pocket page life so much easier!

So fun!  These are many just from thr first day.

Sunday, January 25, 2015

Cards, cards and more cards!


I was on a card making roll last night.  Made nine in about an hour.  I just grabbed a collection of items that I've had for about two years and started layering on a card base.  So easy.

As you can tell,  they have not been placed on card bases yet.  I figured I'd add a sentiment before I give them away.

The collection of stickers, paper, and chipboard pieces are from Colorbok.  It's their Antique Paperie collection and I purchased them at Joanne's on clearance.

Saturday, January 24, 2015

It's Your Day Card Challenge

I'm so excited that I've been spending so much time in the Command Center lately.  I've got my groove back!

This card fits the challenge requirements of two different challenge sites.  The first is SCS and the mixed media site (use a monochromatic color scheme) and the second is a sketch challenge on Let's
Scrap.  I haven't participated in a sketch challenge in a long time so I was pretty excited to start with a card sketch first.  Go to the Let's Scrap website to see the original sketch plus other challenges.  Click here.

Here's the card:


Papers are from my scrap pile; I cut them into 1" squares.  The I sprayed with Tattered Angels glittermist.  Once that dried, I stamped the doiley in Old Olive ink and the a fern stamp in Wild Wasabi.  Two strips of washi tape, ink around the edges and then the  sentiment in black.  Three enamel dots (handmade by me).

Friday, January 23, 2015

She's All About That Bass

My first Mix Media challenge contribution...


The challenge was called "Repeat.Repeat.Repeat".  You get it...figure out what whether it's a shape, color, theme, whatever and repeat it over and over again.  Hmmm...guess what I chose.  LOL

So I saw on the internet a recipe to make your own texture paste.  So I decided to try it.  It works perfect!  Mix together 1/4 cup of powder (I used a foot powder because that's all I had), 1 TBS of white glue and 1 TBS of white paint.  Everything you probably already have.  Then slowly add water while stirring to make a paste.  Be sure to store in an airtight container.

I used this paste on the stencil on the right bottom corner.

Anyhow, I noticed a pattern of favorite colors when I select my paints and inks.  Next challenge I'll have to select pastels or something.

I wasn't sure what to write until I was driving home and heard the Meghan Trainor song "All About That Bass" and thought "so funny!"  So there you go.

Mix-Ability Friday Challenges

I'm so excited to be a part of the Mix-Ability Friday challenges on Splitcoaststampers.com.  There's a new challenge posted each week and I've already worked on one.  If you want to join many others, click here...Not only can you communicate with other mixed media artists, but you can view (and add) projects for more inspiration.


I've decided to do these mix media challenges in my Art Journal, but I may use them for cards, scrapbook layouts or whatever...


Woo Hoo!

Sunday, January 11, 2015

New Year...New Start

Happy New Year!  I finally got a chance to spend some time in the Command Center this morning (wait...I think it's afternoon now).  I helped my sister clear out her office and it got me thinking...I need to do some purging myself.  So last week, I went through boxes and stacks and started tossing.  I filled four garbage bags and had three medium size boxes of stuff to throw away or donate.  Believe me, to everyone else, the room looks the same, but I see the difference.  I decided to throw out many of the items I was going to upcycle.  I have way too many, "I can do something with this" items.  But I did keep some...I'm not crazy afterall.  I found this cardboard boxtop (for lack of a better word).  It's about 9x7.  So, that was what I used for the base of my first of the year mixed media project.  I always have to look at blogs, etc to get a little motivation and found some great tips on Pinterest.

First tip:  when using materials for your project, swipe the remaining product on a page on your art journal.  For instance, I stenciled an area on my main project and then turned the stencil around and swiped it on a journal page.  See photos:

Tip Two:  Use a cylinder item and spray glimmer mist, etc in the center for a solid circle.  See photo:

If you look above the cylinder to the right, you can see the solid green circle.

Ok...now to the details:
As anyone who has played with mixed media knows, it's about layers.  So, I started with adding random pieces of scrapbook paper I have in my scrap pile.  My pink scraps were getting pretty full so I decided to use pink.  There really is no other reason.

Then I put white paint over everything.  Once that dried, I started rubbing Walnut Ink over it, but then thought I didn't really like it so stopped.  If you  look really close, you can see that the while paint created a crackle finish which was very interesting!


I selected four colors from my stash of acrylic paints.  For no reason, I selected Lavender, Marine, King's Gold and Too Blue.  Then started using these four colors to add excitement to the base.
I used random materials that I store in a box marked "mixed media".  These items include some of the ones pictured above.  Like bubble wrap, stencils, cardboard, toilet tissue tube, sponges, sticks, old credit cards, stamps, thread, pens, negative alphabet sheets, and other found objects.    That's the fun part!  Plus if you don't like what you see, you just cover it and start over again.

The photo below shows the journal page I am making using the same products so not to waste materials and the  object on the right is the main project.

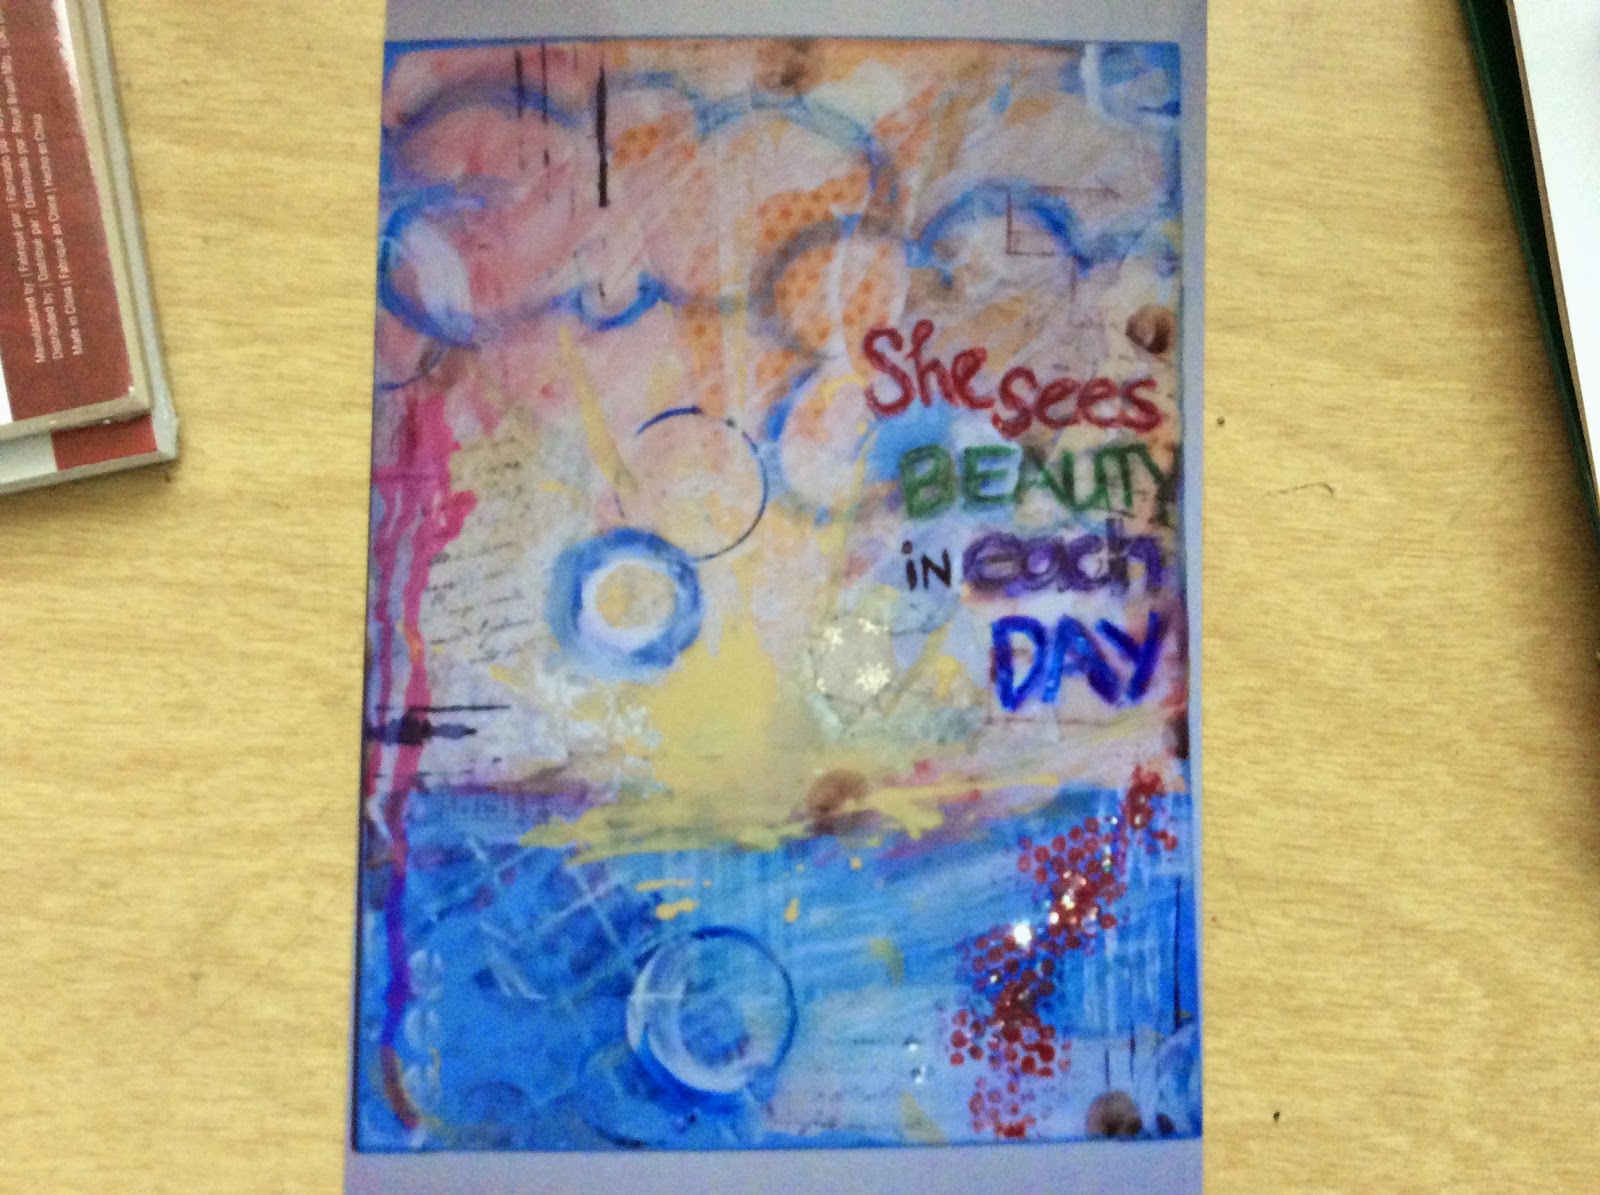
I bought a Prima doll stamp (I finally found one with curly hair!) over the holidays and dressed her up for this She Art.  Here's the final project.  I set out thinking I would make something for my daughter's friend who is leaving to go back to school but I always fall in love with my projects and of course want to keep it.  LOL


I love projects like this.  I do not spend any money and use items I already have.

You probably noticed I mentioned an Art Journal.  I'm been thinking about starting one for awhile, and so now I finally did.  The page is not complete since it needs some sort of focal point.  I may create the doll again or not.  I haven't decided yet.

So...there it is.  My first project for 2015!  How do you like it?

She Art Version II


Check out this canvas when I thought I was done with it back in April, 2014.  I entered this in the Art and Wine Galleria at that time.  Well I hung it up in our bedroom and kept thinking, I like it, but there just seems to be something missing.  So...I took it off the wall; brought it to the Command Center; and just had at it.

Here's the final take:


I plan on giving it to my friend, Nikyra for her birthday.  She's actually the person I was thinking of when I came up with the verse.  She is the most positive person I know.  Very inspiring!

The canvas is actually 16x20, but I had to take a picture of a picture since I deleted the photo of the actual canvas by mistake.  I love the updo...do you?