Thursday, July 30, 2015

Road Trip Mini Vacation

I have been in a funk lately and need a vacation so bad!  Besides taking a day off here and there, I haven't had a long vacation since last year.  I hate taking time off just to stay home since I don't feel like I'm getting time off.  You know the true statement, "Moms never get a day off".  That's me.  Even though my husband and children are all old enough to take care of themselves, I convince myself that I have to do the cooking and all the other "mom" stuff which = NO REST and NO VACATION.

Kenny and I are taking off this weekend to Palm Springs.  It's a five to six hour drive so basically a ROAD TRIP!  We don't have any plans, just relaxing in and by the pool and not a whole lot of anything else.  It's probably not a good time to go south since it's supposed to be 108+ degrees.  (It's supposed to be 103 at home so what's the difference, right?)  BUT...it's a dry heat LOL  I just want to be in a place where I don't need to worry about cooking or cleaning!  Now that's my idea of a great vacation!  There are lots of  art museums and I hope to visit at least one, but not a big deal if I don't...again...no plans.  LOL

Of course, you know I cannot go anywhere without some art supplies.  I do plan on bringing some stuff and hope to do something artsy.  I already googled scrapbook stores and found a couple.  I don't know if we'll stop or they are even on the same path that we're going, but it'll be fun if we get to stop.


Until then...

We're Back:
It actually got up to 115 degrees on Saturday.  We had fun!
(some of my doodles and art supply box)

Wednesday, July 29, 2015

Bad Girls

I love the lyrics to the song "BAD GIRLS" by Tennis and knew I'd use this particular part of the song on something at some point.


I bought some 8x10 canvases over the weekend and started painting until I got to a point that I liked.  Believe it or not, this was much more colorful when I first wrote the words, but it wasn't centered and I did not like it.  So I painted over it with white acrylic paint, let it dry and rewrote it.  I added some pink polka dots and another layer of white paint between letters to cover some of the old marks.  I'm not sure what I'm going to do with this...probably try to sell it or gift it to someone....hmmm...where my bad girls at???  LOL


I am posting this on the SCS Mixability Challenge because I did do some crackle painting on both the upper left and lower right corners.  I used my crackle paint but didn't wait long enough between coats for it to crackle much so I ended up using my crackle background stamp from SU!


Products used:  assorted acrylic paints, black and slate inks, black and gray Sharpie markers, white gel pen, script and crackle background stamps; texture paste and lots of doodling.

Monday, July 27, 2015

Life Happens

Cosmos is the October flower of the month in the Lila Grey Digi Stamps available on the website below and/or Etsy shop.

I printed the flower on the right hand corner of white cardstock.  I followed the Tuesday color challenge on SCS which is Tempting Turquoise, Smokey Gray and Crushed Curry.  I only had the TT but used Granite Gray acrylic paint and Honey CTMH inkpad and alcohol marker.  I did need to use green for the flower stems but besides a little black and white, just stuck to these three colors.

I spread watered down gray paint around the flower and entire page.  Once dried, I randomly stamped some turquoise ink around the page using the Gorgeous Grunge Stampin' Up set.  I used a blending pen to "paint" the flower in honey ink and used the coordinating alcohol marker to darken around the edges and inside lines in the flower.

I used a circle stencil to add gray circles on the top right side of the page and doodled around them with a black BIC pen.  Stamped some background dots on the flower and around the page using the appropriate color ink.  Then I sprinkled watered down white acrylic paint around the page.  After everything dried, I stamped the sentiment.


October Flower of the Month:  Lila Grey Stamps
Splitcoaststampers Color Challenge:  Splitcoaststampers

Sunday, July 26, 2015

50 Year Celebration

My sister's in-laws just celebrated their 50th wedding anniversary and they asked me to make the table centerpieces.  So we got together one weekend and prettied up some mason jars.  Carly wrote "50" on each jar with hot glue; I spraypainted them in gold and dipped them in gold glitter once they dried.  I had some tulle that I purchased from a yard sale a few summers ago and it was perfect that I had both gold and rose (rose was their wedding color).  So we tied bows on each jar.  I used my cricut to cut out the mats for the photos and the number "50".  I had so much gold printed paper from my own parent's 50th party we had a few years ago.  My sister bought a bunch of carnations to place in the jars.  They turned out so nice and my sister received so many compliments.


I used the Storybook cartridge to cut the bases and the "50"s.

Thursday, July 23, 2015

She Wears Pink

I know I really need to learn more about my camera and videos, but for now, I have created two videos, one on a time-lapse and the other the traditional way.  I didn't realize the time-lapse video would be so quick!  LOL


This first video shows the process of the mixed media page and some of my tools.  Unfortunately, it is really fast and you can't really see all the tools so I took a photo of the tools I used for this page.  What I love about these "tools" is that they aren't anything special.  All discarded or homemade items that are used to make cool marks on my mixed media pieces.

I'm having a hard time uploading the second video but hopefully I can figure out how to upload successfully.  I had to chop the beginning and may need to chop more.  I decided to forget about this one for now.  If I figure it out later, I'll add it but I am getting frustrated.


I had a little bit of a creative block, but I ended up really liking it and even make an adjustment or two to the final product.

I'm entering this project on the Stampotique Designers Challenge blog.  Click HERE to go there and check it out.  The July challenge is to use household items for your "stamps".  I think this qualifies.  LOL


AND...I'll be researching aps soon.  If you know of one or have any helpful hints, I'd love to hear about it!


And here's the photos of the tools and the final product.  I wasn't sure about the wording on the final product until I added the pink ribbon to her dress.  Now...I love it.  My mother-in-law, sister-in-law and two close girlfriends are breast cancer survivors.


(Bubble wrap, old gift card, glue gun mask, straw, empty adding machine tape roll, old toothbrush, punched circles on a baby shower invitation/stencil, script stamp)


Monday, July 20, 2015

Summer of Color Week 6 and Some Sports Trivia

This is the last color challenge on the Twinkle Twinkle Summer of Color series.  This week the colors are ORANGE + ORANGE + BLUE.


At first I thought, "geez, this is a Met's fan dream come true" but since I'm not a Met's fan, I had to think of something else.


Sports Trivia:  The Met's team colors is a combination of the Brooklyn Dodger's blue and the New York Giant's orange.  When the two teams moved to California, the Met's were created and they wanted to incorporate both past New York teams.


Ok, back to the challenge.  I used two inkpads, Bashful Blue and Tangerine Tango from Stampin' Up.  I also grabbed used orange acrylic paint.


The daisies are a digi stamp from Lila Grey Stamps.  I printed them on a piece of white cardstock and regular copy paper.  I created a mask with the copy paper and placed it on top of the flowers on the cardstock.  After that, I sponged both the orange and blue inks around the page.  I used my new stencils to create some dimension around the page - mini punchinella (orange paint) and letter stencil (white acrylic paint).  I then removed the mask and added orange ink to the centers of the daisies.  I used my white Wink of Stella marker to add sparkle to the flower petals and some black ink lines around the page.


Voila!


Click here for more info on the digi stamps:  Lila Grey Stamps
Click here for the challenge blog:  SOC
Click here if you'd like to see more of Stampin' Up! products.  This is my demonstrator, but you can always find someone local in the directory.

Have Hope

I don't use digi stamps very often because I'm not really thrilled with my coloring.  I was asked to try some out for the Lila Grey Stamps Design Team so of course I jumped at the chance.  I do like to try new things and this was one of them.  Instead of coloring in the image, I made another Mixed Media piece using the packing tape transfer technique.  Which happened to be the Mixability Challenge on Split Coast Stampers this week.


I used the October Flower of the Month digi image.  I printed the image on regular copier paper.  I transferred the image onto packing tape.  You can pretty much look it up anywhere but basically, you print an image on a copier.  Then you cover the image sticky side down with clear packing tape; soak the tape/image in warm water.  Once the entire image is wet; pull it out and start rubbing the paper off.  Keep on doing it until you remove all the paper.


I do not own a gelli plate but I've noticed it a lot on Pinterest and other websites.  I usually don't just jump on all phases until I feel like I can't live without it.  I do not feel that way about it (yet).


BUT, I do like the idea of creating on a base and then using that to make backgrounds so...I used a piece of glass from an old frame and added paints, etc until I liked what I saw.  Then I placed the packing tape image sticky side down onto the glass; rubbed a little to picked up the paints and then put it aside to dry (sticky side up).


While that was drying, I grabbed a page from an old dictionary and splotched some ink and other marks on it.  Once that dried, I adhered the packing tape pieces to it.


Just a few more things here and there, stamped the sentiments and all done!


Link to Lila Grey Stamps
Splitcoaststampers


Have a great week!!


Tuesday, July 14, 2015

Big as an Ocean

This stupid boot on my right foot really makes it hard to go anywhere.  Not only does my foot ache, I'm pretty much housebound.  I really need to get to the library since I just finished my seventh book for Carly and my Summer Reading Marathon.

Carly and I have challenged ourselves since she first started to read.  When we first started, she would read mostly picture books with few words and always outread me, but the last five or six years has found our numbers pretty close.  So what we do is read, read, read from the last day of school to the first day of the new school year.  One year, we both read 21 books!  That's pretty amazing for a 2 1/2 month spread.  Like I said, I just finished book seven.  BTW, she's 21 now so we've been doing this for 15 years.

Boy, I got off on a completely different subject.  LOL

I finished up another Art Journal entry this evening.  This is an entry inspired by the Anything But Cute challenge site.

Here's the mood board:


And here's my finished project along with a close up:


I started the page with acrylic blue paint and some white bubble wrap circles.  I added the "sand" by using Mudd Puddles Tahiti Sand that I purchased at the Scrapbook Expo two years ago - had to have it but of course this is the first time I've used it.  The nautical stamps are from SU! (1998); shells also from SU!; migrating birds from Stampscapes (Rubber Paws goodie).  Skeleton Leaf from Rubba Dub Dub (also from Rubber Paws).  Small white rings were added by dipping a straw into white acrylic paint; handcut hearts shadowed with markers.   The yellow circles were added by using the mini punchinella stencil from Balzar Designs.

I'm entering this in the Simon Says Monday Challenge site as well since this week is "Anything Goes".  Click here to go to their website.

Monday, July 13, 2015

You Make Me Smile

You know I don't make cards very often, but I noticed my card rack is getting low.


I stamped this image three times and cut out sections for a 3-D effect.  The photo does not do it justice.  The second layer is the fishbowl and the last layer is the fish itself. 


I used my CTMH alcohol markers to color in the image and used my white Wink of Stella pen to go over the cat's face to wash it out some.  I love the way it looks, plus it gives a little sparkle.


This stamp is another one that I received from Rubber Paws and the first time I used it.  It's very cute and can see myself using it again soon.


This is for the Simon Says Wednesday challenge site.  Go to the website by clicking HERE.


Sunday, July 12, 2015

My Cup Runneth Over

I had this idea so I made two pieces.  Both are basically the same, but just a little different.  The tea cup and pot stamps are from the Tea Party set from Lila Grey Stamps.  The words "joy", etc are from SU!.  I love how it really does look like the tea pot is pouring out JOY.

The base paper is a tag book that I received from Rubber Paws.  I used CTMH alcohol markers to color in and shadow the cup and pot.  The sentiments are both written using a black Sharpie.

I could have stopped there, but with my mixed media frenzie in full force, it just looked too clean.  So I added white acrylic paint and a punchinella stencil to add the white dots all over.  Then I used a fine point BIC pen and just sort of squiggled around.

Here are the two together:

And each one alone:


I'm submitting this on the Simon Says Monday Challenge site.  Click here to see the challenge and entries.

Lila Grey Stamp Site

Saturday, July 11, 2015

Happiness Starts With Me

I'm participating in a challenge on Off The Rails Scrapbooking website.  This month's challenge is a color mood board.  I was inspired to create this Art Journal page.


Close Up:


Here's the mood board:

Details:
The page started with acrylic paints and random stamping with a text background stamp.  This stamp was a gift from Rubber Paws and arguably my favorite stamp.  I think I use it for everything!  I also used a light grey stamp pad to stamp some wildflowers.  The wildflower stamp is from Unity.

The Julie Nutting paperdoll stamp was put together using scraps and Tombow wtercolor markers for shadowing.  I made this doll in a class that I took in Reno.  Once I adhered her to the page, I added punched hearts and the handwritten quote.  I used a black Sharpie for the lettering.

It's a simle page that I put together pretty quickly, but I really like it.

Monday, July 6, 2015

Mail Art for Jori

I've been thinking about mail art for awhile and thought I'd do something for my niece, Jori.  She painted a painting of a mission for her 4th grade mission project and did such a great job, my sister entered it in the county fair.  Not only did she win 1st place in her division but also best of show!!  So exciting for her as she was so nervous about it.

I wanted to send her a congratulations card but just forgot about it.  She's at camp this week and my sister sent me her address to write her a note.

So...by combining my need to send something to my niece and this color challenge on the Twinkle Twinkle website.  I came up with this:

Back View


The Summer of Color (SOC) challenge for this week (Week 5 - yes I started late) are green + green + pink.  I tried to use only the three color selections, but added a third green with the pistachio spray.  I also added black and white for accents.

This was so fun to make!  I know she'll be so excited to get this in the mail at camp.  I wrote her a letter and I'll stuff it with some riddles or something too.  I am definitely going to make more of these!

This is a total upcycle project since the envelopes I used are castoffs from my work.  I primed them with gesso and then layered the lt. green and bright pink paint.  Since the colors weren't quite dry, some of the combined color was an orangey color.  Very pretty.  I used my fingers to apply the dark grass green in circles.  Then I used one of my hot glue gun masks and the spray to add some texture.  After that I just added black rings and white rings.  Smeared white paint all over and used some bubble wrap for the small dots.  I used a handmade circle stencil to add some lt. pink circles (added white to the bright pink paint).  Stamped in black ink the flower (SU!) and text print.  Used a fine point black sharpie for squiggles and my white sharpie for more random dots, squiggles, and doodles.

Hot Glue Magic


Cool right?

Just grab a craft mat and your hot glue gun and go for it!

I'm sure you'll see these masks and many more in my upcoming projects.

Sunday, July 5, 2015

Beyonce

I believe I have found my niche.  I am really getting into mixed media.  I love the freedom to use whatever, however I want.  Carly had this canvas ready to go in the trash.  It was something she did a long time ago.  She removed pictures off it and all the embellies.  So I grabbed it.  It is a 12x18 flat canvas.  Since she had already put holes in it, the design had to be landscape.

The internet surfing I was doing earlier today led me to youtube and a video on making your own masks/stencils using your hot glue gun.  Ummm...yes, had to try it!  So I went upstairs, pulled out my craft mat and plugged in my glue gun.  I made a squiggly circle with lots of rings - probably about 3" in diameter for one and another one of assorted size circles connected together.  The YouTube video was by Southerngalsdesigns.

I grabbed five different color acrylic paints (plum, surf blue, lemon, bright pink, orange) and of course black and white.  First I covered the canvas with gesso then randomly applied the acrylic paints.  I used two of the masks that I just made with the hot glue gun.  You can see the bright pink squiggly circles (they almost look like roses) and the circles in the lower left corner.  LOVE!  The hardest part was waiting for each layer to dry.

Canvas is all covered and this is it:

Random supplies I used:  hot glue masks, packing tape roll (for large black circles), perfume lid for small white circles, coffee cup sleeve, microwave rice steamer tray (for black starburst), old gift card.

I wasn't sure what I was going to do with it.  I thought another she art and then thought, I'll put some birds and that led to a beehive and bees.  With that comment, Carly suggested we do a Beyonce quote since she is called Queen Bee.  So she searched for a quote, we liked a few, but then we thought the quote "Don't Worry Be Yonce" was hilarious.  So...

I grabbed my sketch book and drew a bee hive and some bees.  The hive is made by cutting yellow scraps and stacked.  I added some washi tape, ink, markers, etc to dress it up.  The bees are painted yellow and stamped with black ink to mimic a yellow/black bumble bee.  The wings are painted with lt. blue and gold opal paint.  Then swept some Wink of Stella for shimmer and a bit of dk. blue to each wing.  The antennaes are drawn on with markers.  I just glued them on the canvas.

The quote is stamped on using some old foam stamps I had forever and never used.  I think they are from Making Memories.  I used white acrylic paint for each letter.  Then used a violet watercolor marker to give a shadow to each letter.

The complete canvas:

I'm proud to say that this is hanging in Carly's bedroom.  She has never asked to hang something of mine before so it is quite an honor.

I love it.   It's fun...it's whimsical...and unique.

Friday, July 3, 2015

I Won!

I got this email yesterday from Momenta.  I wasn't sure if it was a haux, but when I responded, they sent my $100 gift card voucher right away.  I redeemed it to my Amazon account and there it was!  Woo Hoo!

Amazon shopping...here I come!

Hi,
Thanks for taking the time to answer our Secret Shopper survey this month.   You were randomly picked as one of our winners!
We will be emailing you an Amazon gift card for $100!!!   Please just reply back with your name and state where you live.  We will then email the gift card right away.
Thanks again...and congrats!


This is going to be so much fun!

Thursday, July 2, 2015

Day Dreaming

I am in love with Mixed Media!  I love how a project can start one way, but end up completely different.  Of course, this may be the way I mixed media.  I'm sure most artists plan their projects and select techniques and steps according to their plan - that is so not me.

I started this project thinking I was going to do a two page project in my art journal.  I am participating in the "What If?" challenge on Splitcoaststampers and wanted to try something different.  I saw this technique where you place glue on a page as a mask.  So, I set off to perfect this technique.

Once the glue dried, I selected four acrylic paint colors.  Plum, Lemon Yellow, Surf Blue, and Orange. I painted the first three paints all over the pages, no specific plan in mind.  I used bubble wrap to apply the orange paint.  Once the paint dried, I spritzed my water/white paint solution all over.  I love this spritz!  No matter how often I clean the nozzle, the paint comes out in full force.  I then added my blue ink/water solution to the page.  The blue ink I dipped the stick into the spray bottle and dripped dots all over the page.

Once that dried, I went back and peeled the glue.  For some reason it worked for the right page but not for the left.  The paper pulled up with the glue on the left side so I left it.  I liked the 3D effect of the lines.

See the difference:


Since both sides didn't work out the same, I changed my mind and did a one page entry.  I still didn't know what I planned to do so I set it aside.  Later, I was on Facebook and my friend Nancy posted a beautiful photo of the sunset.  It just so happened to have similar colors to my page - yellow, purple, orange and blue.  So, inspired by the sunset photo, I took another look at my page.


Inspiration Photo:


The bottom third was mostly yellow so I added some green watercolor marker to create a hill.  I spritzed the page with water and then scribbled.  All of a sudden the random shapes looked like trees so I drew branches and trunks around them to mimic trees.

Once I found my inspiration and my direction, there was no stopping me!  I first thought I'd do another "She Art", but then remembered I had this "Dreaming of You" stamp that I won from http://yournextstamp.com/shop/ on the 
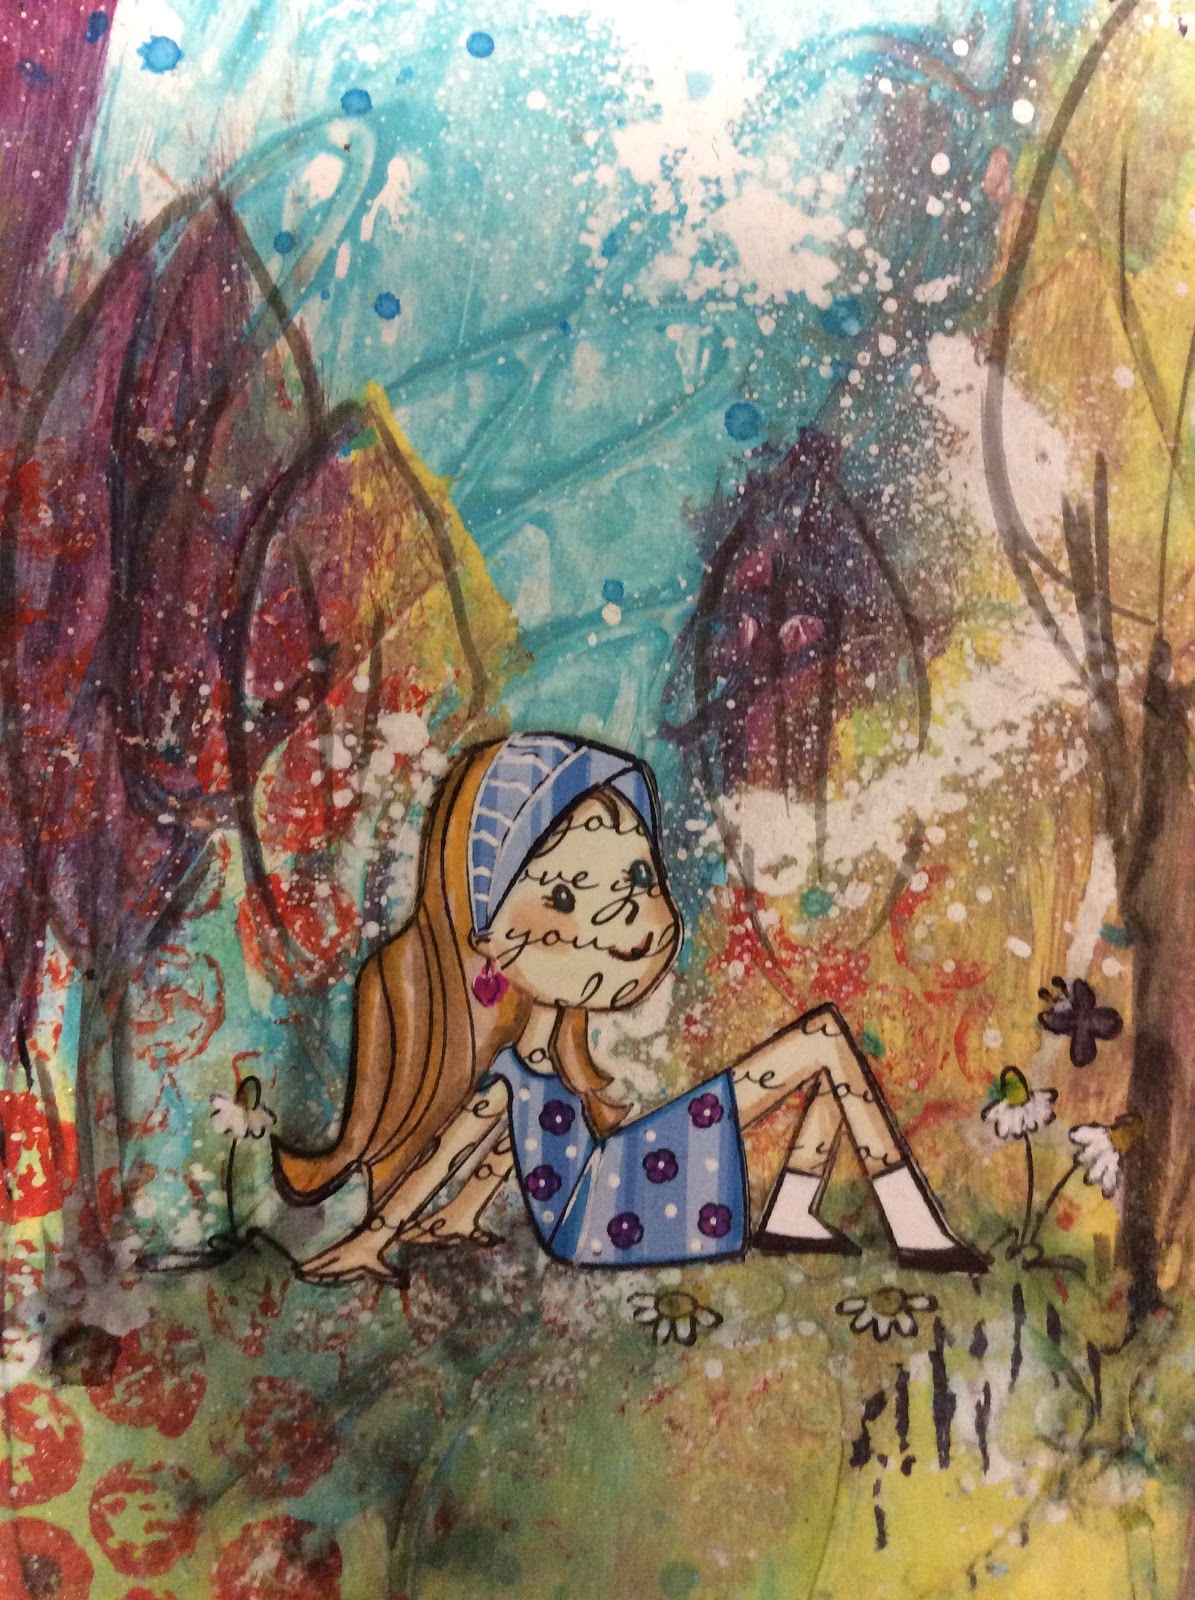
Let's Scrap Challenge Blog.  This cutie is leaning back and dreaming....  Oh my gosh!  LOVE this girlie for my page.

More photos:


Then added the words "Day Dreaming And I'm Thinking Of You".  The sentiment included with the little cutie is "dreaming of you" so I stamped this as trunk and multiple times in the right corner.  Made a few more additions and viola!

Finished page:

Don't you just love that little day dreamer?  As you can already tell, I paper pieced the girl with scrap paper and highlighted with pens in my stash.


The black marks are added by dipping the corrugated side of a Starbucks coffee sleeve into black ink.  The little flowers and butterfly are part of the girl stamp.  I accidentally got plum paint on one of the word strips and loved the way it looked so I "accidentally" did it to all of them.  Drew lines - highlighted - etc.