Friday, July 30, 2021

Shaker Card Wreath

This card started as I was following the challenge theme on the Heart 2 Heart CTMH challenge blog. One of the challenge themes for the month of July is...banners. (They post two challenge themes per month.) 

I wanted to use the Remarkable Wreath Seasons & Nature stamp set since there are banners in it. All of a sudden I thought it would be cute to make it a shaker card as well. I purchased a pack of small circles/ovals adhesive sets for shaker cards from Queen & Co. years ago at a Stamp Expo and one of the circles was the perfect size for the inside of this wreath! Don't you love when that happens!?!

I used CTMH inks for the wreath & banner: Cranberry, Olive and Indian Blue.


I made a mistake by adding a fine stamping glitter to the shaker element, since most of it stuck (probably by static) to the transparency. Lesson learned...chunky glitter only! I mean, it's glitter so it still looks pretty, but...

I used two different background stamps from my stash to the card. One was stamped in Honey (from CTMH) and the other was Oatmeal from FSJ.

To add even more interest, I scored randomly spaced lines across the green cardstock that mats the focal image. It's not much, but it adds a little something, don't you think?

If you have CTMH products and are looking for a great challenge blog, click on over to the Heart 2 Heart challenge blog.

TGIF; Thankful Friday #187


Happy Thankful Friday! This week I'm thankful for my ice cream maker. I may have mentioned it before, but I really am thankful for it! Over the weekend, I made some chocolate ice cream. Yes, chocolate. I'm not a big fan of chocolate ice cream. I'm more of a vanilla type of girl, but hubby loves chocolate. 

I wasn't sure how chocolatey it would actually turn out, but it was FABULOUS! (I just channelled my inner Oprah Winfrey.)

This is definitely something I didn't realize I needed until I owned it.


Have a great week - stay cool, stay healthy, stay safe.

Leave a comment and let me know what you are thankful for this week.


Thursday, July 29, 2021

Using Vinyl on Other Things


Look what I found at the Dollar Tree! This super cute & fun glow-in-the-dark beach ball!

And then I added vinyl and made it even more fun!


I found the Splish Splash cut with the First Years set and the mermaid on the Winter Character Images (I didn't realize it was a holly in her hair until I cut it - oh well). I used a dark blue vinyl to place on the beach ball.

I didn't want to break the glow stick for the photos but I can't wait to see this in the pool. (By the way, we don't have a pool but my DIL's parents do and they live across the street. My granddaughters love swimming and I'm sure they will have fun with this!)

I went back to the Dollar Tree to buy more but of course they didn't have any.  So fun and the glow stick can be replaced!

Friday, July 23, 2021

TGIF; Thankful Friday #186


Hello and happy Thankful Friday! This week I'm thankful for the fact that I don't have to do all the things when I come home from work. What I mean is all the dinner cooking, cleaning and general housekeeping items. I'm glad we can eat leftovers, go out to eat or have meals delivered. 

After returning home after two weeks of being away, I just wanted to relax when I got home from work. Between my hubby and daughter and Door Dash, I didn't have to cook once this week!

And I am thankful for THAT!

How about you? What are you thankful for this week? Please share in the comments. 

Thursday, July 22, 2021

Simple & Inexpensive Purse Organizer

Hi there, I'm excited to share a simple, inexpensive & quick purse organizer project with you. My big purse/tote is full of everything and nothing - you know the drill, the bigger the purse, the more you put in it. And of course, it was a big chore to find anything in there.

I went to my local Dollar Tree and found some simple binder pencil pouches and thought they would be perfect. When you have a Cricut, you are always on the lookout for inexpensive blanks and these certainly fit the bill. I bought two. 😄

Check out the process video:

I do this a lot and it's mentioned in the video, but when creating words, I'll check the images first before typing them using a font. Reason? There are many images of words that have a more artistic & fun look that I cannot recreate using fonts. You can remove the parts you don't need by using the contour function, slice function or ungroup & delete them. 

Anyhow, it's an easy project and super inexpensive to do. The pouch looks great in my purse and I already see a difference - check it out!

Of course I didn't remember to take a "before" photo, but here's the "after":
What's inside the "Random Stuff" pouch...random stuff!


NOTE: After I adhered the vinyl to the pouch, I thought this would have been great to apply the vinyl to a sold black backing to really make the words pop - now if this was a project that was going to be seen more, I probably would have done that, but since it's in my purse, I didn't worry about it.

How to create a solid backing to an image that does not have one? Duplicate the image and with that click the contour button on the bottom right corner. Click on all the cut out pieces (i.e. the letters) and that removes the cut out portions.

Be sure to give the video a THUMBS UP and hit the SUBSCRIBE button!

Wednesday, July 21, 2021

WOYWW #633

Happy Wednesday folks and Happy WOYWW! It's been a long time since I posted a photo of my desk. I was out of town and mostly I just kept forgetting. I hope everyone is doing well and enjoying the summer heat.
Why am I sharing my desk? Click over to Stamping Ground and read all about the multiple year linkage that Julia started 12 years ago - share your desk/work area on Wednesdays - it doesn't get any easier than that!

Here's mine:

It's not too bad since I "sort of" cleaned the general work area to work on the zippered case. (I'll be posting a YouTube video soon on this project.) I added patterned vinyl on it and plan on using this Dollar Tree purchase as a purse organizer. My big tote of a purse was getting so messy & full, it needed some sort of organizer. I didn't take a before photo...but here's the after:
So organized!

Anyhow, be sure to click on over to Stamping Ground to check out other desks and post a photo on your blog and add it to the linkage.

I am looking forward to checking them out too!

Monday, July 19, 2021

BBTB2 Recycle Challenge


I am so excited about the current challenge at Bitten By The Bug 2 (BBTB2) Cricut challenge site. The challenge theme is recycle. Now, I feel like I'm always recycling but then I realized, I don't think I'm actually recycling - I think I'm upcycling! 

So the way I understand it is that recycling is using something bound for the trash & using it a whole new way and upcycling is basically giving something an updo. Is that right? What's your opinion on this? Does it even really matter? LOL Either way, it's fun!

Well, it took awhile to figure out my recycling project for the current challenge and this is what I came up with:

I recycled a couple of old jars into super cool lanterns! I watched a YouTube video on the Plaid YouTube channel and was instantly inspired to make my own version.

Turning this:


Into these:

Aren't these fabulous! I know it's too early for Halloween, but you know it's just around the corner and I thought these will be perfect for my porch.

How I made them:
  • Remove the label from the jars
  • Create a mixture of Mod Podge & food coloring to get the color you want (I used gloss Mod Podge and red & yellow food coloring to make orange)
  • Pour the glue mixture into the jars and swirl around until you get full coverage
  • Turn the jars upside down to drip out the excess glue; let dry overnight
  • Once dry, use multiple Halloween images in Design Space* to create the pumpkin faces & words with black vinyl
  • Wipe the outside of the jars with alcohol before adding the vinyl
  • Decorate the jar rims with fabric scraps or twine like I did
  • Drop a battery operated tea light in & enjoy!
More photos:

Once they start drying, the glue mixture becomes transparent - so cool!


What are you going to recycle using your Cricut? Please link your project at the BBTB2 challenge site. Be sure to include how you used your Cricut to create your project.

*Happy Pumpkin Face Decal
Spooky
Bat
Spooky Face
Boo

Thursday, July 15, 2021

Sketch n Scrap; Layout Sketch #229

I feel so behind on my scrapbooking and having a sketch to start your pages really does help! I love the current sketch at Sketch N Scrap challenge site.

Here's my layout:
Close Up of the sushi rolls:
My daughter & I went to Godzilla Sushi in San Francisco and loved the themed restaurant. I love the woodgrain base on the sketch but decided to use brick since the mural behind my daughter was a brick wall. The orange is a vellum piece I've had forever and thought coordinated with the walls of the restaurant. I wasn't sure what other colors to go with so I settled on black/white. These papers were pulled from my scrap bin.

And don't you love the sushi Washi tape? So perfect for this layout!

I used my Cricut to create the title and the sushi embellishment. The hearts were fussy cut from a patterned paper scrap also in my black/white scrap bin.

Be sure to link your layout to the Sketch N Scrap challenge blog before the end of the month to be eligible for the monthly prize.


Wednesday, July 14, 2021

Mixed Media Tag

Hubby and I are visiting my sister and mother in Tucson, Arizona. I know you're thinking why would anyone go and visit Arizona in the summer...we're here to give my sis a break while watching mom. We are experiencing high temps but also monsoons. Even as I'm typing this, it is raining hard with thunder and lightening outside. We even experienced a sand/dust storm. Now that was eerie!

I brought along some crafty supplies and my sis has some supplies here too. I had some downtime and decided to make (and film) a mixed media tag. I started out thinking I was going to make a card, but it turned into a tag and I just love it!

Check out the process video here - you even get to see me on this one!

Here are some photos of the final project:

I love how fun this was working with limited supplies and tools. It took a turn from "wasn't sure if I liked it" to "love it!"


Saturday, July 10, 2021

TGIF; Thankful Friday #185


Happy TGIF Thankful Friday on Saturday! Sorry I missed posting this yesterday but I'm visiting my sister and mom in Tucson, Arizona. It's hot over here and humid. Whatever happened to the "it's a dry heat"? LOL  It's rained most nights but has cooled down at night and by that I mean, cooled to the 90's versus the 100+ during the day.

Don't get me wrong, I love it which is what I'm thankful for this week...visiting family, relaxing, and getting a pedicure!

Isn't the turquoise perfect for Arizona!?! I don't know why I don't get pedicures more often. This is only my second time.

What are you thankful for this week? Leave a comment below and share!


Wednesday, July 7, 2021

Frames, Frames and More Frames - Playing in the Junk Journal!

I filmed another quick Junk Journal YouTube video. I took a three hour nap one day and when it was time to go to bed, I just wasn't tired! So I decided to mess around in the Junk Journal. I flipped to a page that had already been covered with navy blue paint so it was nice & dark. I grabbed two different tipped white pens and just started marking the journal page. I had no idea how this was going to end up...check out the video:

And even after filming the completing the page, I still don't really know if this is how it will end up. LOL


I hope my random pages encourage you to create your own junk journal or art journal and just dive in! They are so much fun especially when you know you just want to get artsy, but not sure what to create. 

If you're not already a subscriber, consider hitting the subscribe button and be sure to give me THUMBS UP!


Monday, July 5, 2021

Sketch N Scrap #197 Card Sketch

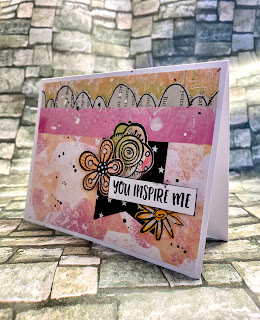
I decided to use a bunch of my gel prints & other collage goodies to create this card for the Sketch n Scrap card sketch #197. I did a little mixed media as well.

What do you think? Do you love it as much as I do?

Here's the card sketch:

I was inspired by the stars when I selected the gel print with stars. I used a fine point black marker to draw scallops to book page and then just cut it out. After adhering all the papers to the card base, I added drips of white acrylic paints & black ink drops. I dug into the baggie that holds my gel print scraps for this card.
I stamped these funky flowers on gel print scraps and added white pen and a clear glitter pen for sparkle.

Close Up of the flowers:


Be sure to link up your card using the sketch to the Sketch n Scrap challenge site before the end of the month.


Bitten By The Bug 2; Oh Baby Challenge


The current challenge on the Bitten By The Bug 2 (BBTB2) challenge blog is...Oh Baby. For this challenge, we're teaming up with Double Trouble. Because of this, we are dropping the "must use a Cricut" rule to allow for any die cut as long as it meets the current theme.

I hope you join us and/or Double Trouble for this fun challenge.

My project:


I made a tunnel card! This card needed lots of foam adhesive and I think it turned out so cute! I used various cuts in Design Space of stars, clouds and a moon. It's so easy to search for these images. Even though there are lots of layers on this card, I still feel like it fits the "keep it simple" theme described under Thing 1. Do you agree?


WELCOME to Challenge #88 - Let the Troubles Begin 

This Challenge runs from 
Monday,  July 5th thru Sunday, July 18th
"Mood Board - Oh Baby" 


Thing 1:  Trouble Maker 
says, "July 12th is "National Simplicity Day" which promotes the concept of unnecessary clutter in our lives and the idea that less is more. As liberating as this may seem clutter is an accepted way of life when you have babies... so we decided to keep it simple.  

"Simply use My Mood Board for inspiration and create a project for a Gift Card, First Birthday, Invitation, Congratulations, Announcement, Thank You Note, Scrapbook page, etc."  

You can stop here... 
OR  
play along with Twisted Sister's optional twist below to earn another chance at our random draw.  


Thing 3: Twisted Sister says, "What! Eliminate clutter? Does that mean I have to scrap my scrapbook space? I don't think so! 

My stash is essential and dies are important to this challenge. Let's use at least one die or Cricut cut in creating your project and don't be afraid to use more than one, e.g., frames, sentiments, objects, borders, etc."  

You can stop here...
Or
If you use a die or Cricut cut on your project you will earn another chance in our Random Draw and can share it with Double Dare's Dare below.


Thing 2:  Double Dare
says, "Bitten by the Bug 2 is a challenge that usually requires the inclusion of a cut from a Cricut, however, we CUT a little Baby Die'al with them."
 
For this challenge only, our partner is accepting the use of cut items from punches, dies, and any digital cutting machine, but NO fussy-cutting! You need to have a baby project and use Twisted Sister's optional twist to enter.  

You earn an additional chance at the Double Trouble Random Draw" when you enter your project HERE for Bitten by The Bug 2 "Baby".
and/or 
if you use a Cricut Cut you will get another chance at the random draw. Don't keep us guessing, let us know in your post.  

Play along with Double Trouble

And of course, BBTB2 by clicking on either or both of the links!

Friday, July 2, 2021

TGIF; Thankful Friday #184

This week went by so fast! I'm thankful for staying busy at both work and home. Busy, but not crazy busy! I'm thankful that summer is here and we have hot days and hot nights but it feels so good!

Hubby bought me an ice cream maker and I'm hoping to use that over the weekend - YUMMY!

Share what you're thankful for this week in the comments below.


I'm giving some thought to a short & quick YouTube series focusing on the Cricut and Cricut projects. Leave me some thoughts on that or if there's any project you'd like to see me create. I'm thinking something like "Five Cricut Projects in  Five Days" kinda thing...


Thursday, July 1, 2021

LTSCB; July Challenge


July 1st!?! Can you believe it? This year is going by so quickly. It's time for a new monthly challenge on the Love To Scrap Challenge Blog (LTSCB). This month it's...Anything Goes. In fact, it's Anything Goes every other month on the LTSCB.

My stamping project is this stunning spanner panel card. I learned how to make it from one of my favorite YouTube channel's, Lisa's Stamp Studio.

I have to be honest...I had this stamp set for awhile, but was a little nervous coloring in this hummingbird. I finally just went for it and grabbed some green and teal alcohol markers and just started coloring.

I love the way it turned out - so bright and colorful!


Now it's your turn...create a stamped project following the Anything Goes theme and link it to the LTSCB by the end of the month.

Here's a tip: Be on the lookout for face shields going on sale right now.  With COVID PPE restrictions lifting, many stores have them for cheap and these are perfect to cut up and use for all your clear material projects like this one.