Wednesday, January 31, 2024

Gnome Fun Fold Birthday Cards

Have you checked out your local dollar stores for crafty supplies? I'm telling you, the Dollar Tree in my town is bursting with great supplies. Recently I found some 6x6 paper pads so I bought one. There were others, but even at $1.25, it's not a bargain unless you know you are going to use it! 

Honestly, I don't know if the paper is acid free and all that, but for card use, $1.25 for a pad of 24 sheets of paper!?! Heck ya - that's a deal!


I decided to make some cards using the paper and they turned out so cute! I found the card design from Klompen Stampers Blog. You can find the dimensions there as well as a quick look in my own YouTube process video.


I used gnome stamps from Close To My Heart and colored them in using alcohol markers from my stash. Cardstock is from CutCardStock and the other patterned papers are just from my scraps.


This card is a little different since the base is not folded but the small card placed in the triangle pocket is. It's a great place to put your greeting and a gift card if desired.


CutCardStock: Patriotic Blue, Light Blue, Grape Purple and Cougar Smooth White and Cotton Candy Pink and Pink


Monday, January 29, 2024

Embossed Birthday Card

I treated myself to a Sizzix Sidekick and I was pleasantly surprised that not only did it include the cutting & embossing plates, it also included stamps, dies to coordinate with the stamps and two small embossing folders. I was so excited to open it and try it for myself! My first project was using one of the embossing folders.


I used patterned paper was that laying on my desk as well as a punched border to create this super easy card.

Check out the YouTube process video:


I trimmed the embossed pieces to 2.5" height and 2.75" width and cut the patterned paper to 2.5" as well so it flowed. Added some coordinating enamel dots and even tied a twine bow to complete the card.


So fun! I can't wait to create more and more die projects with this Sidekick!


Friday, January 26, 2024

TGIF; Thankful Friday #302

TGIF and Happy Thankful Friday! This week I'm thankful for conversations with my nephew. I am so thankful that I have a close relationship with my nephews and nieces from both sides of the family. This is truly a blessing!

I don't have a photo of my conversation with my nephew, but I thought I'd share a couple of group photos of my family.


Yes, you probably noticed that some of the relatives are on both sides of the family. My sister was married to my husband's cousin so my nephews & niece are also my cousins on the in-law side. LOL


Thursday, January 25, 2024

Multi-Photo Layout

This layout is pretty simple. I really wanted to use the five photos I had for this evening and they fit perfectly into the 11" square. I even had room for some embellishments.

I cut down a 12" square piece of patterned paper to 11" and adhered it in the center of the Pewter cardstock piece. I am really happy about this layout because I really wanted to use up the remainder of the scraps & embellishments I had gathered for this occasion and I did!


In 2021, my family decided to start a virtual marathon in remembrance of my nephew, Tommie a.k.a. TomKat - hence the name TomKat Strut. We just finished the third year but with each year, my other nephew creates a new logo for the Strut. In 2022, the color is still red, but it's more of a vintage red.

Check out the YouTube process video:


Be sure to hit the subscribe button on my YouTube channel because my goal this year is to create more videos, participate in more challenges and hopefully engage more of my audience. I'm so close to 1,000 subscribers that I need to push.

Tuesday, January 23, 2024

Pismo Beach Layout; Printable Cuttable Creatables


Hey there. I’m sharing a scrapbooking layout using the Seagull on Pier E300 cut file from Printable Cuttable Creatables (PCC) website.

Are you a scrapbooker?  Do you create your own embellishments for your layouts?  I love using my Cricut and cut files to do just that! 

The Seagull on Pier cut file has a multitude of choices you can use on your projects. In fact, all the cut files I have purchased and used from PCC do.  You definitely get your money’s worth when purchasing cut files from Printable Cuttable Creatables!


I decided to use the large layered seagull on a single post but I also wanted the flying single layer seagulls to sprinkle around my layout background.


When working with multiple layers on a cut file, the best tip I can give is to lay the pieces out prior to applying adhesive.  This helps with placement and helps avoid putting adhesive on the wrong sides. Just so you know, I had to tear layers apart because I didn't take my own advice. Oops!


Here’s my double page layout.  I used the large seagull as the main embellishment, single layer seagulls on the background and for the journaling block.


I had five total 4x6 photos for this two page spread. I searched for a good layout to incorporate all these 4x6's and found the sketch on THIS blog. I'm definitely bookmarking this one because I love lots of photos on my scrapbook pages!


I decided to pull out some stamps for the title and then came across some sentiment stamps that are made for memory keeping. With the stickers from The Dollar Tree and those stamps, I LOVE this layout. It's everything I love about scrapbooking!


I didn't film a process video but I do have one that talks about what I did. Check it out!


Here's a close up of the main cluster...so fun!!


Products Used:

SVG Cut Files from Printable Cuttable Creatables

Stickers Dollar Tree

Patterned Papers from Simple Stories

Sentiment stamps from SU! and CTMH


Be sure to check out the PCC Blog for this project as well as other project inspiration. The Design Team has lots of projects for you! And when you purchase files, use 3SONS15 for 15% off your purchase!

Sunday, January 21, 2024

CutCardStock Fractured Card


Have you heard of a fractured card? Well, talk about an easy card! I had these watermelon and apple cuts in my stash (originally cut using a cartridge - yes, I've had them for that long!). 

I knew this card would be perfect for my CutCardStock DT project. I made the cuts earlier but I could have certainly used Bonsai Green, Hunter Green and Basis Red for them. CutCardStock has such a big variety of shades, you will definitely find what you need on their website.


Besides the cardbase & any embellishments, this card only needs three additional items; a piece of patterned paper cut at 5.25 x 4", a small square cut at 2.25 (you can certainly go smaller if you wanted); and four .25" strips of cardstock the same color as your cardbase.


Complete the Card in Four Easy Steps:
1.  Adhere the 2.25" square piece on the patterned paper as a diamond. I used Cougar Smooth White Cardstock for this square.


2.  Adhere one strip at a time to the edge of the small square making sure to extend the strip to the edge of the patterned paper base. Snip any overage.


3.  Adhere the patterned piece of paper to the cardbase. I used Pewter, Pepper Red, and Granny Smith Apple Green from CutCardStock for the card bases and strips for the variety of cards created.

4.  Embellish as desired. Like I mentioned above, I used Cricut cuts that I had in my stash. Some I adhered directly to the card and the top one I used foam adhesive to add height. I also stamped sentiments directly on the patterned paper. 

A couple of more that I created. Yes, I was on a roll!


Take a look at the YouTube process video for more clarification, but it really is that easy. By keeping the strips the same color as the cardbase, it really does look like it's fractured!


Be sure to check out the CutCardStock blog for all sorts of paper inspiration.

Saturday, January 20, 2024

Hey Honey; Sketch n Scrap Sketch#258


When I saw this sketch from Sketch n Scrap, I instantly had an idea on how I was going to create it. I saw something similar and I've wanted to try it for awhile. Here's the sketch:


The first thing I did was go to my Cricut to create this "film strip" type cut using hexagons instead of circles. Be sure to check out the video to see how it was done:


Then I grabbed a bunch of different shades of yellow scraps and cut them into thin strips. I didn't worry about the width measurements since I wanted a variety.

I stamped and colored bee themed images to add to these "honeycombs" using alcohol markers. You can watch the YT Short here:

And here are the completed cards (I made two since I stamped a variety of images and also...why not?):


Be sure to check out the video because this card went through a few stages before it was completed and be sure to subscribe to my YouTube channel because I've made a goal for myself this year (2024) to post at least two videos AND at least one short a week. You don't want to miss anything!

Stamp set is by Fun Stampers Journey (now Spellbinders)
Alcohol Markers were purchased from HomeGoods Store and the Spectrum Tri Blend (which are my favorite - no guesswork on shading!)
Cardbases are Natural and Sandcastle and Yellow for the honeycomb "filmstrips" are from CutCardStock
All yellow cardstock scraps are from my stash
Gems are from my stash
 

Friday, January 19, 2024

TGIF; Thankful Friday #301


Happy Friday and Happy Thankful Friday! This week I'm thankful for all the NFL Playoff buzz. I'm especially happy because the 49ers are a part of it.


Before the first game of the 49er season, we took a shot of booze and dedicated the season to Tony. I'm telling you, win - lose - or draw, we would have been ok with the results but I'm very grateful that it's a winning season. My son would be all about it too. I can see him walking in the house on Saturday all 49er geared up just chanting and cheering for the team.

What time is it? GAME TIME


What are you thankful for this week?

Iron Crafter Challenge YT Hop


It's the Third Friday of the Month and time for another Iron Crafter Challenge YT Hop. When the mystery challenge ingredient was announced, I was really excited since it's STAMPS.

I had so much fun with this layout. I used three Merry Christmas stamps and one Santa stamp to create the design at the bottom right of the layout. 

Products Used: I used My Mind's Eye All is Bright collection for the paper & stickers. The "Merry Christmas" sentiment stamps didn't have a company name or set name. Ink pads used are all Stampin Up! (Creamy Caramel, Real Red and Sage Shadow)


Check out my YouTube video to see how this came together and then be sure to hop along to the other participants.

Here's more info on the challenge:

Join a fun group of crafty peeps each month as we take on the Iron Crafter Challenge! Each month Anna from @piececraftlove or Tara from @thepapersnob will select a challenge ingredient to use on a layout. This hop goes live on the THIRD FRIDAY of the month. We will have a hop on YouTube and Instagram to show how we used the challenge ingredient(s) for the month. The mystery item for the month will be announced on the first of each month.

Here is a playlist with ALL the videos of the participants:

https://www.youtube.com/playlist?list=PLCfSqErOPJoqJOtmJxSg3rD6IQbLQ8fGk

If you want to learn about the mystery item and play along, come over to the Piece Craft Love Facebook group: https://www.facebook.com/groups/piececraftloveclubhouse

Here is a list of the folks playing along, please check out their Instagram or YouTube channels to subscribe and say hi!!

YouTube:

Tara https://www.youtube.com/@thepapersnob

Kristen https://youtube.com/@scrappingonthefly1217

Christine https://youtube.com/@ScrappingHarden

Kimberly https://www.youtube.com/c/IdRatherBeScrapbooking

Hollie Www.youtube.com/ivycoelcreations

Michele https://www.youtube.com/@stampbooker

Lynda https://www.youtube.com/@thescrapbookingphotographe3607

Briana https://www.youtube.com/@lovemylifeonpaper

Misty https://www.youtube.com/@craftysoupvideo

Dorlene https://www.youtube.com/@dorlenedurham  HEY that's me!

Ashley https://www.youtube.com/@thescrappingnerd3566

Mel https://www.youtube.com/@MelWScrapping

Karen https://www.youtube.com/@alittlekinder/videos

Instagram:

Brandi Jo: https://instagram.com/scrappy.boymama

Simera https://instagram.com/scrappysimi

Tina www.instagram.com/tinamcmmvr

Laurie https://www.instagram.com/scrapbookingbits/

DawnLyn https://www.instagram.com/dawnlynsdesigns/

Angie https://www.instagram.com/ellerang


Get ready to be inspired!


Monday, January 15, 2024

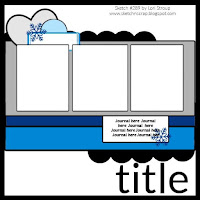
SNS Layout Sketch #289


Happy New Year! I'm still trying to finish up 2021 photos before I get too far behind! These photos were taken in Arizona while going on a hike near my sister's home. We got to look at original American Indian rock writings. It was really cool. 

The sketch I'm working with from Sketch n Scrap had room for three photos which was perfect for these photos.

I had a really hard time working with this layout because I just wasn't sure how to embellish it. But I do like the final result and I hope you do too.


Please check out the YouTube process video to listen to my thought process and see how it comes together.

I definitely like using scraps and supplies I already have and this layout proves it. I put together a scrapbook kit for this trip but because these are some of the last photos, most of the items have been used. I still love it!


Check it out:


Products used:
Wild Salmon cardstock by CutCardStock
Patterned Paper is Golden Desert by Prima
Tile stickers purchased at the Dollar Tree
Wooden embellishments are from my stash (maybe Close To My Heart?)
Black Licorice Color Silk (splatter)


Friday, January 12, 2024

TGIF; Thankful Friday #300

TGIF and  Happy Thankful Friday! Everyone is back from the holidays so our office has been buzzing with activity. That's not what I'm thankful for this week although it's always nice to socialize with my coworkers.

This week I'm thankful for video conversion services. Is that what they are called? I sent in old film and they converted it onto a thumb drive. Well, we've been watching our old movies and it's so special. I really thought with everything that has happened this year, it would make me cry, but honestly it didn't.

This gave us all an opportunity to laugh, remember the life we had all those years ago and really appreciate that even though we didn't realize it at the time...we had it all. We still do.

I miss my son so much, but I'm so thankful for video evidence of him and also all those memories that are still in my brain. Isn't this why we scrapbook...take photos...make videos? It's such a wonderful thing to be thankful for!

What are you thankful for this week? Let me know in the comments. I'd love to hear all about it!

Stamped Sympathy Cards

I received a request for sympathy cards so I figured I’d make a lot and add some to my card box. 

I'm so glad I decided to use my MISTI to stamp these flowers because I had to press a few times to get a good ink impression. I'm sure I need to toss a lot of my ink pads because some of them I've had for more than 15 years!

These cards use two different stamp sets from Stampin Up and they are both old sets that are no longer available. I love this flower stamp set since it gives the illusion of layered stamps with each impression. 

The first thing I did was stamp the sentiment on a 4.25 x 5.5" white cardstock base and then I stamped the same sentiment on a scrap piece of paper to create a mask. I used a magnet from the MISTI to hold it down while I stamped the flowers around it. I'm so glad I went with a monochromic color scheme on these cards. They are so pretty!


Check out the YouTube process video:

I tied metallic thread around the card and added some gems to pretty it up.

They are really very simple, but oh so pretty. I hate that I get many requests for sympathy cards but it’s a reality and sending cards is so important during this time.


Products Used:
Stamp Sets: Flowing Flowers and Heartfelt Sympathy from Stampin Up!
Cardstock:  Cougar Smooth White, Wild Blueberry, and Sand Castle
Ink Pads: Ballet Blue, Brocade Blue and Marina Mist for the blue card and So Saffron, Groovy Guava and Tangerine Tango for the orange card.  I also used black archival ink for the sentiment.
Metallic Thread from my stash
Gems from Hobby Lobby (I realized as I was putting them away that they are Glow-in-the-Dark gems...interesting!)

Wednesday, January 10, 2024

Hello December 2021 MIR

I love doing the Month In Review (MIR) layouts especially for December. For 2021, I took so many photos that I had to create more full layouts than normal which is fine with me! I did, however, get 11 photos on this two-page spread!


I filmed the process and it's on my YouTube channel. Be sure to check it out!


This layout used only one piece of double-sided patterned paper and some red cardstock scraps. I used some snowman and tree Cricut cut outs that I did years ago. The title was created by combining the words "hello" and "December" together and then creating an offset around it.


The background was created by cutting four 2" strips and four 1" strips. I adhered the strips two on top and two on the bottom on both sides. The red 4.5x12" red vertical strips was a much needed after thought which led to the two .5x12" strips on the left side. Color, color, color! I love it!


I have noticed that collecting Christmas papers is my hobby, so I need to really get in my collection and use these papers. Many I donated to my "Trash to Treasure" pile to bring to any future crops but I really need to use more so I can purchase more! LOL Isn't that how it's supposed to work!?!
 

Sunday, January 7, 2024

Winter Cardinal Card; Printable Cuttable Creatables


Happy New Year! I’m excited to announce that I’m staying for another term on the Printable Cuttable Creatables Design Team. 

Since winter is still here, I decided to create a card using the Winter Cardinal on Branch E567 cut file for the focal image.

I’ve said it before and I’ll say it again, I love that the cut files come with more than one way to cut them. For instance, with this one, you can either cut the pieces where it fits like a puzzle or they lay on top of each other. I’ll be honest, I wasn’t sure which one I preferred so I decided to cut both. I mean, if you’re making one card, you may as well make two!

After uploading the image into Cricut Design Space, I decided to create a base for my birds by duplicating the image (assembled) and then Uniting the entire image together.


I changed the red to white before cutting the pieces. By doing this, it allows me some guidance on where the pieces are to be placed. (This helps this woman’s old eyes but is not necessary to create the card.)

After placing all the pieces on my work surface, I used liquid glue to adhere the pieces together.

So pretty! To add some sparkle, I added some clear sparkly Nuvo drops to the snowy areas.

As I waited for this to dry, I went back to Cricut Design Space to make a frame for my cardinals to rest on. I decided to create a tunnel card effect for two reasons, one I love the look and two, I really couldn’t decide which patterned paper I liked for the card background so I was able to use all three!

I used the Shapes option in Design Space to create the tunnel frames. First, grab the square and unlock the size to create a 5.25 width by 4 height rectangle. You’ll want to duplicate the rectangle and change one to another color because we will be making two frames. Then insert an oval (also from Shapes) onto your canvas and play around with the size to fill most of the first rectangle as shown below.

Change the color of the oval so you can see it more clearly in the rectangle. Once you decide on the size. Use the Align function at the top menu bar to center align the two. Now select Slice at the bottom right corner to remove the oval.


For the second rectangle, use the same oval but make it smaller than the first one then repeat the aligning and slicing process as above.

You’re tunnel frames will look like this:


I cut one piece of patterned paper at 5.25x4” (without an oval) and adhered it to the A2 card base. Then adhered the smaller oval frame to that solid piece. I added foam adhesive to the back of the larger oval frame to give it some height.


I also added foam adhesive to the cardinal & branch and liquid adhesive to the branch tips that will be resting on the frame.

To finish the card, I added Nuvo drops to the center of the frame. It certainly gives a snowy appearance.


I love how this card turned out. The bird was so easy to put together and the card is so pretty. I’m so glad I decided to make two and both methods of cutting were easy so whichever one you choose, I’m sure you’ll be happy.


Be sure to check out the Printable Cuttable Creatables Blog for all sorts of inspiration. The DT has some wonderful and amazing projects - check it out!

And don't forget to use my discount code when purchasing files. 3SONS15