A place to showcase my crafts and talk about it...what's better than that? I hope to inspire and encourage others to create things for themselves, friends and family.
TGIF and Happy Thankful Friday! What are you thankful for this week? Me, I'm thankful for books and the fact that I love to read!
The weather outside is frightful but I am so delightful since I've got a stack of books that I need to read. I just finished a book from my aunt, Betty Weatherby called Winnowing Fork. It's a biblical fiction book about Zacchaeus and his life before and after he gets a visit from Jesus. Good stuff!
I'm now reading my Book Club book which is Dava Shastri's Last Day. I just started it and so far so good.
I hope you are staying dry wherever you are and that if you are a reader, you are enjoying a warm cozy spot just to read.
What about you? What are you thankful for this week? Please share in the comments below or on my IG account @3sons_and_astar.
Oh how I love a fun cake topper! Well, this one is super fun as I created a shaker cake topper AND it's only 4" so it's perfect for a small cake, cupcake or even tucked into a plant.
Cricut Official held a Craft Day on January 7th and I was so excited to participate in their challenge and also watched many tutorials. There is so much to Design Space that I didn't even know!
I used one of their editable images #M3F11B875 and edited it to create this fun project! I decided to create it in primary colors so it could be for any gender or age.
Check out the quick YouTube process video:
One more photo:
If you're interested in making your own, I did include this in the Cricut Community and you can either chose to Make It or Customize It to create one for yourself!
All cardstock is from CutCardStock. I'm on their Design Team and absolutely love the colors and quality of their papers. Check their site out and then check out their blog. There are fabulous paper projects and I know you'll be inspired!
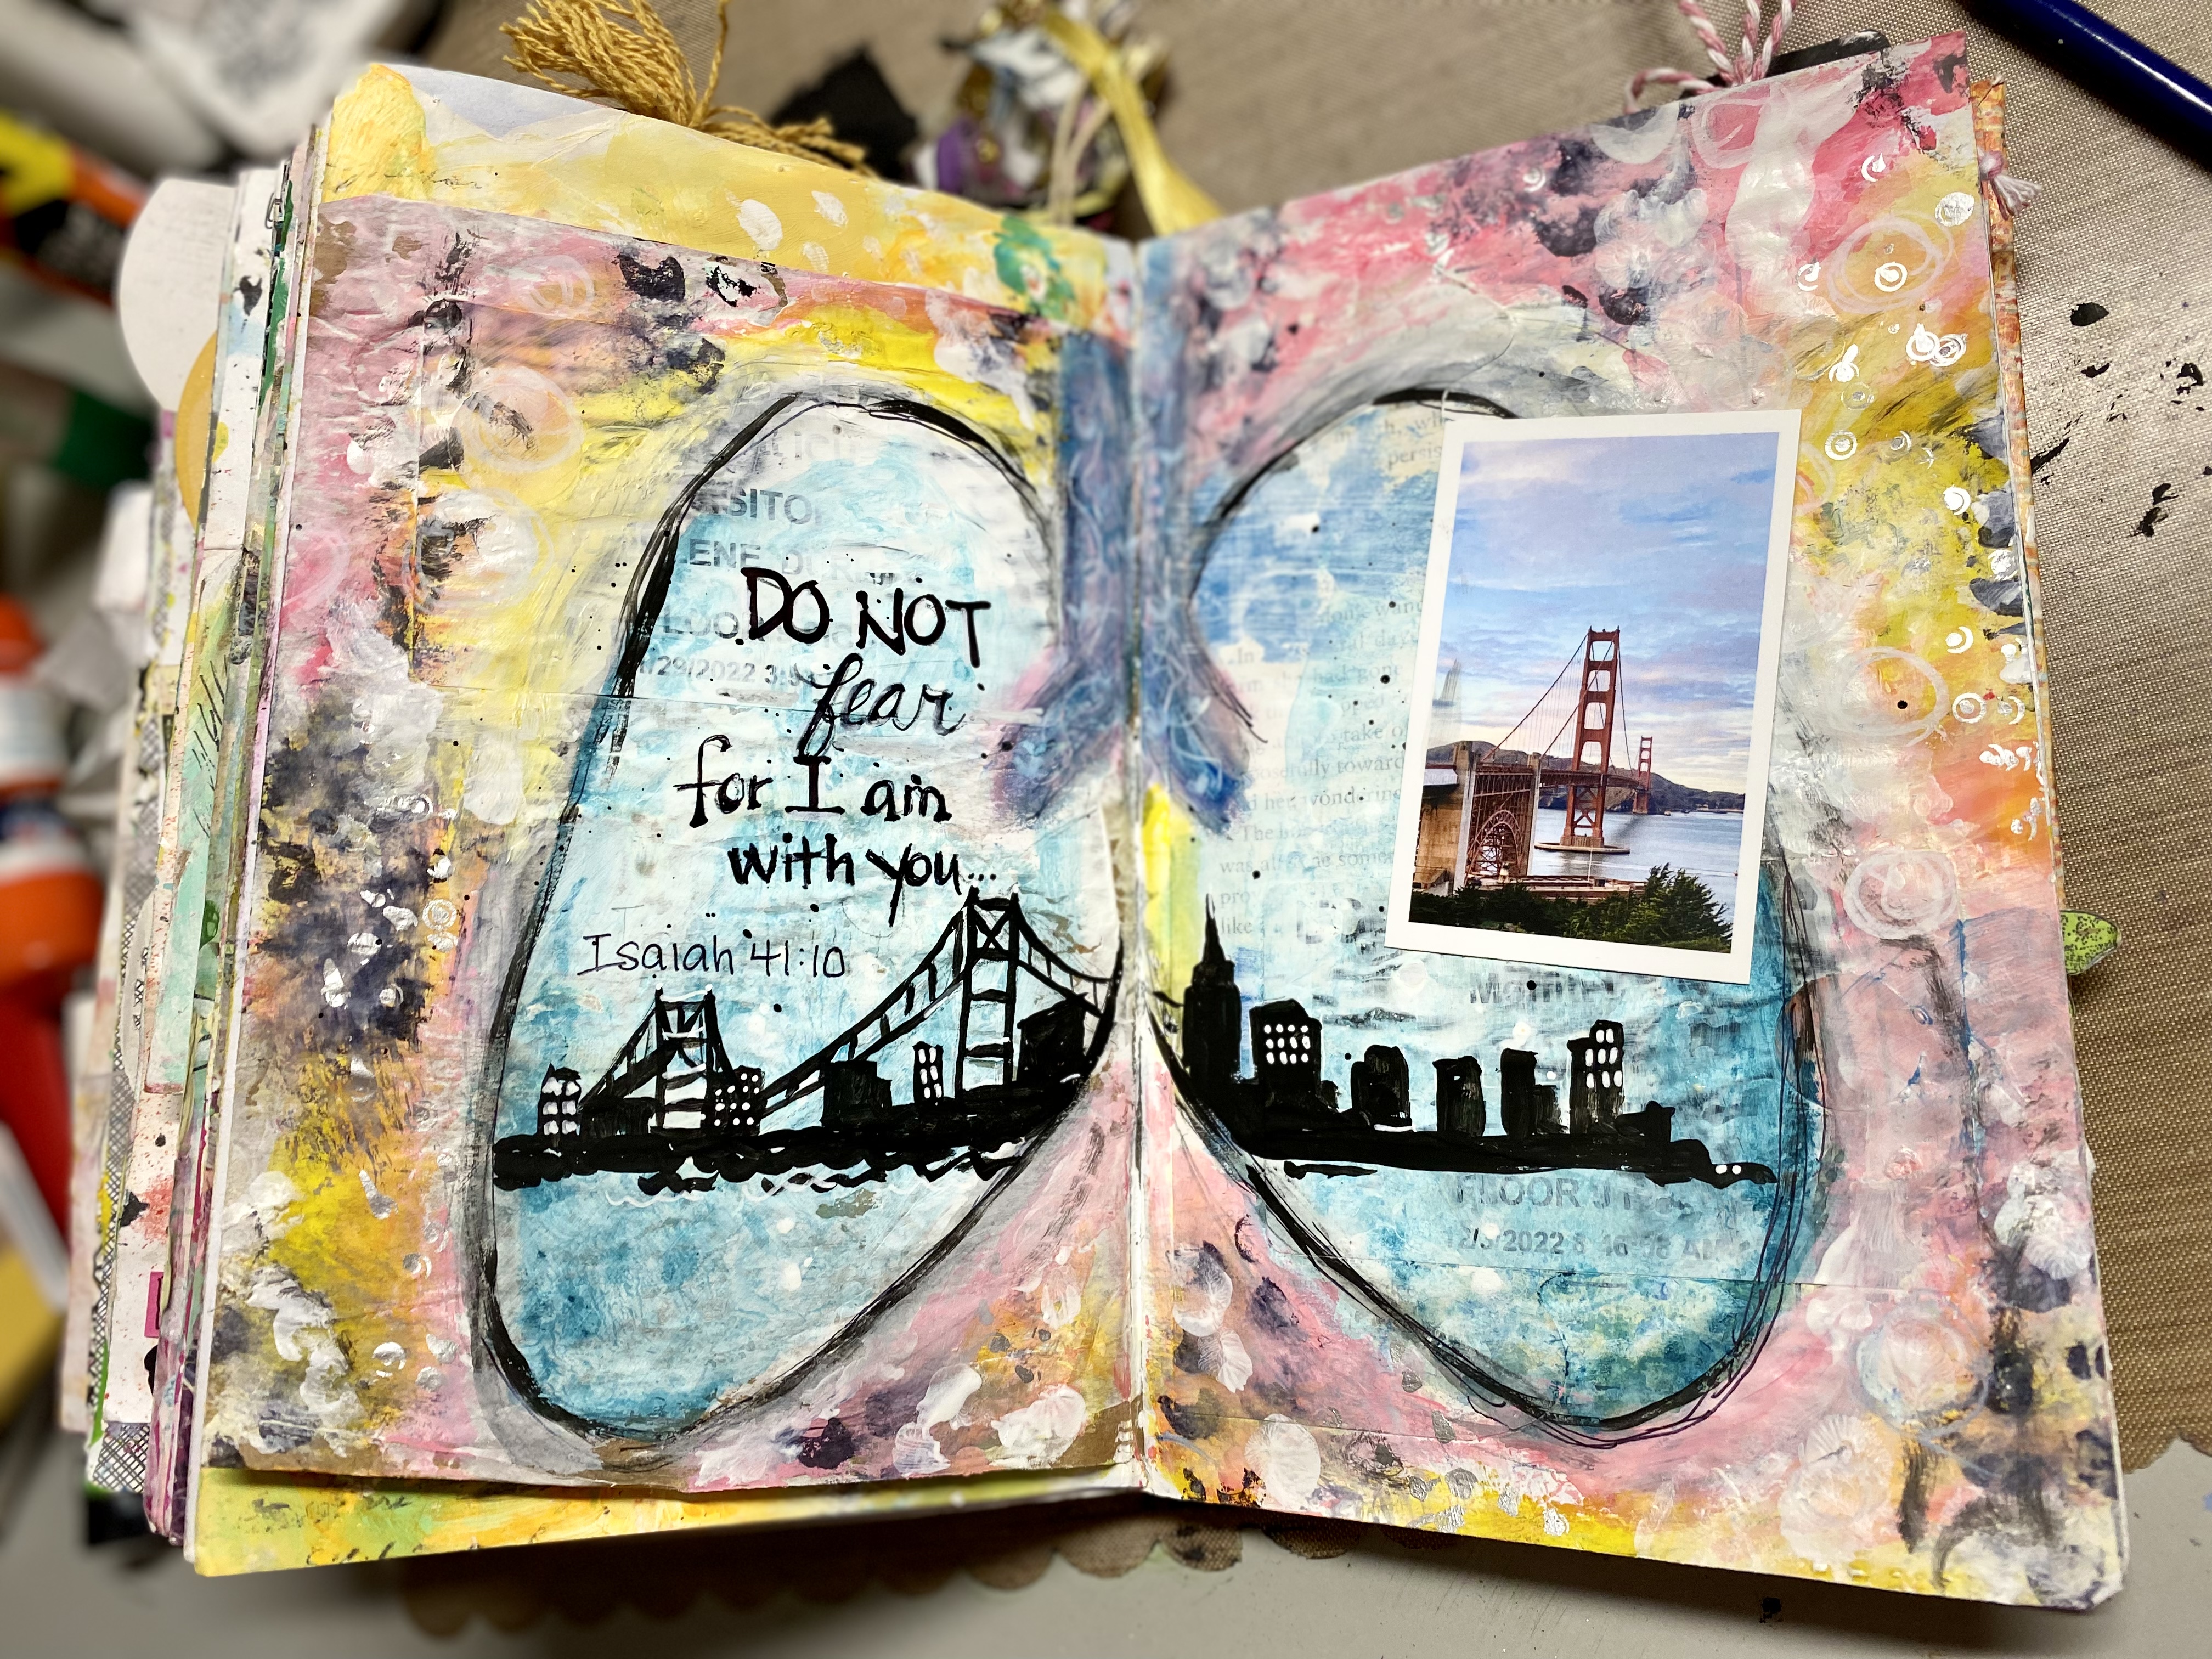
I have not worked in my Junk Journal in a long time and every time I crack it open, I wonder, why not?!
I love all the messy goodness already inside and the fact that I am contributing to more inky/painty/scrappy goodness is a bonus.
December was nuts and we spent more than half of it at the hospital. I felt the need to document this time in my artsy Junk Journal.
As always, the first thing I did was open up the JJ to find a two page unfinished spread that I could use for it. Once I found the pages, I applied white gesso to them to give me a "blank" space to start. From there I drew a pair of lungs with a black Stabilo pencil (which reacts with water), colored the inside and outside of the lungs with an assortment of Gelato sticks; did some random stamping and mark making to get here.
Check out the YouTube process video below:
Now, the problem with stopping and starting the video camera is I often think I'm starting but often stopping, etc. That's exactly what happened when I was filming this. UGH! Unfortunately, I didn't film while I was doing all the mark making and coloring.
One of the pulmonary doctor's had a logo on his vest that had the SF skyline inside a pair of lungs. I wanted to emulate it in this spread. I found the silhouette skyline of SF online and did my best to copy it across the lungs. I think I did a great job.
I was debating about the small photo of the Golden Gate Bridge, but decided to use it since we could see it out the window on the ICU floor.
If you like this type of post, stay tuned because I am going to be doing more and more of messy play in 2023! My six signature Junk Journal is so close to being finished that I have decided this is an achievable goal - finish this journal so I can create another one!
If you haven't already, while you're in YouTube, check out my Junk Journal playlist. There are many flip throughs and tutorials that I know you'll enjoy.
Products Used:
Gelato sticks (Snowcone, Blueberry, Acqua Dolce, and Banana)
Illustrated Faith crayons
Posca White Marker (fine point)
Ranger White Paint pen
Silver paint pen
Lila Gray/Bloom Art Elements Stamp; her shop is no longer active in Etsy
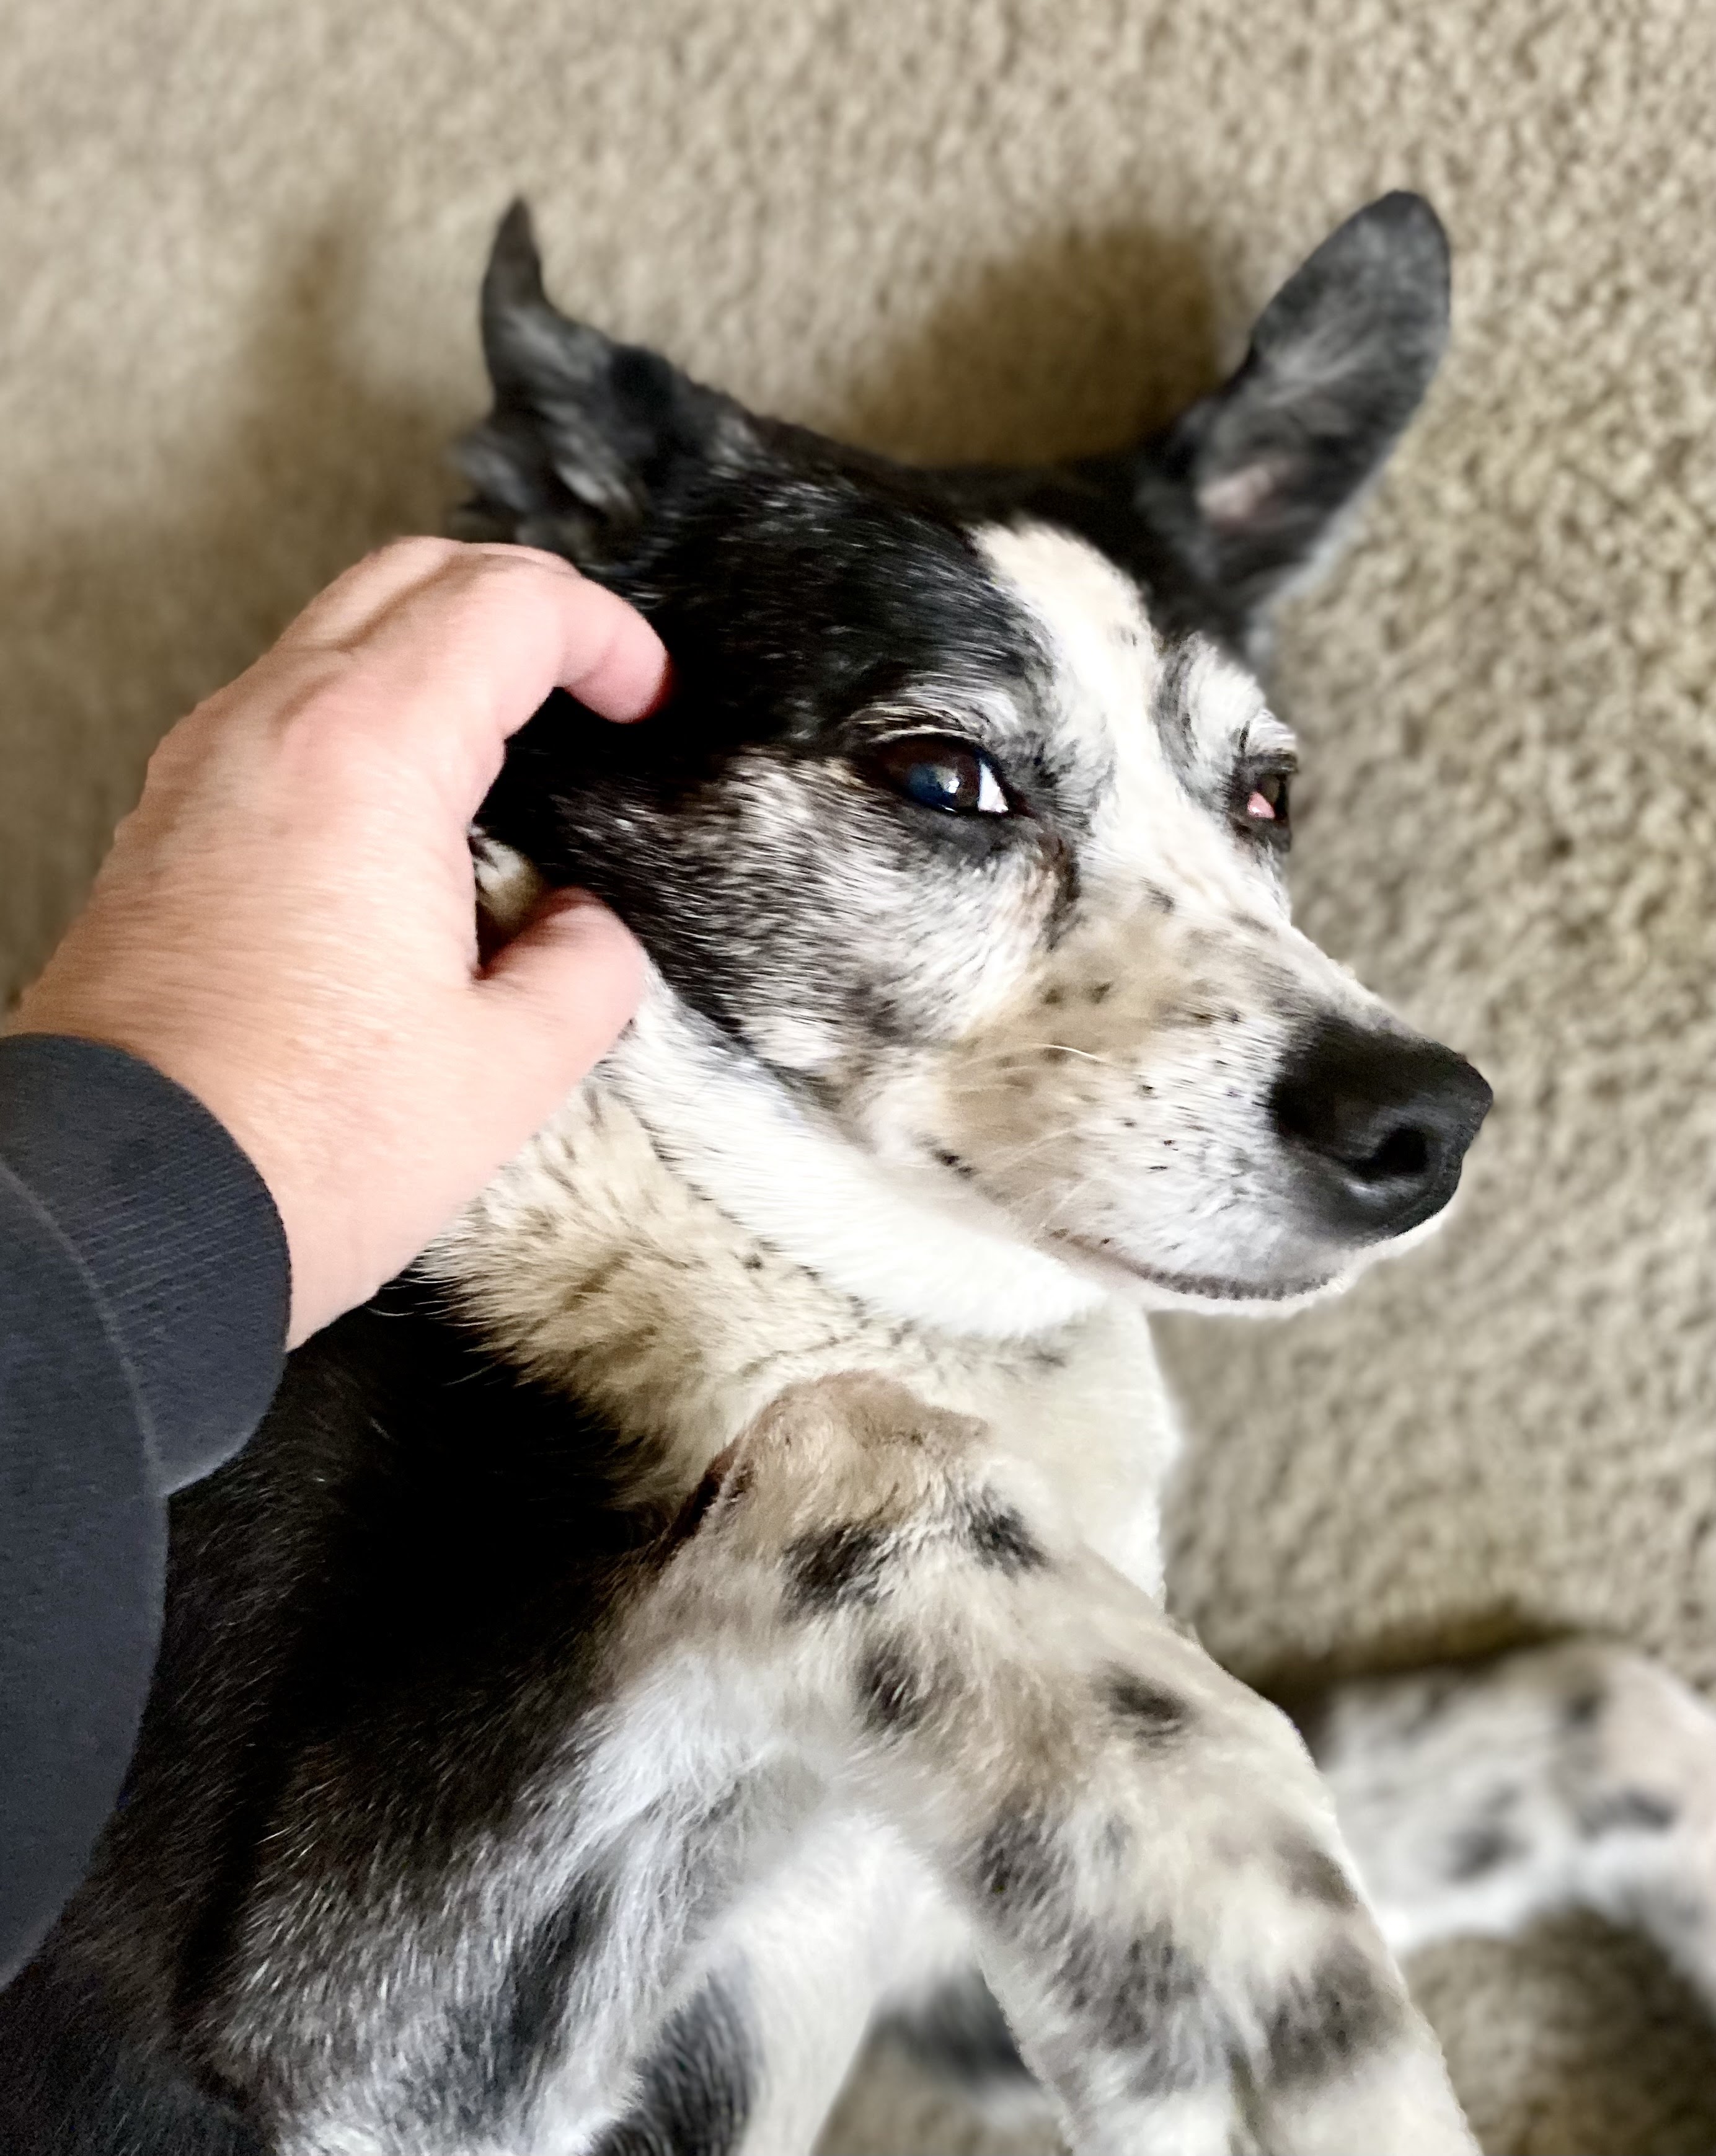
Happy Friday and Happy Thankful Friday! This week I want to do a tribute to our dog, Gracie. We had to put her down on New Year's Day and I don't think I've stopped crying since. I'm trying to keep myself busy, but most times I am just sad.
This little girl of ours was perfect for our family. In fact, we always said, she's exactly like us. Loves to eat and lay around all day.
I won't get into details but she got sick and because of her age the the progressive nature of the illness, it was the humane thing to do.
Our G-Baby, I'm not sure what we're going to do without her.
I'm thankful for the 12+ years we were able to enjoy her - all the memories - all the situations and funny antics she used to do.
Oh how I love an easy fun fold card! This one was quick and actually pretty easy to create. I used Granny Smith green cardstock and Cougar Smooth White cardstock from CutCardStock and the green polka dot patterned paper from The Basics 8" paper pad from Hobby Lobby.
This card is featured at the CutCardStock blog. Check out the blog for other projects! My recommendation is to watch the YouTube video because it may be easier to follow.
Once all the patterned pieces are adhered to their correct places, cut a shape out of the front of the card. I used a circle, but you can use any shape.
Adhere the right side of the accordion piece to the right side of the inside right side of the card. Adhere the tabs to the back side of left side of the accordion piece; then fold up the accordion, add adhesive to the front of the tabs and then close the card. Now the accordion is attached to the inside of the card!
When looking through the cut shape from the outside, adhere the decorated cut shape to the portion of the accordion that is showing through. This allows it to swing.
Cutting Dimensions:
Card Base: 5.5 x 8.5"; scored at 4.25"
Accordion Piece: 5.25 x 6"; scored at 2" & 4" on the 6" side
Tabs: Two .5 x 4"; scored at 2"
Pattern Paper Pieces:
Card Front: 4 x 5.25"
Strips for the Inside: Two 1.75 x 5.25"
White:
Strip for Inside: 1.75 x 5.25
I also used white for the circle that swings out. This is the same size as the circle you cut from the card front.
I was so happy to use more of my older stash to complete this layout. Hubby, my sister, BIL and I visited a couple of breweries in Tucson during our last visit. Although my sister and I didn't try the beers, we did have other drinks.
This layout uses two 4x11 vertical strips of patterned paper (check out the YouTube video for my secret on one of them!). The top paper is 8x10 and matted with white cardstock. The beer themed papers and stickers are from Reminisce. The other beer stickers and letter stickers are from my stash.
I love layouts that showcase the photos and also allow me to use some of the supplies in my stash. I’m doing pretty good using older stash but oh my, it sure is hard sometimes!
Check out my YouTube video:
Another look at the layout:
I created this layout for the Scrapbooking With AnnMarie website. This is my last Design Team project since I’ll be stepping down. If you’re looking for a fun place to learn more about scrapbooking, develop friendships and so much more, look no further. Check it out! She has a free membership as well as one you pay a monthly fee- so worth it!
Yes, I know I have shared many Grand Canyon layouts but this is the last one from the 2020 trip.
I’m sharing this layout on the Love To Craft Challenge Blog (LTCCB) for the latest challenge. This blog invites all crafters as long as you crafted it! I had a lot of fun using supplies from a scrapbooking kit I created for our outdoor adventures.
I created a YouTube process video to show how I put it together. The plateau and title were cut from my Cricut. Aren’t they so fun?!
More close ups:
LTCCB challenges last for six weeks and this one is from January 1st through February 15th. Be sure you link your creations to the LTCCB site by the deadline.